Zero to Hero Platform
User manual — for members and students
1. Introduction
Zero to Hero is a learning platform that brings together courses, communities, live events, mentoring, and practice exercises in one place. On this platform, you can:
- Search and join communities that fit your interests
- Enroll in courses inside those communities and study at your own pace
- Book 1:1 sessions with teachers and mentors
- Test your knowledge with Practice and Mock Tests
- Message other members and admins
- Use it on both web and the mobile app
2. Sign up & log in
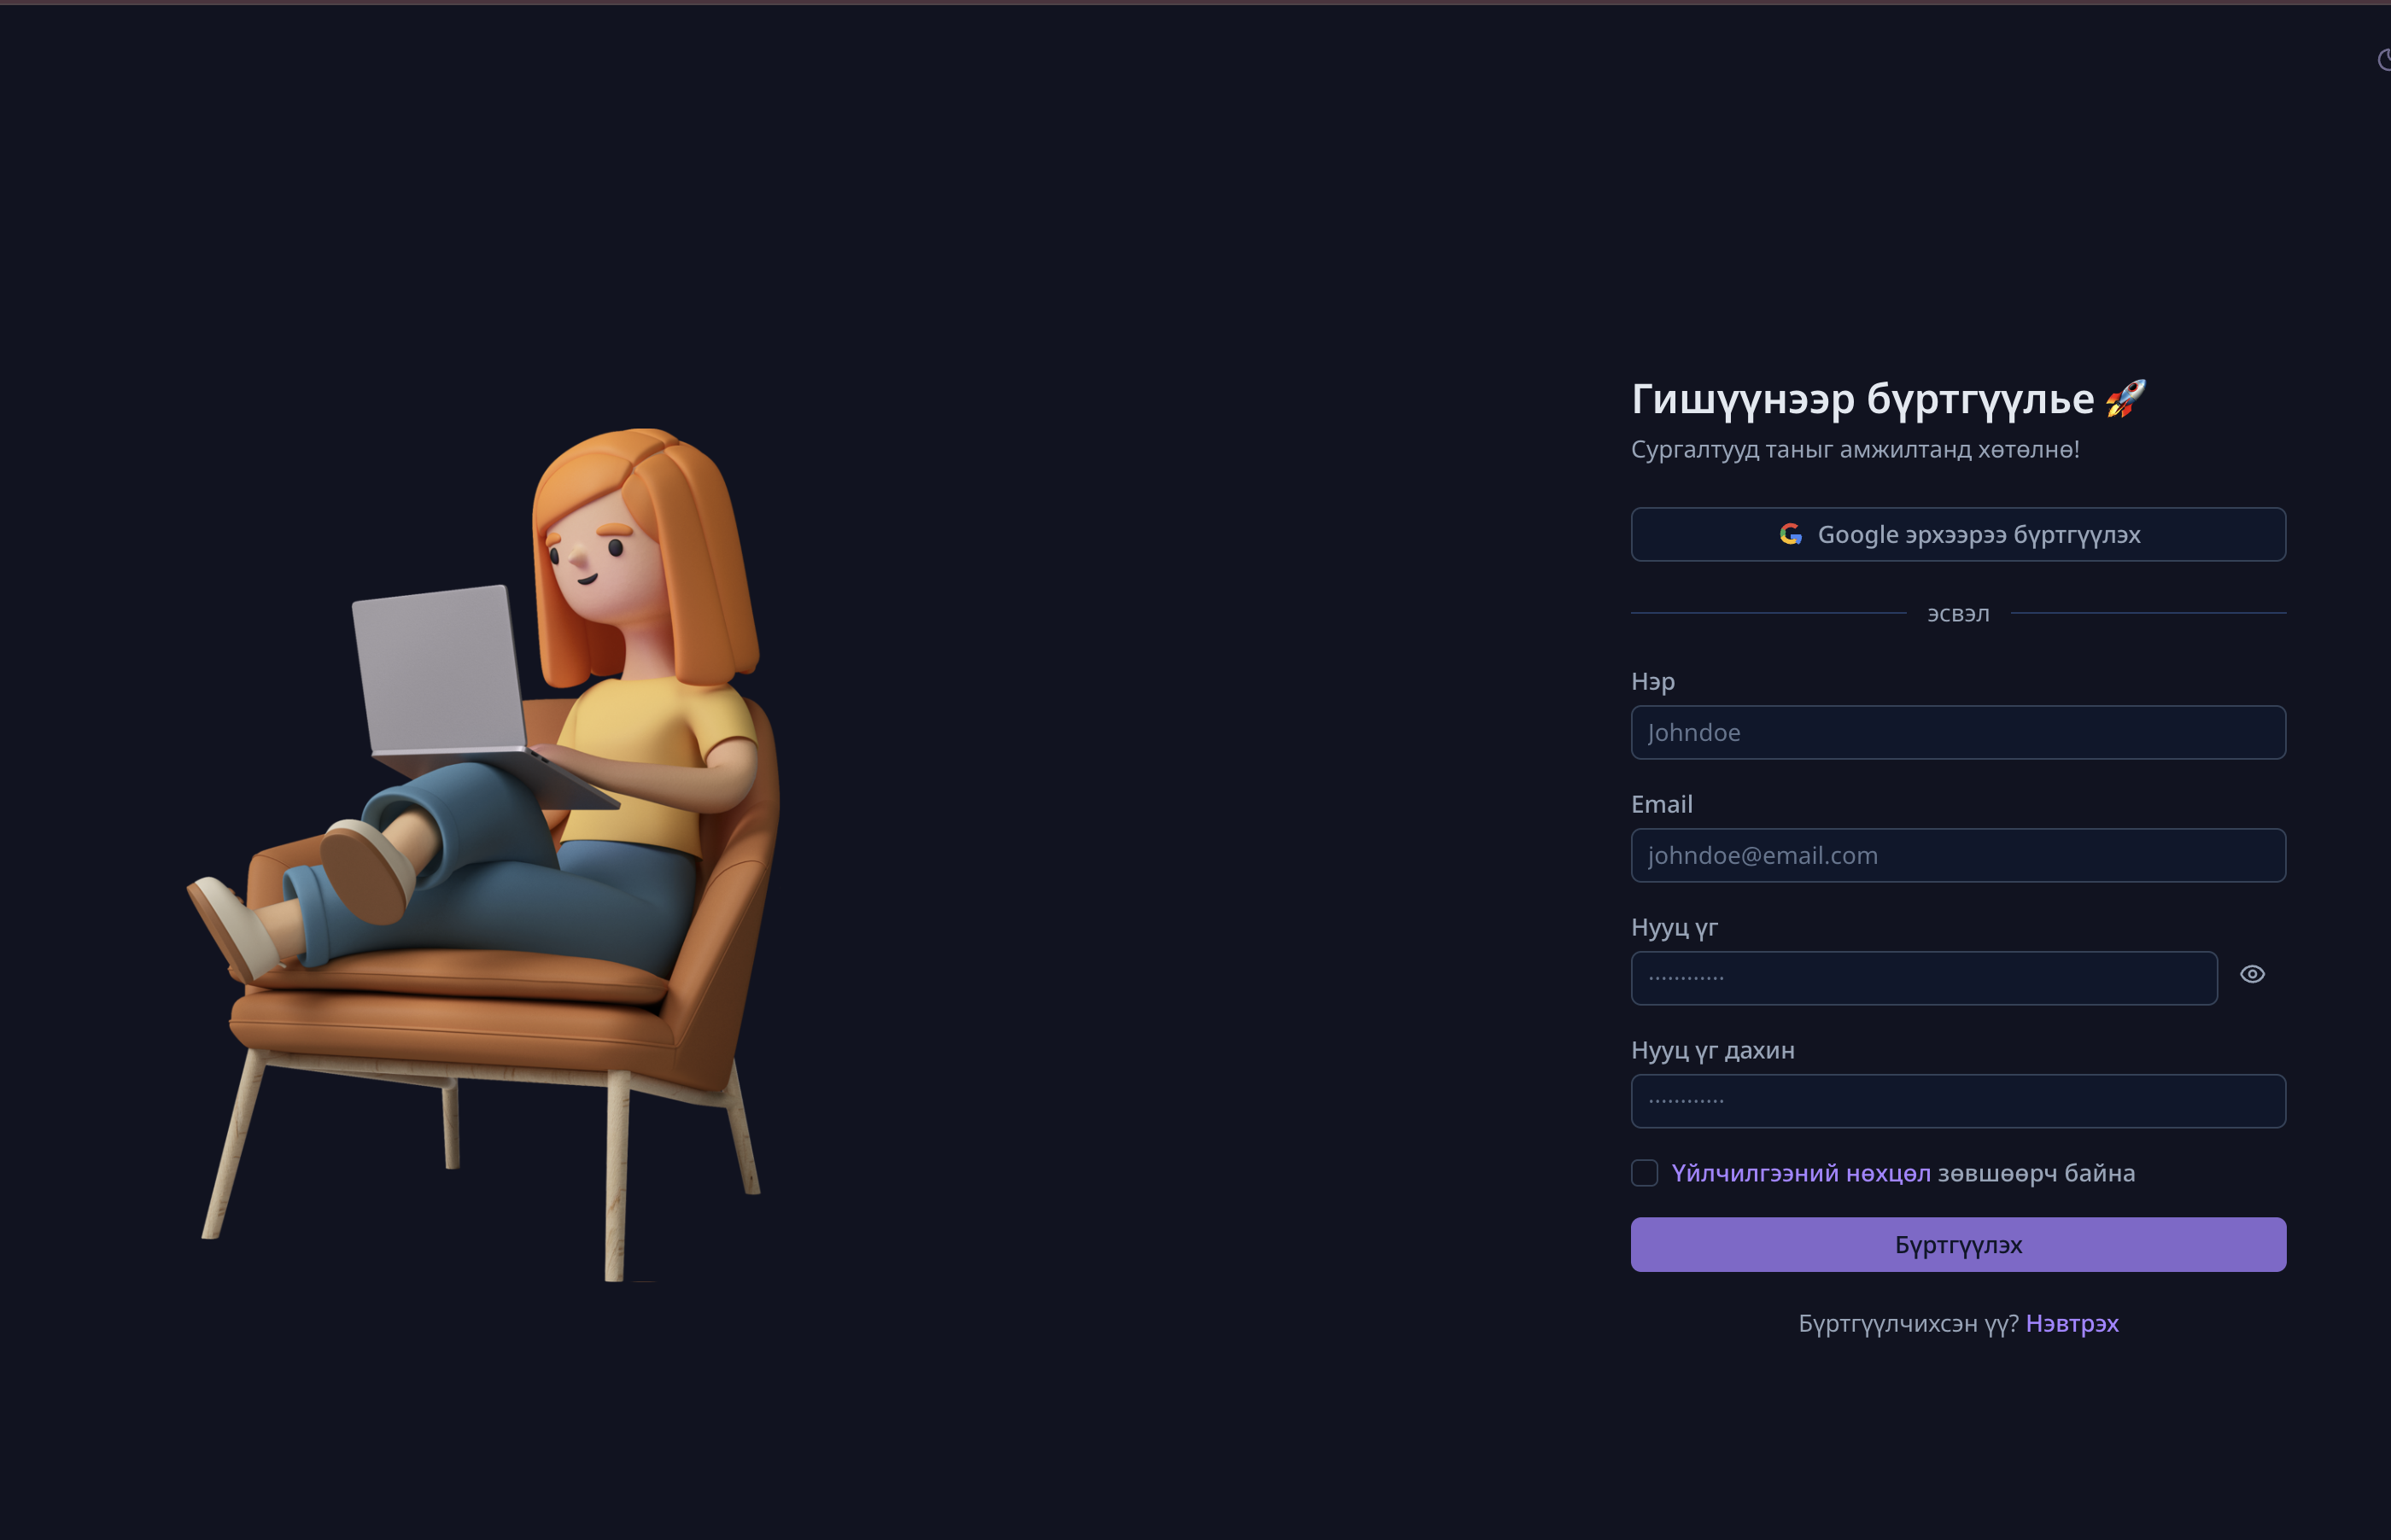
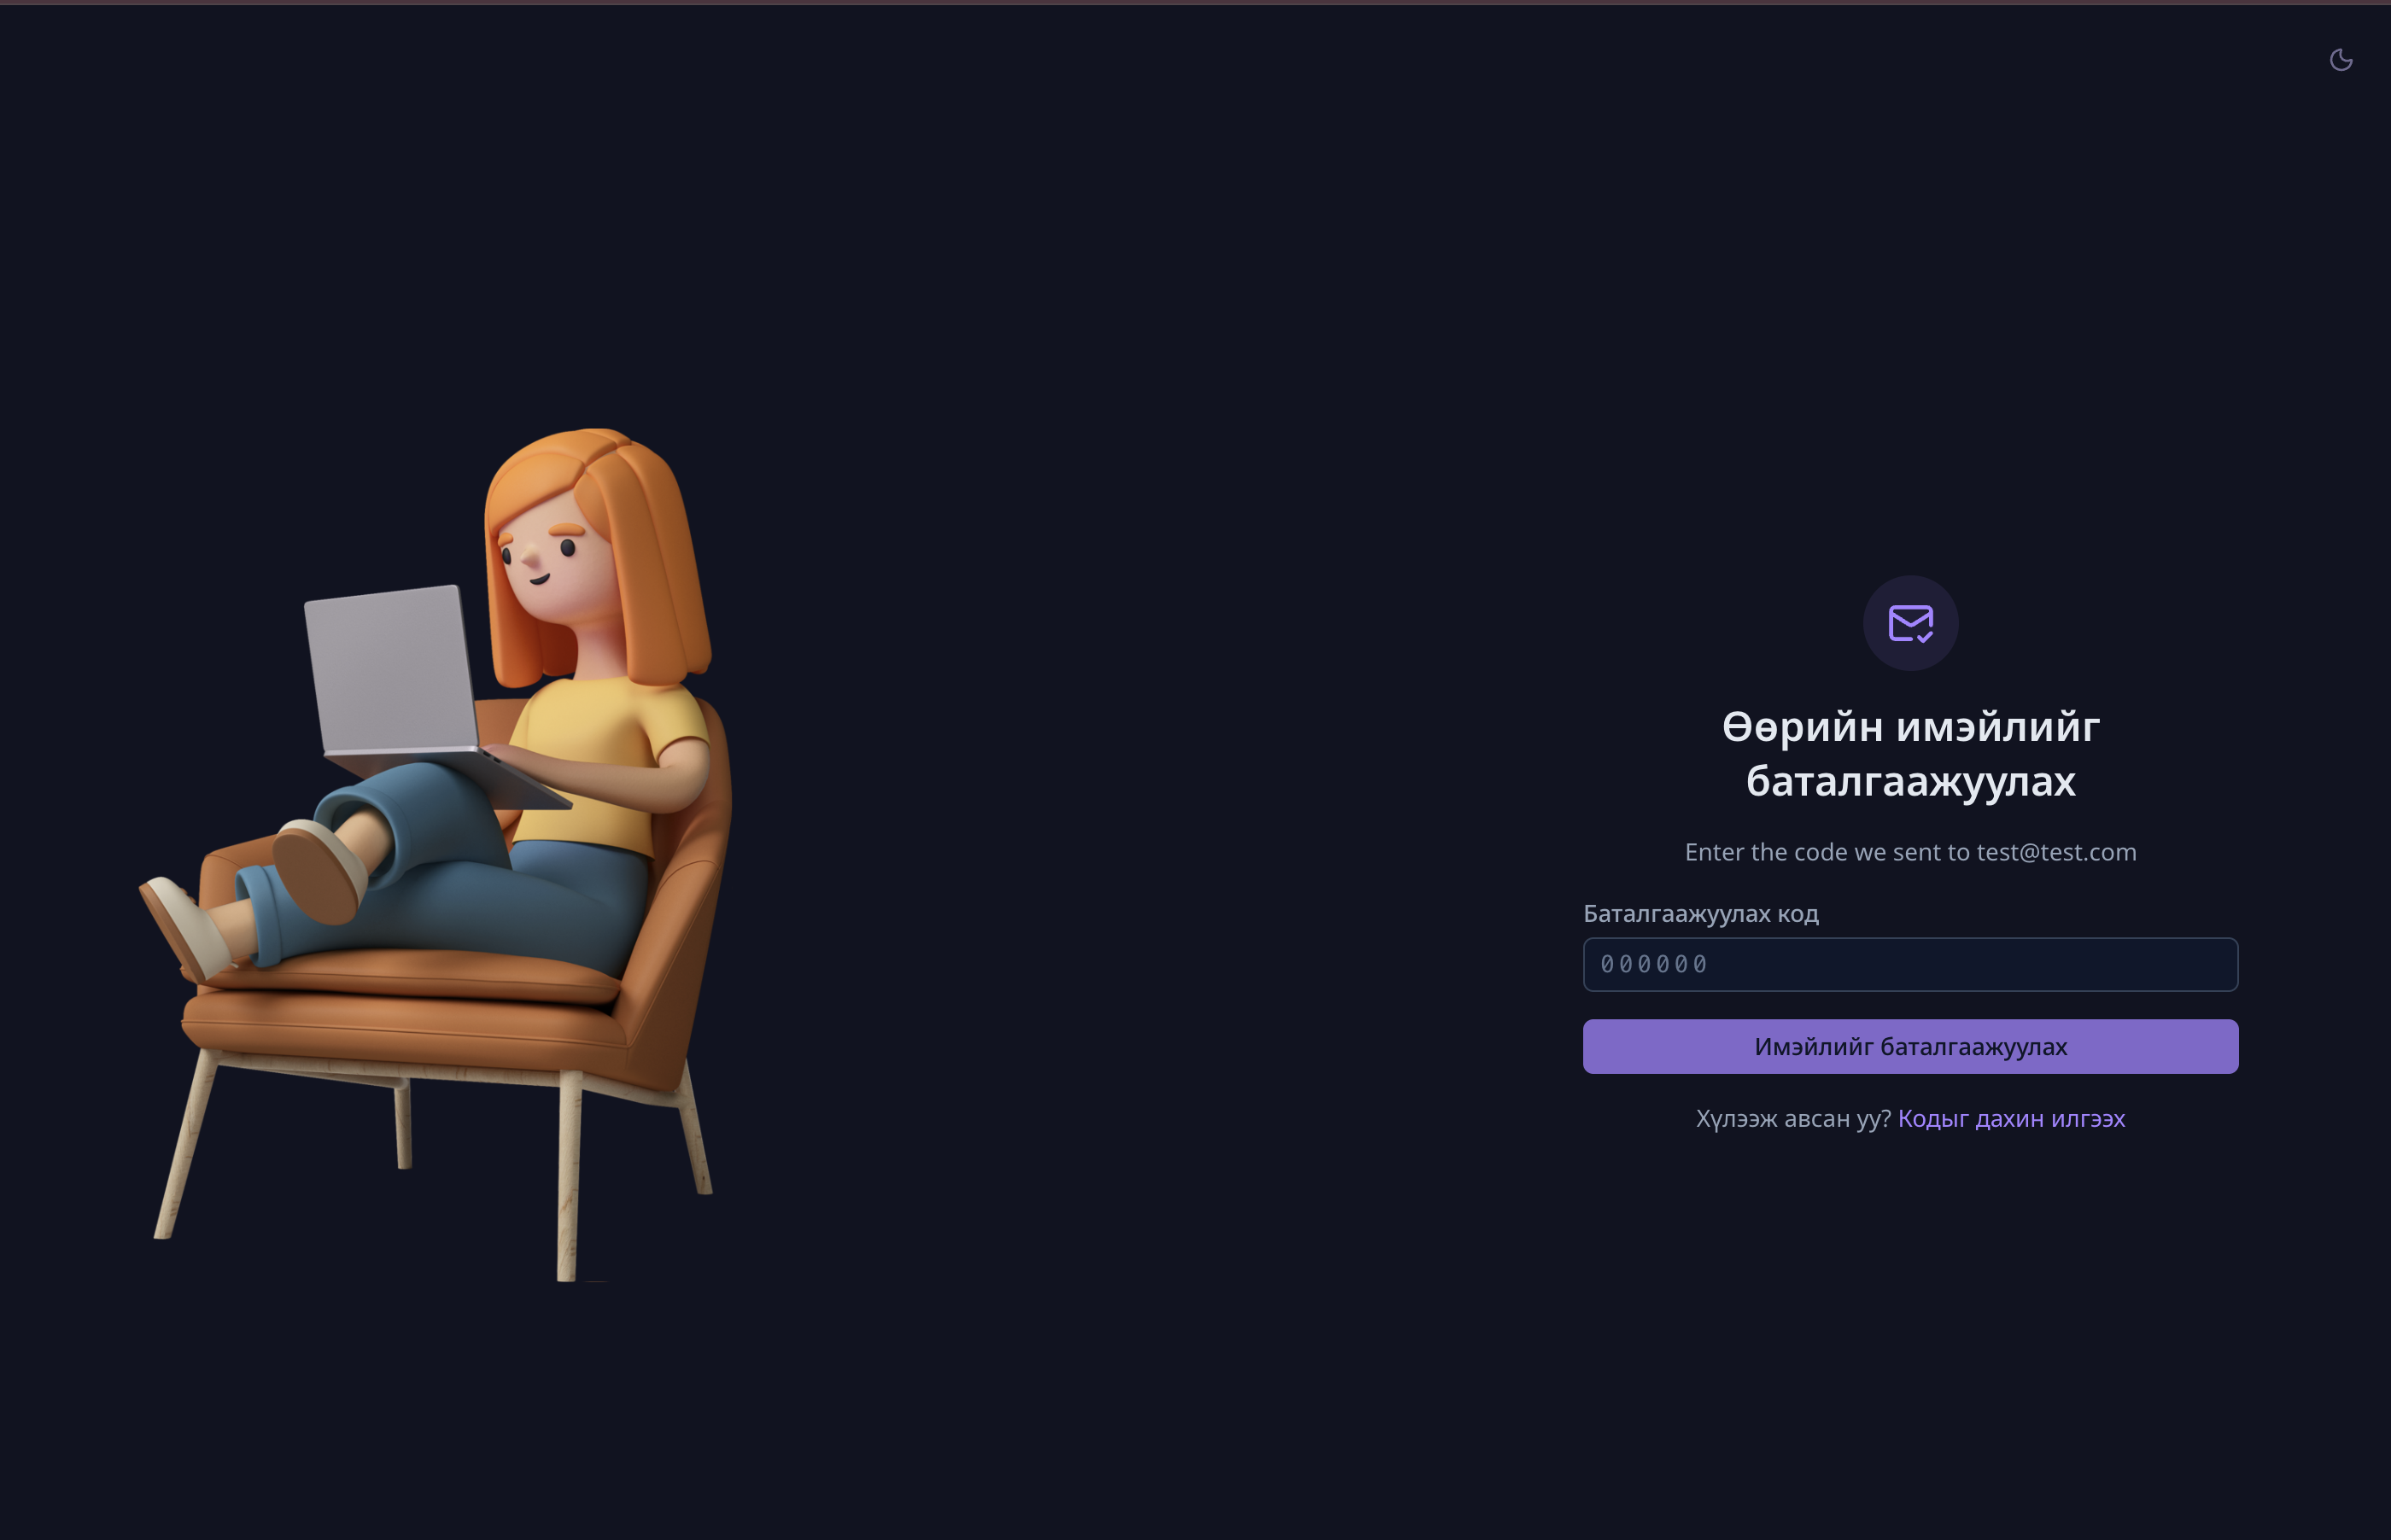
2.1 Creating an account
- Open the platform homepage and click the "Sign up" button in the top-right corner.
- Enter your email, password, and name. You can also use the Sign up with Google option.
- Enter the verification code (OTP) sent to your email.
- You'll be logged in automatically once your account is verified.
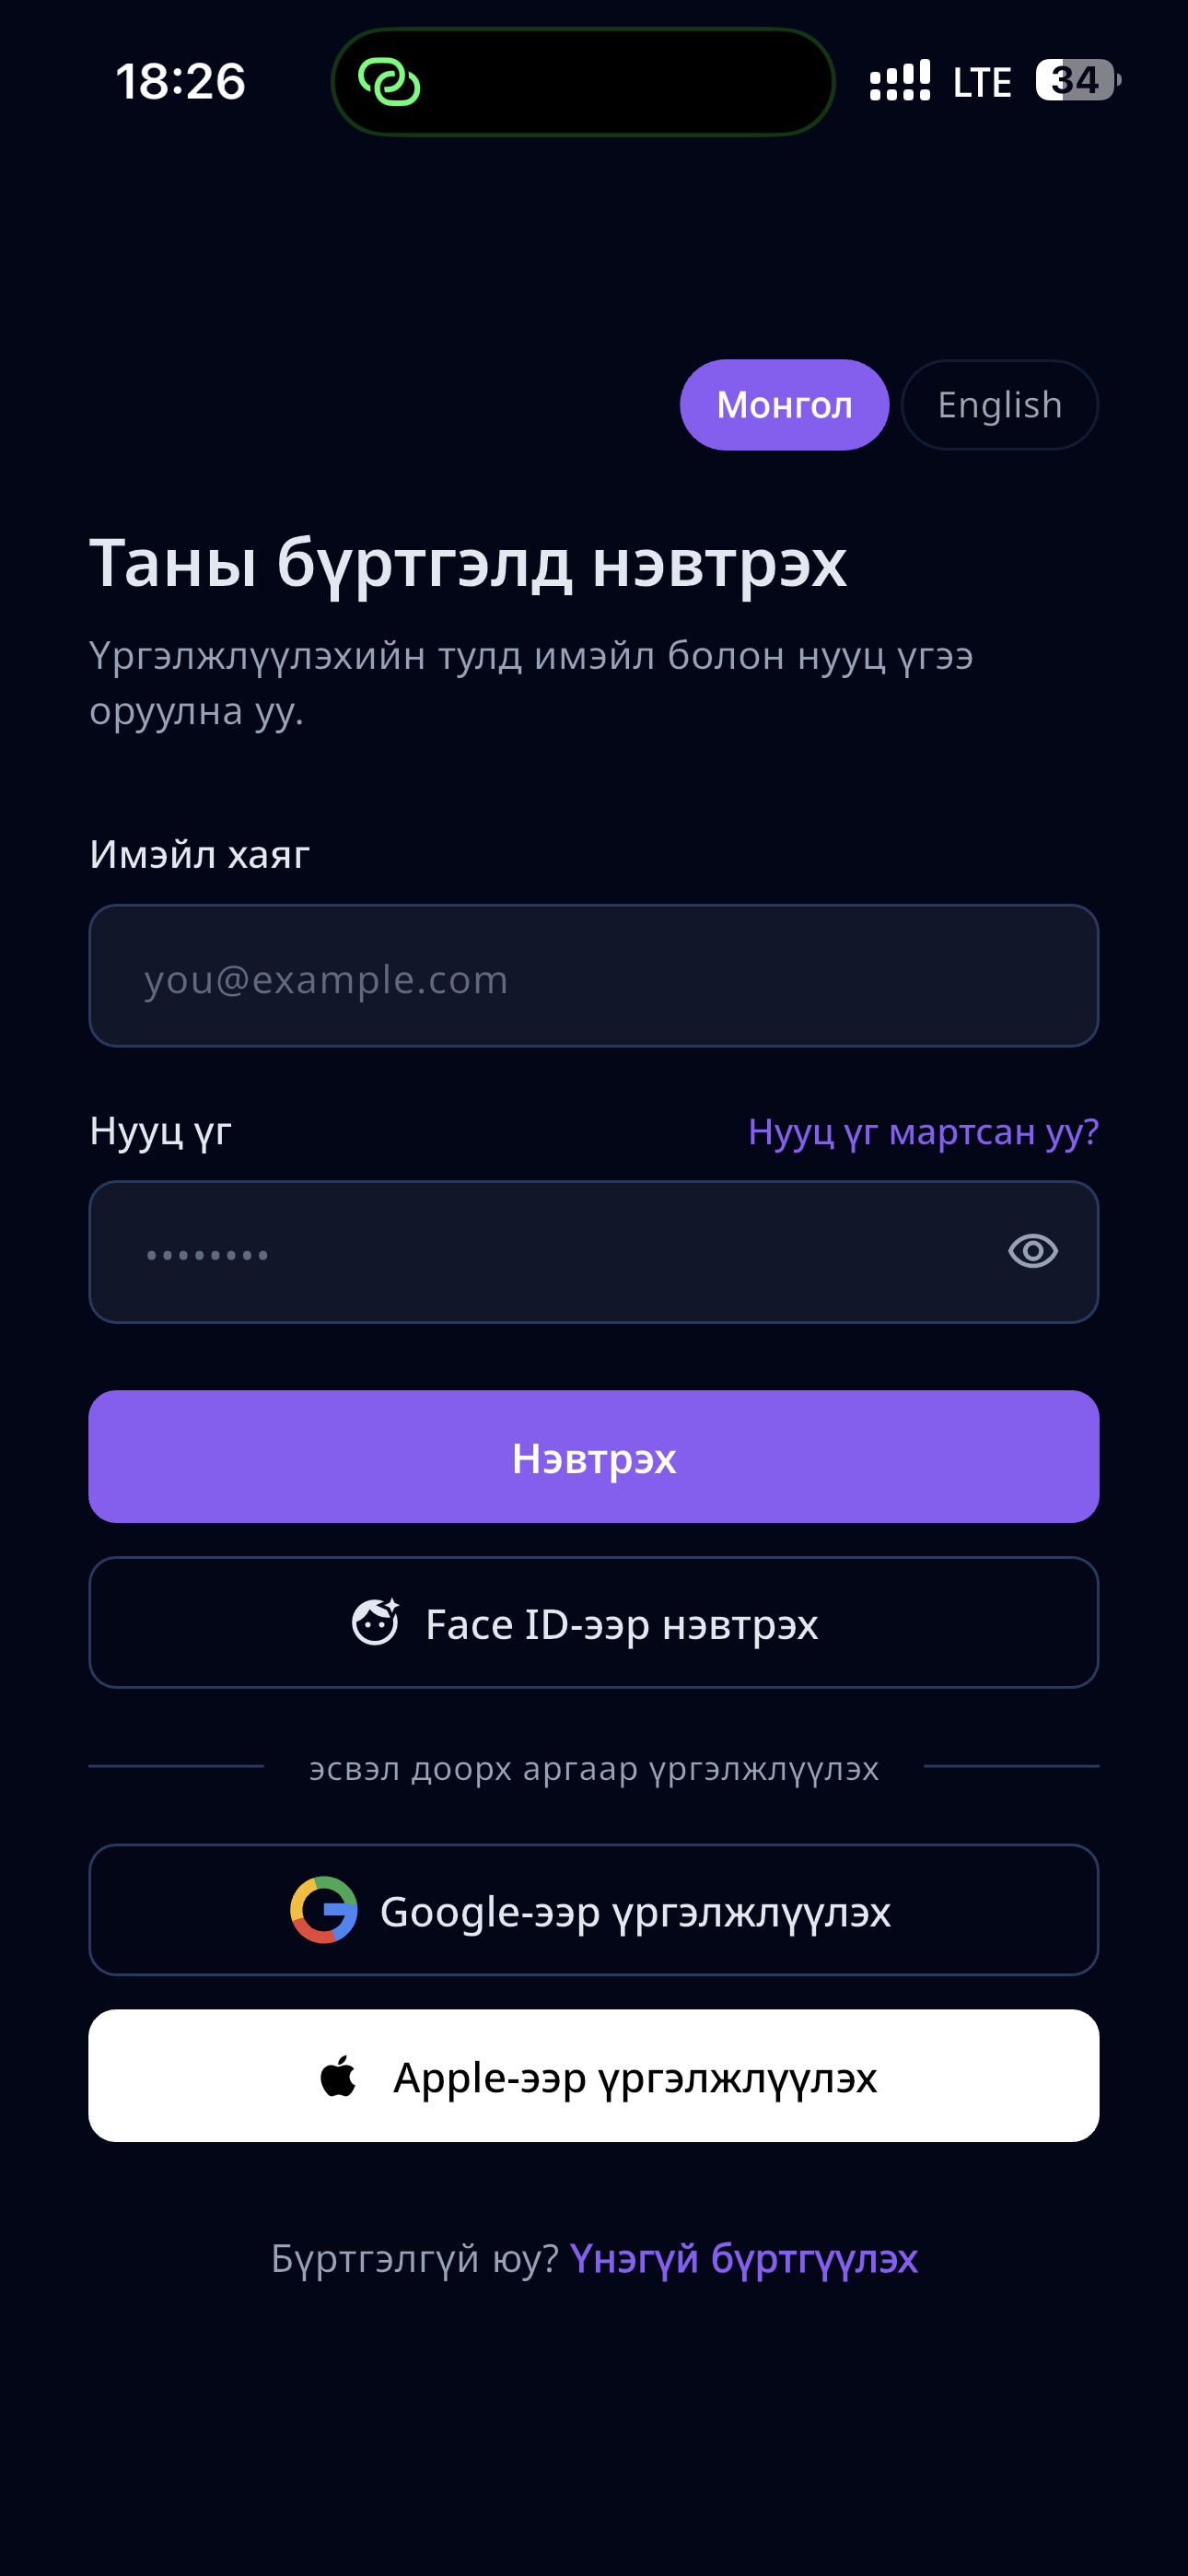
2.2 Logging in
- Click the "Log in" button.
- Enter your registered email and password — or use the Google button.
2.3 Forgot password
- Click the "Forgot password?" link at the bottom of the login page.
- Enter your email. Click the link in the email you receive to set a new password.
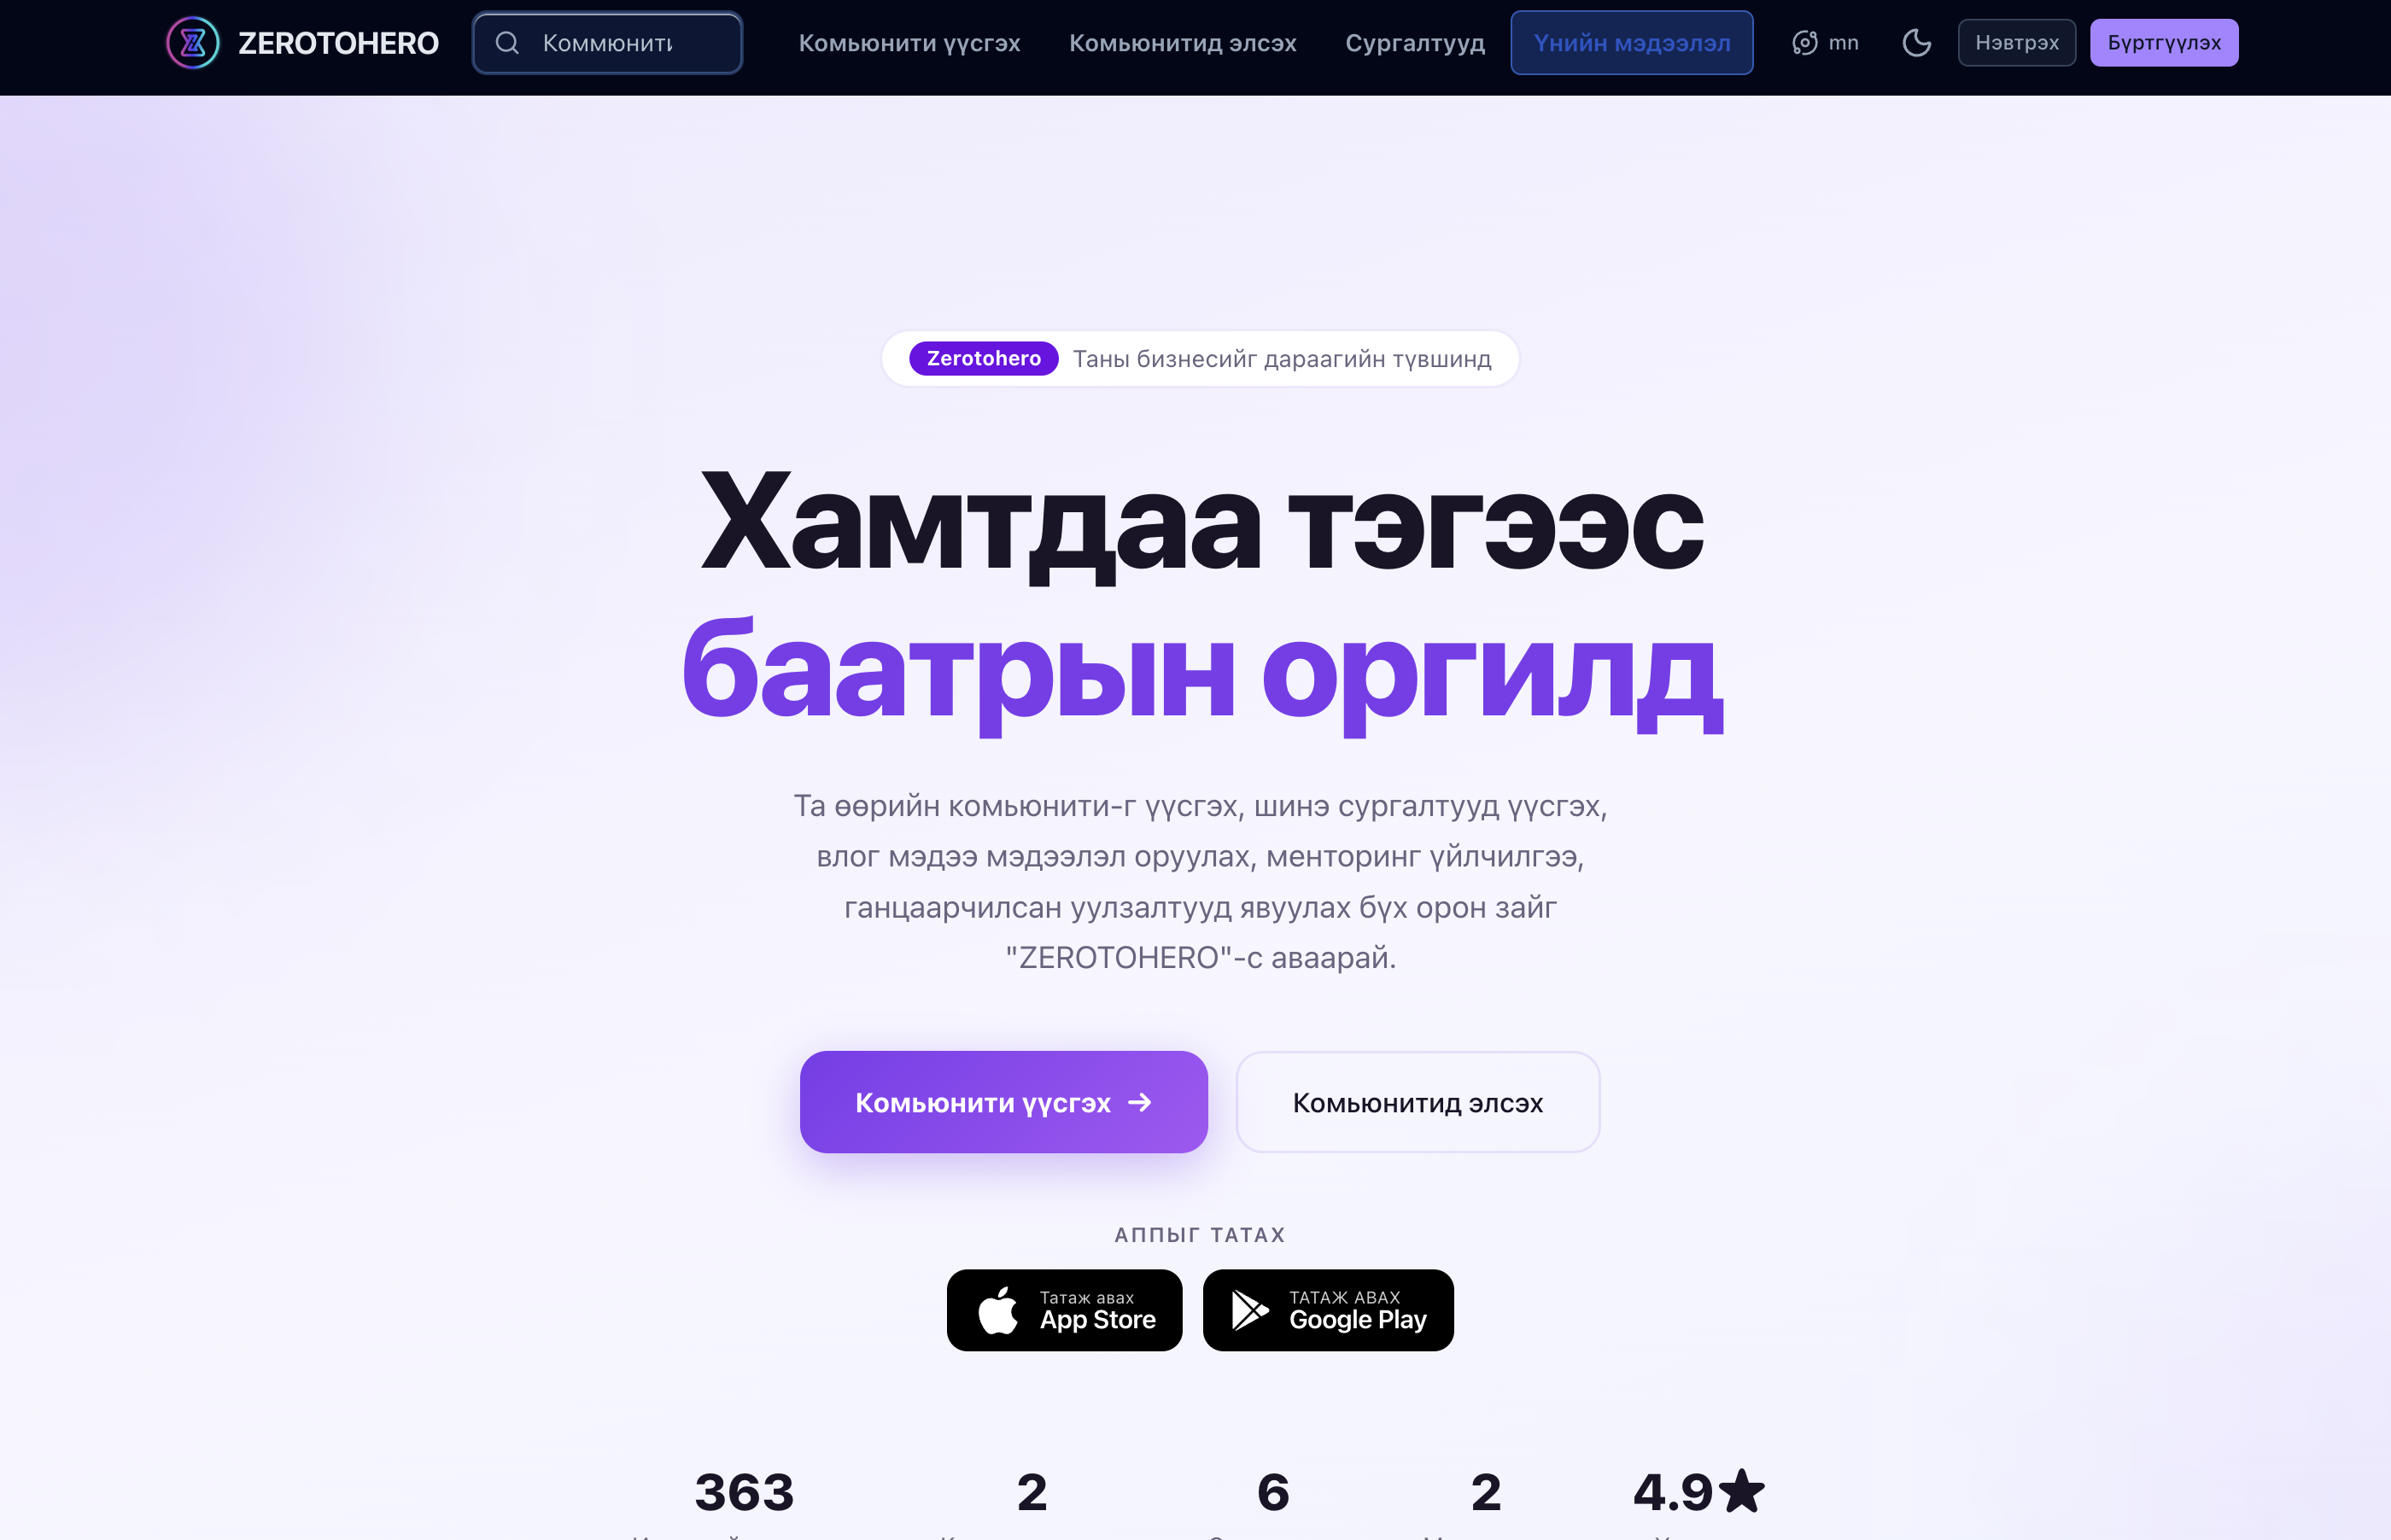
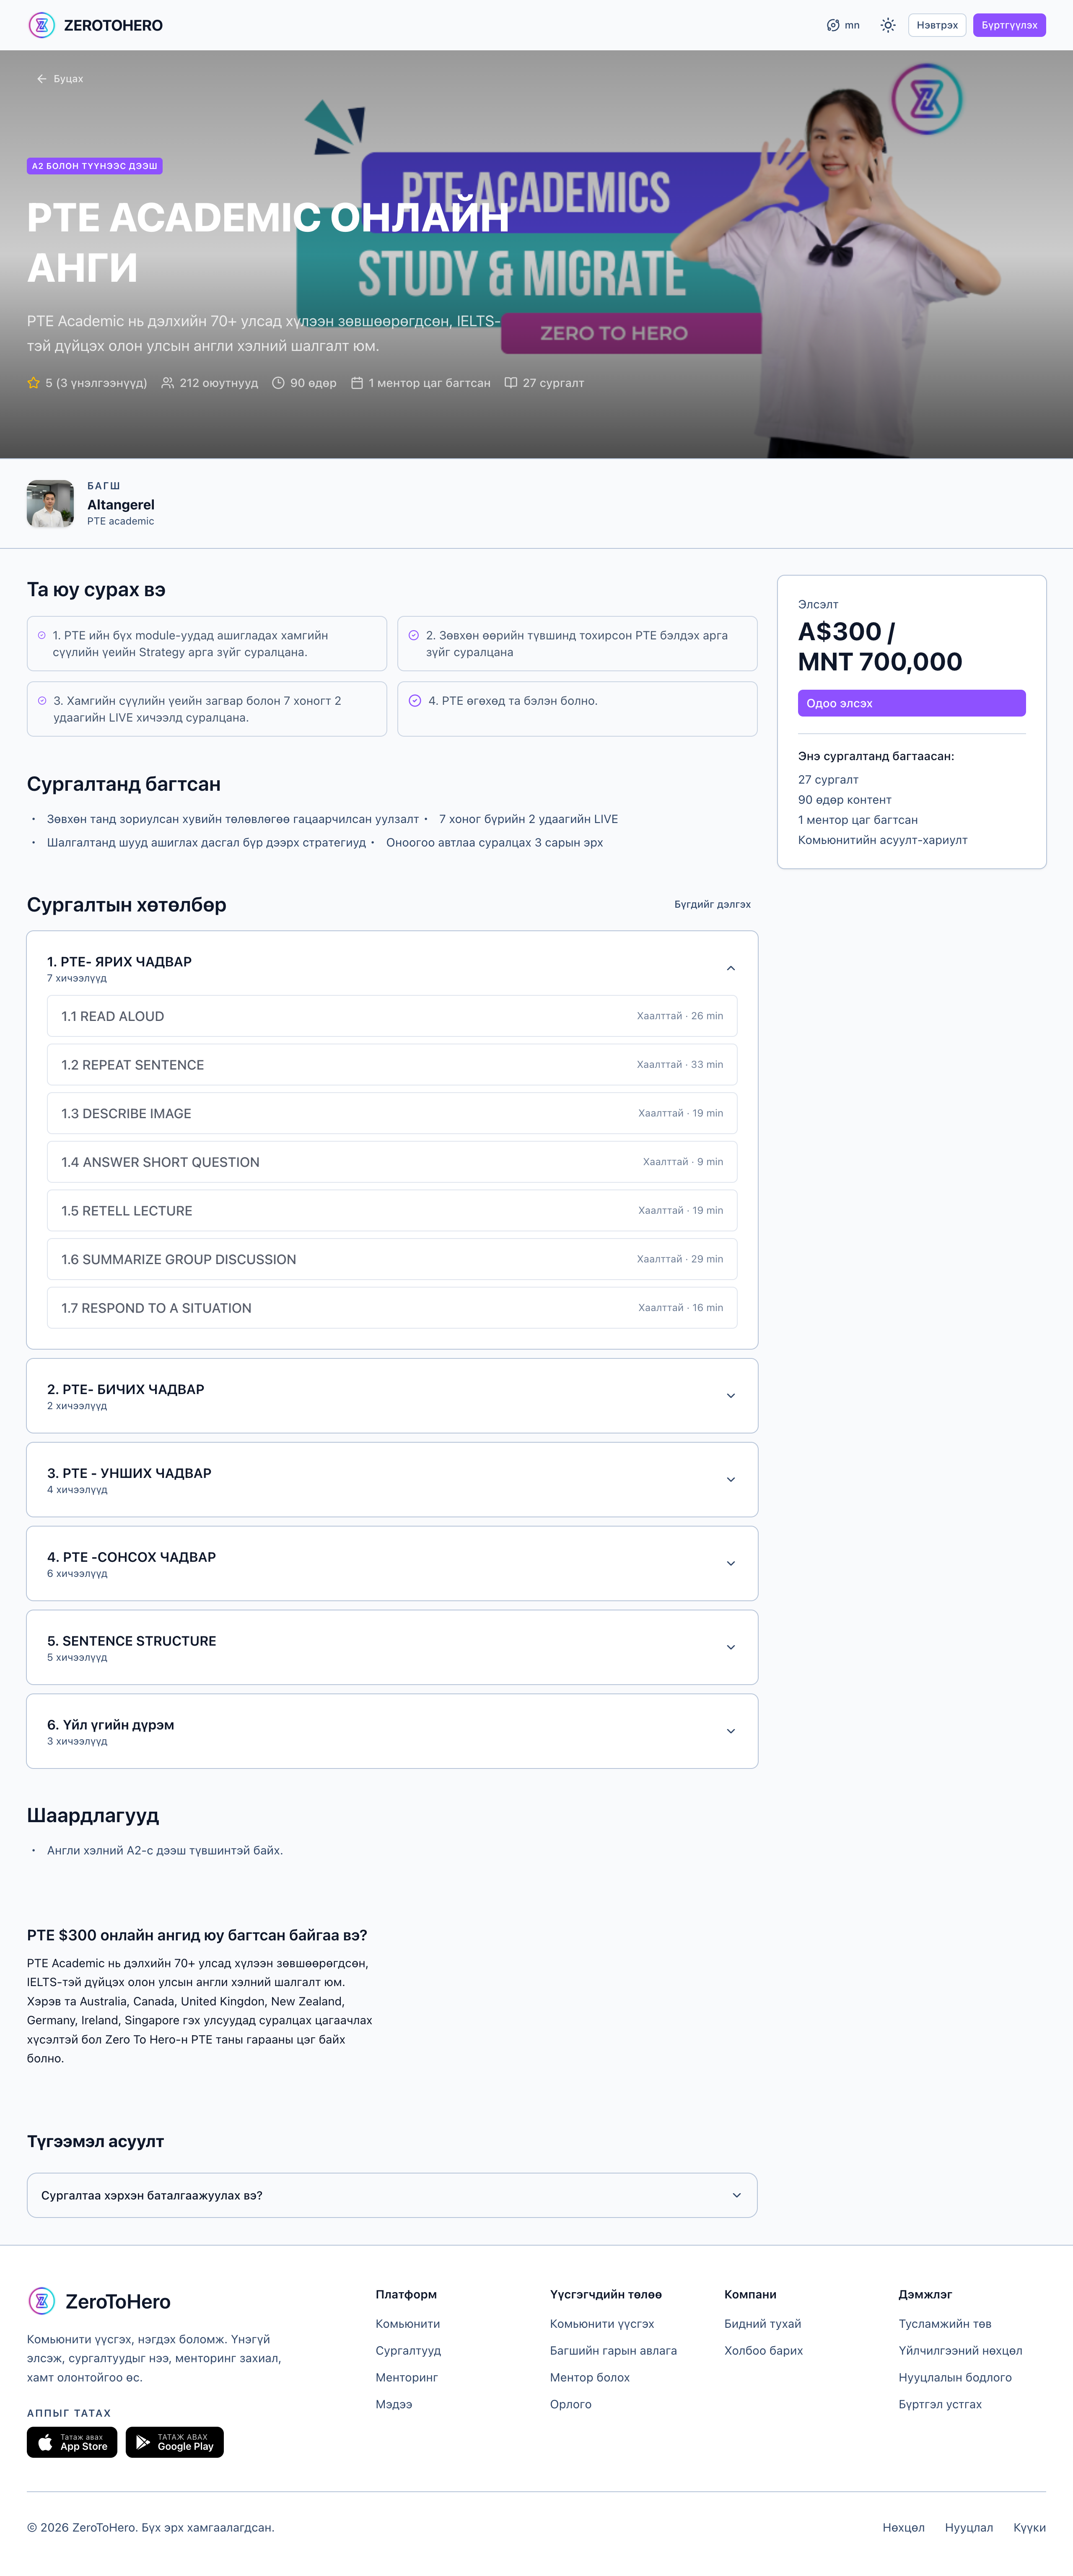
3. Finding a community on the marketplace
The marketplace (homepage) lists all publicly available communities, courses, mentors, and news.
3.1 Search
- Use the search bar at the top of the homepage to enter a topic (e.g. "English", "programming").
- Results are grouped by communities and courses.
3.2 Filtering communities
From the top menu, open Communities and filter by:
- Category
- Free / paid
- Most popular, newly added, etc.

3.3 Viewing a community's public page
Clicking on a community thumbnail opens its public landing page, which shows:
- A short description and the owner
- Member count
- Featured courses and upcoming events
- A "Join" button
4. Joining a community
4.1 Free communities
- Click "Join".
- You become a member instantly and are taken to the community space.
4.2 Paid communities
- Click "Join" — the payment page opens.
- Choose a payment method (bank transfer, QPay, Stripe) and complete the payment — see "18. Payment methods" for details.
- You become a member as soon as the payment is confirmed.
4.3 After joining
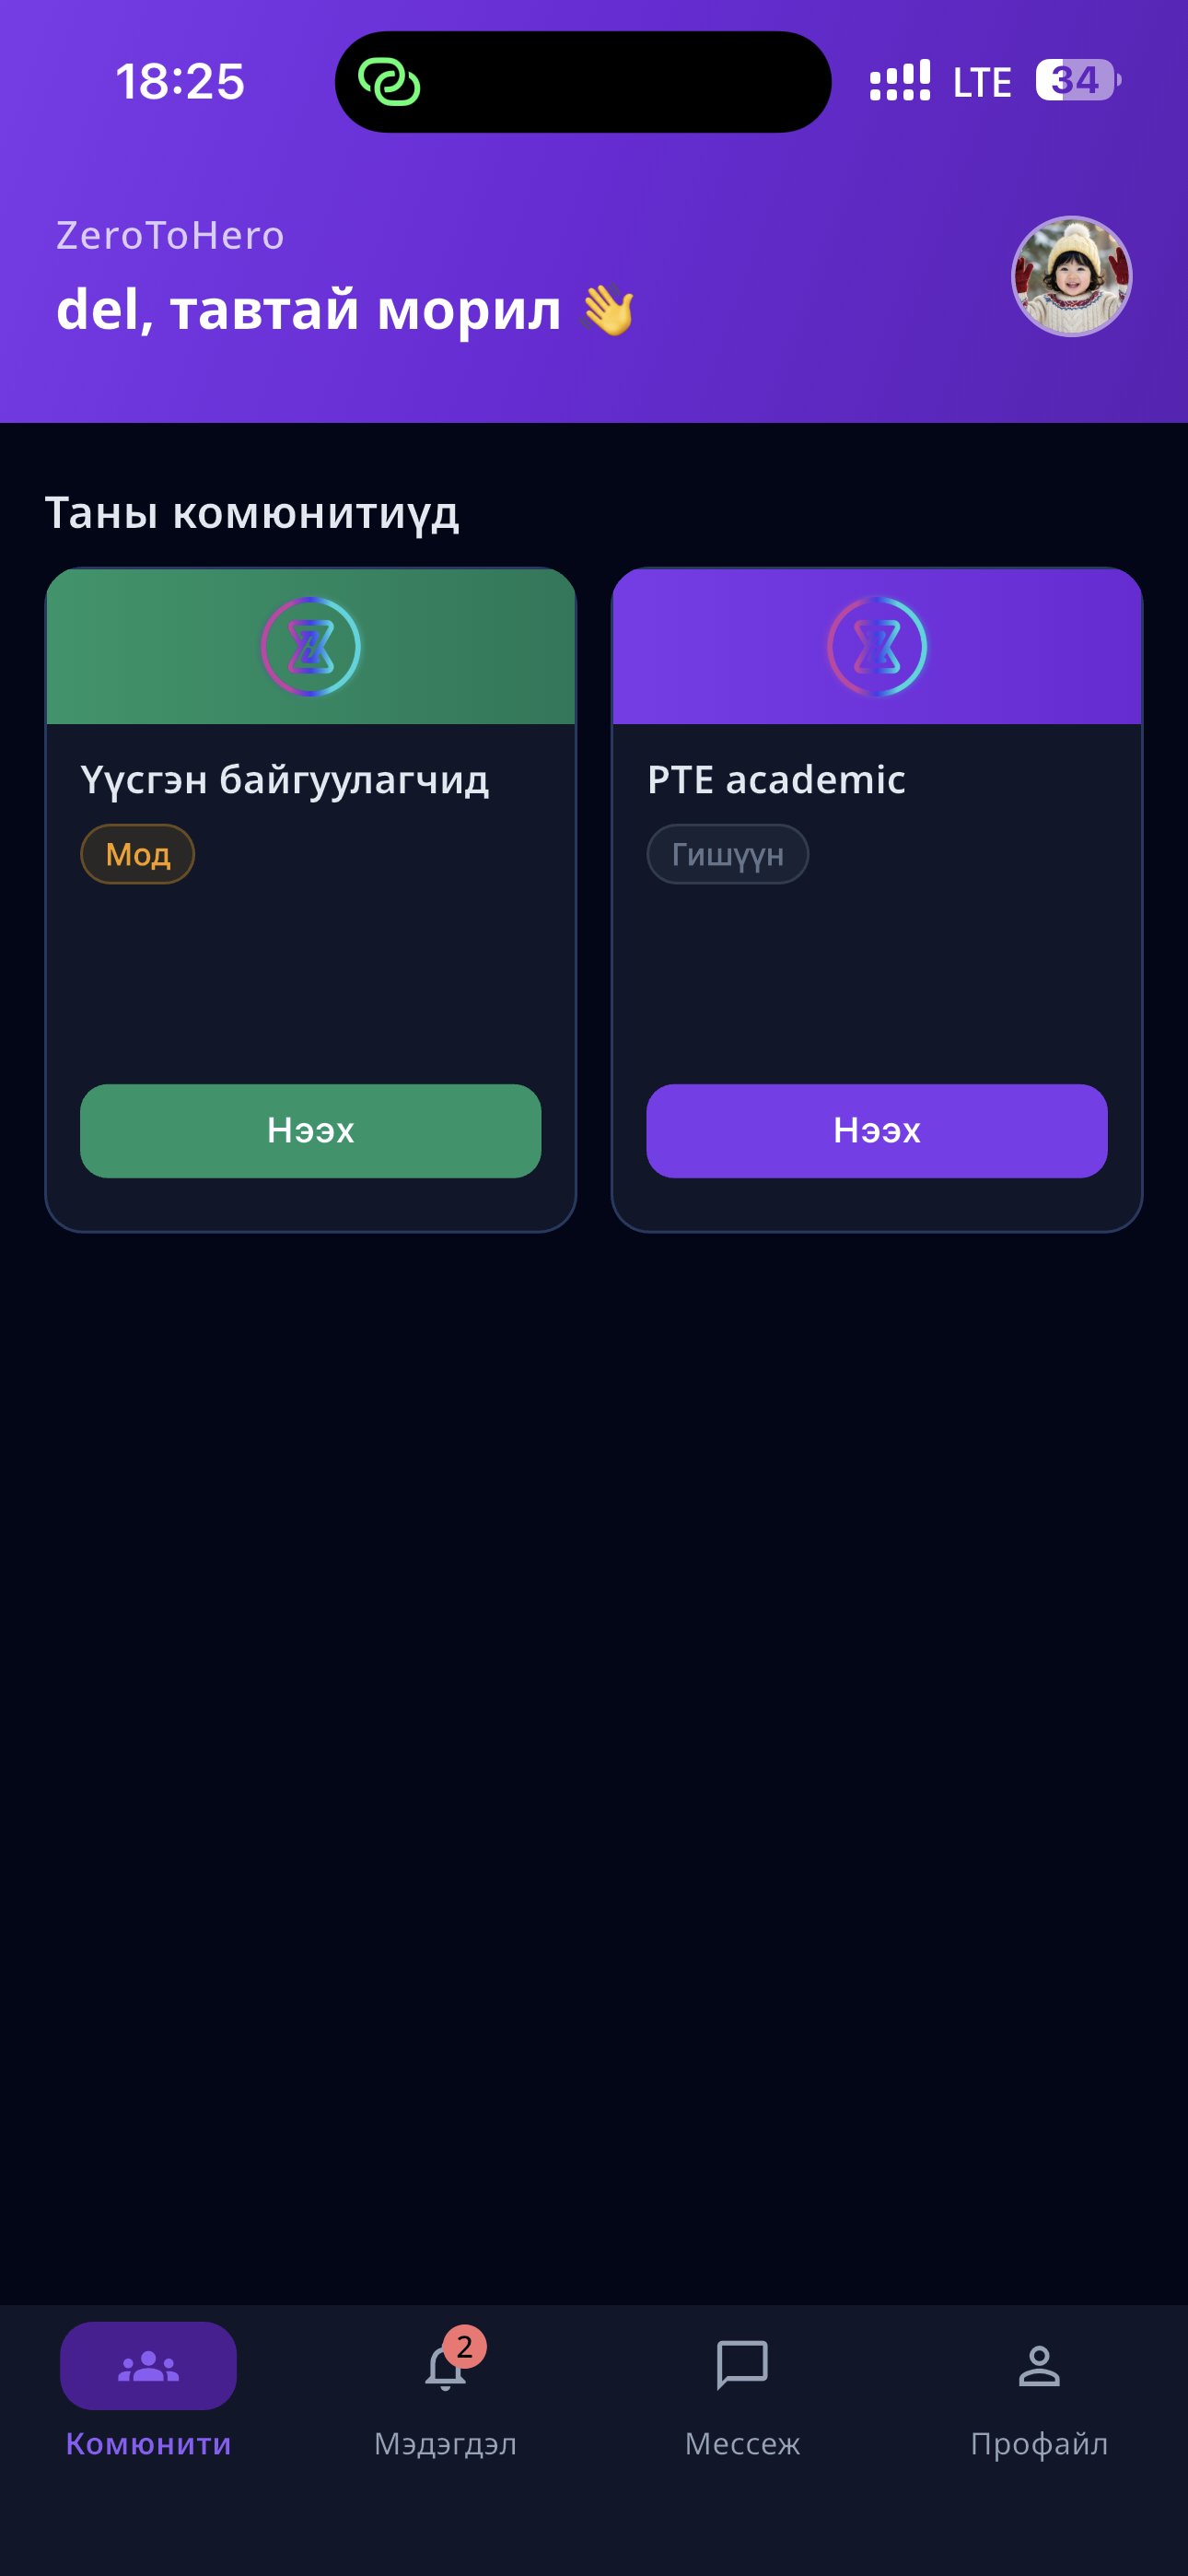
Once you've joined:
- The community appears in your profile's "My communities" list.
- You get full access to that community's space — channels, courses, and everything else.
- It also appears in the mobile app using the same account — see "19. Using the mobile app".
5. Community space overview
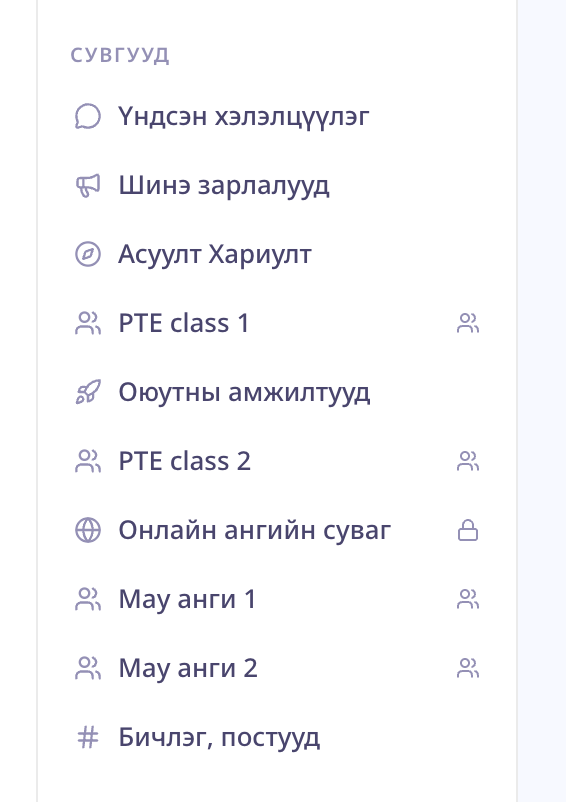
Once you're inside a community, a left sidebar appears with the main navigation. It contains:
| Menu item | Purpose |
|---|---|
| Channels | Forum-style discussions, Q&A, and posts |
| Courses | Video courses and lessons |
| Calendar | All events, live classes, and meetings in one view |
| News | Community announcements and updates |
| Live | Live events and Zoom sessions |
| Mentoring | Browse mentors and book 1:1 sessions |
| Mock Test | Full-length practice tests with scoring |
| Practice | Flashcards, quizzes, and other practice exercises |
| Members | Member directory and profiles |
| Testimonials | Member reviews |
| Blog | Long-form articles and posts |
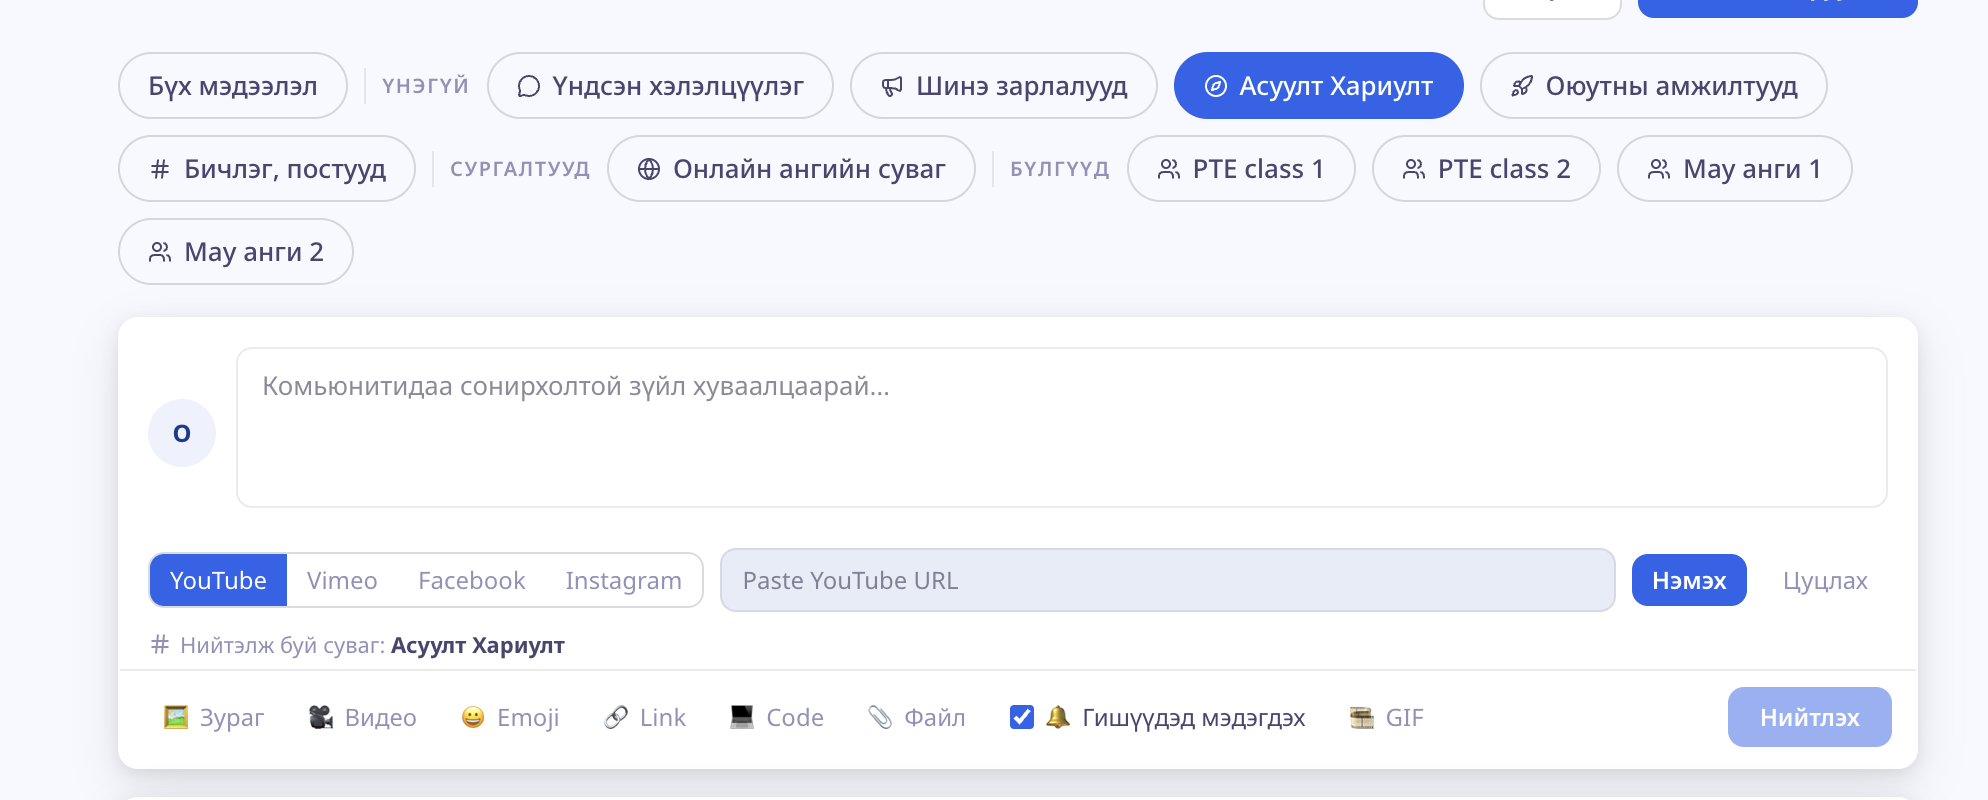
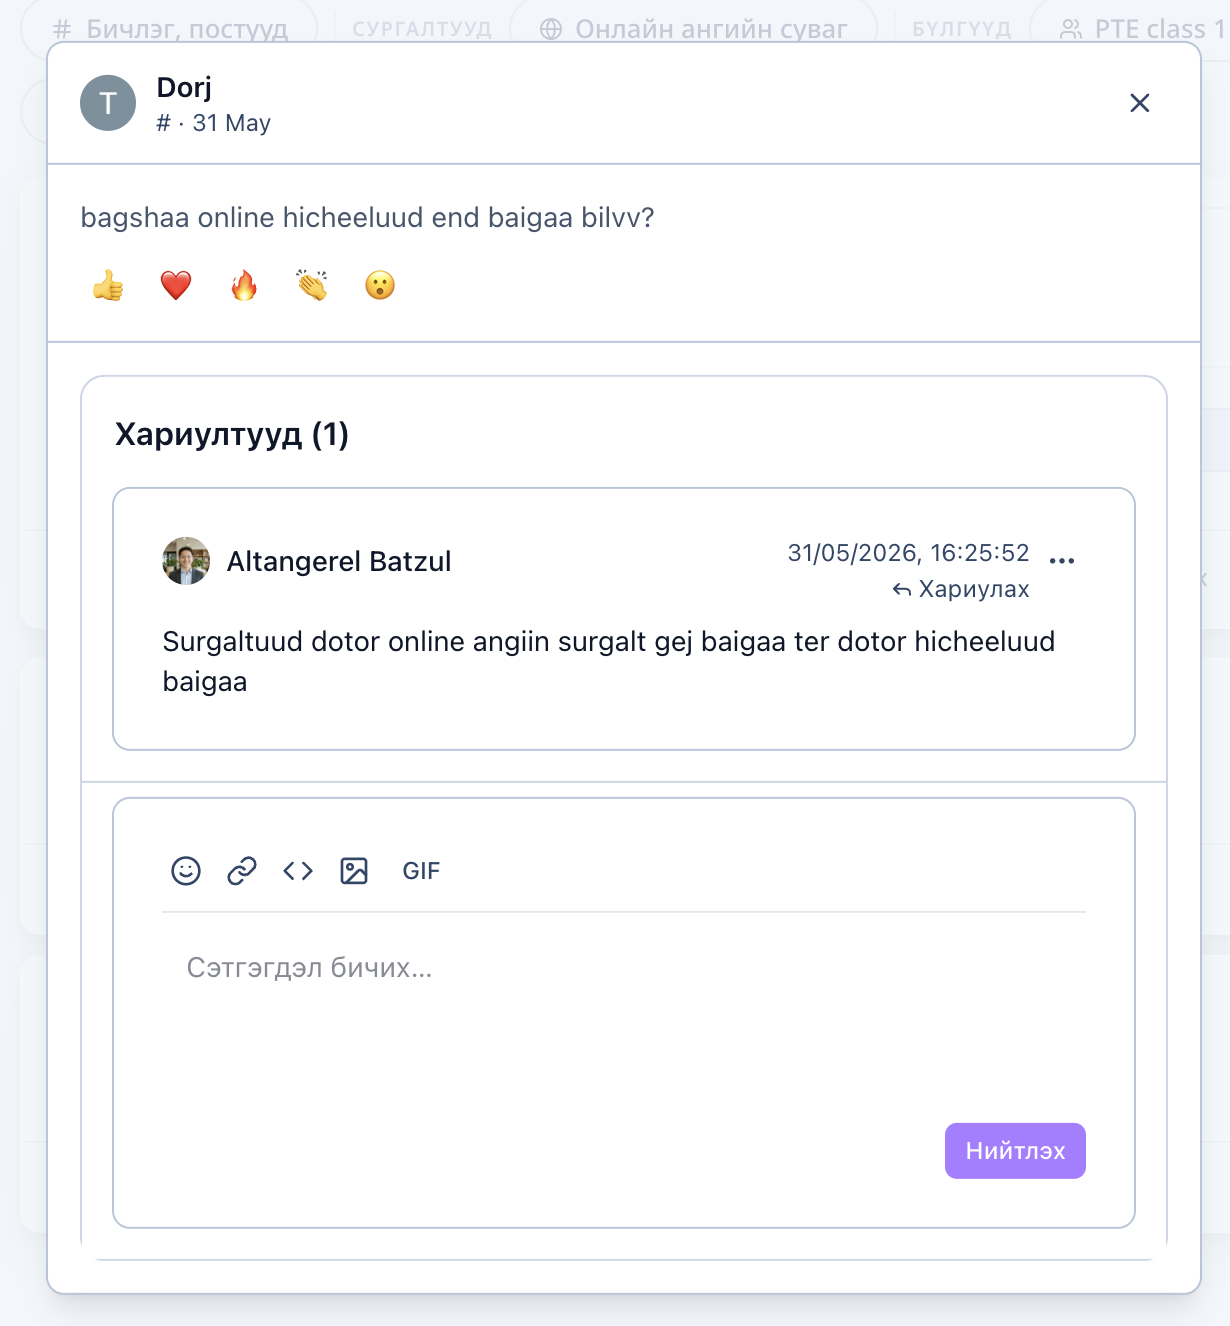
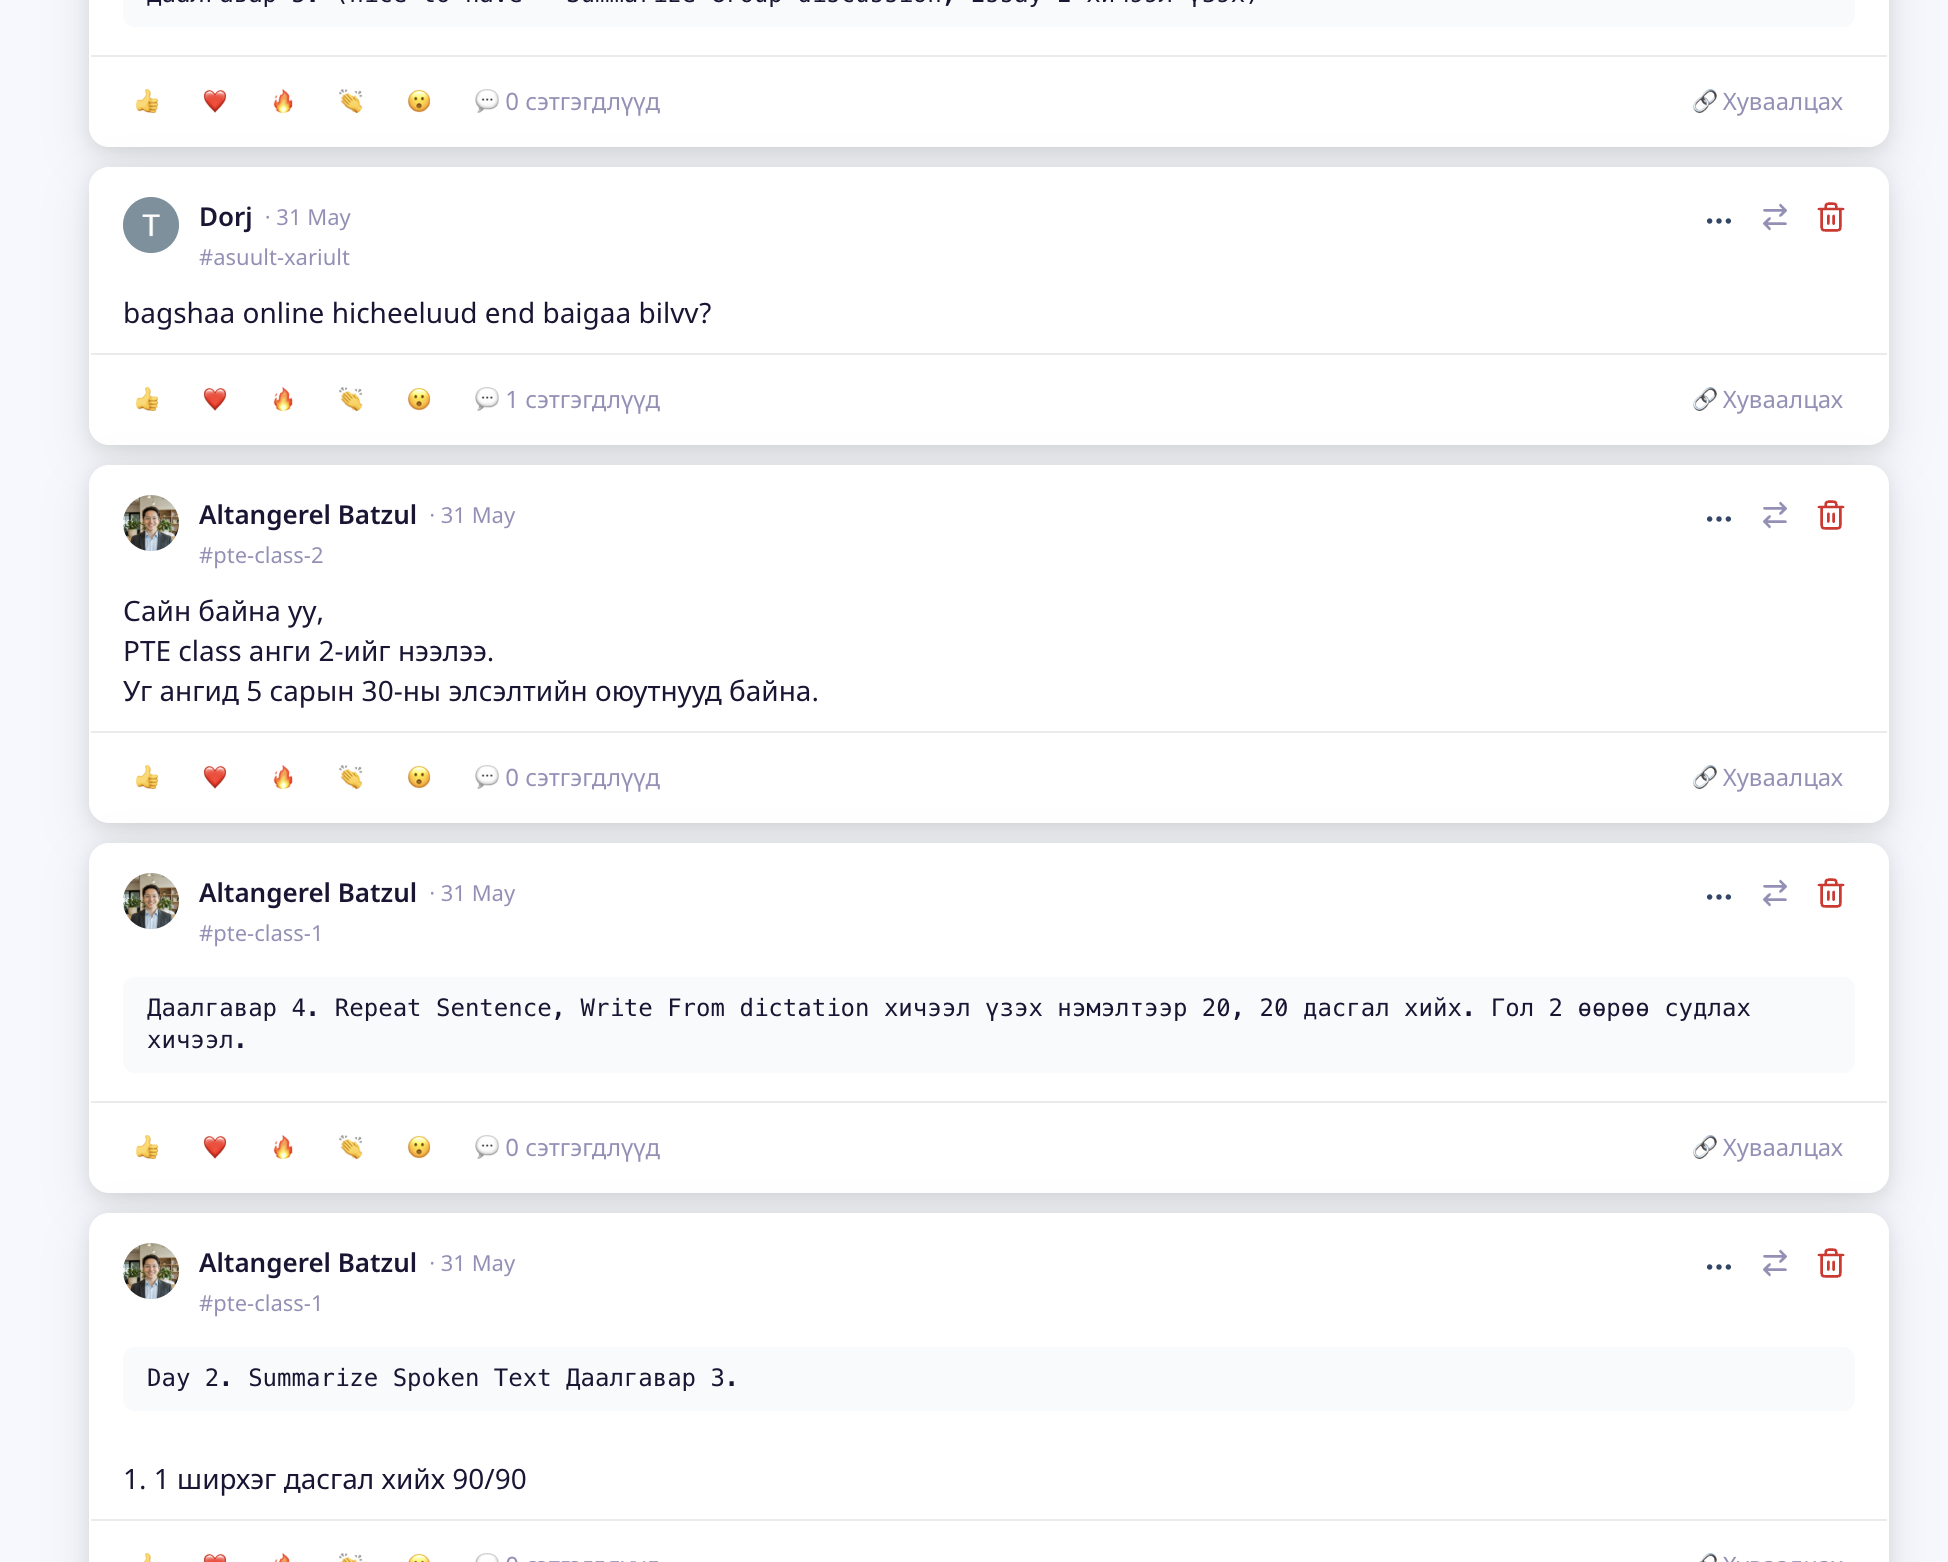
6. Channels
Channels are the community's internal forum. The owner creates channels around topics, and you can post, reply, and react in any channel.
6.1 Browsing channels
- Click Channels in the left sidebar.
- You'll see multiple channels (e.g. #announcements, #questions, #showcase).
- Click any channel to open it.
6.2 Creating a post
- Click "New post" at the top of the channel.
- Enter a title and body. You can attach images and videos.
- Click "Publish".
6.3 Replies and reactions
- Use "Reply" under a post to comment.
- React with hearts, likes, etc.
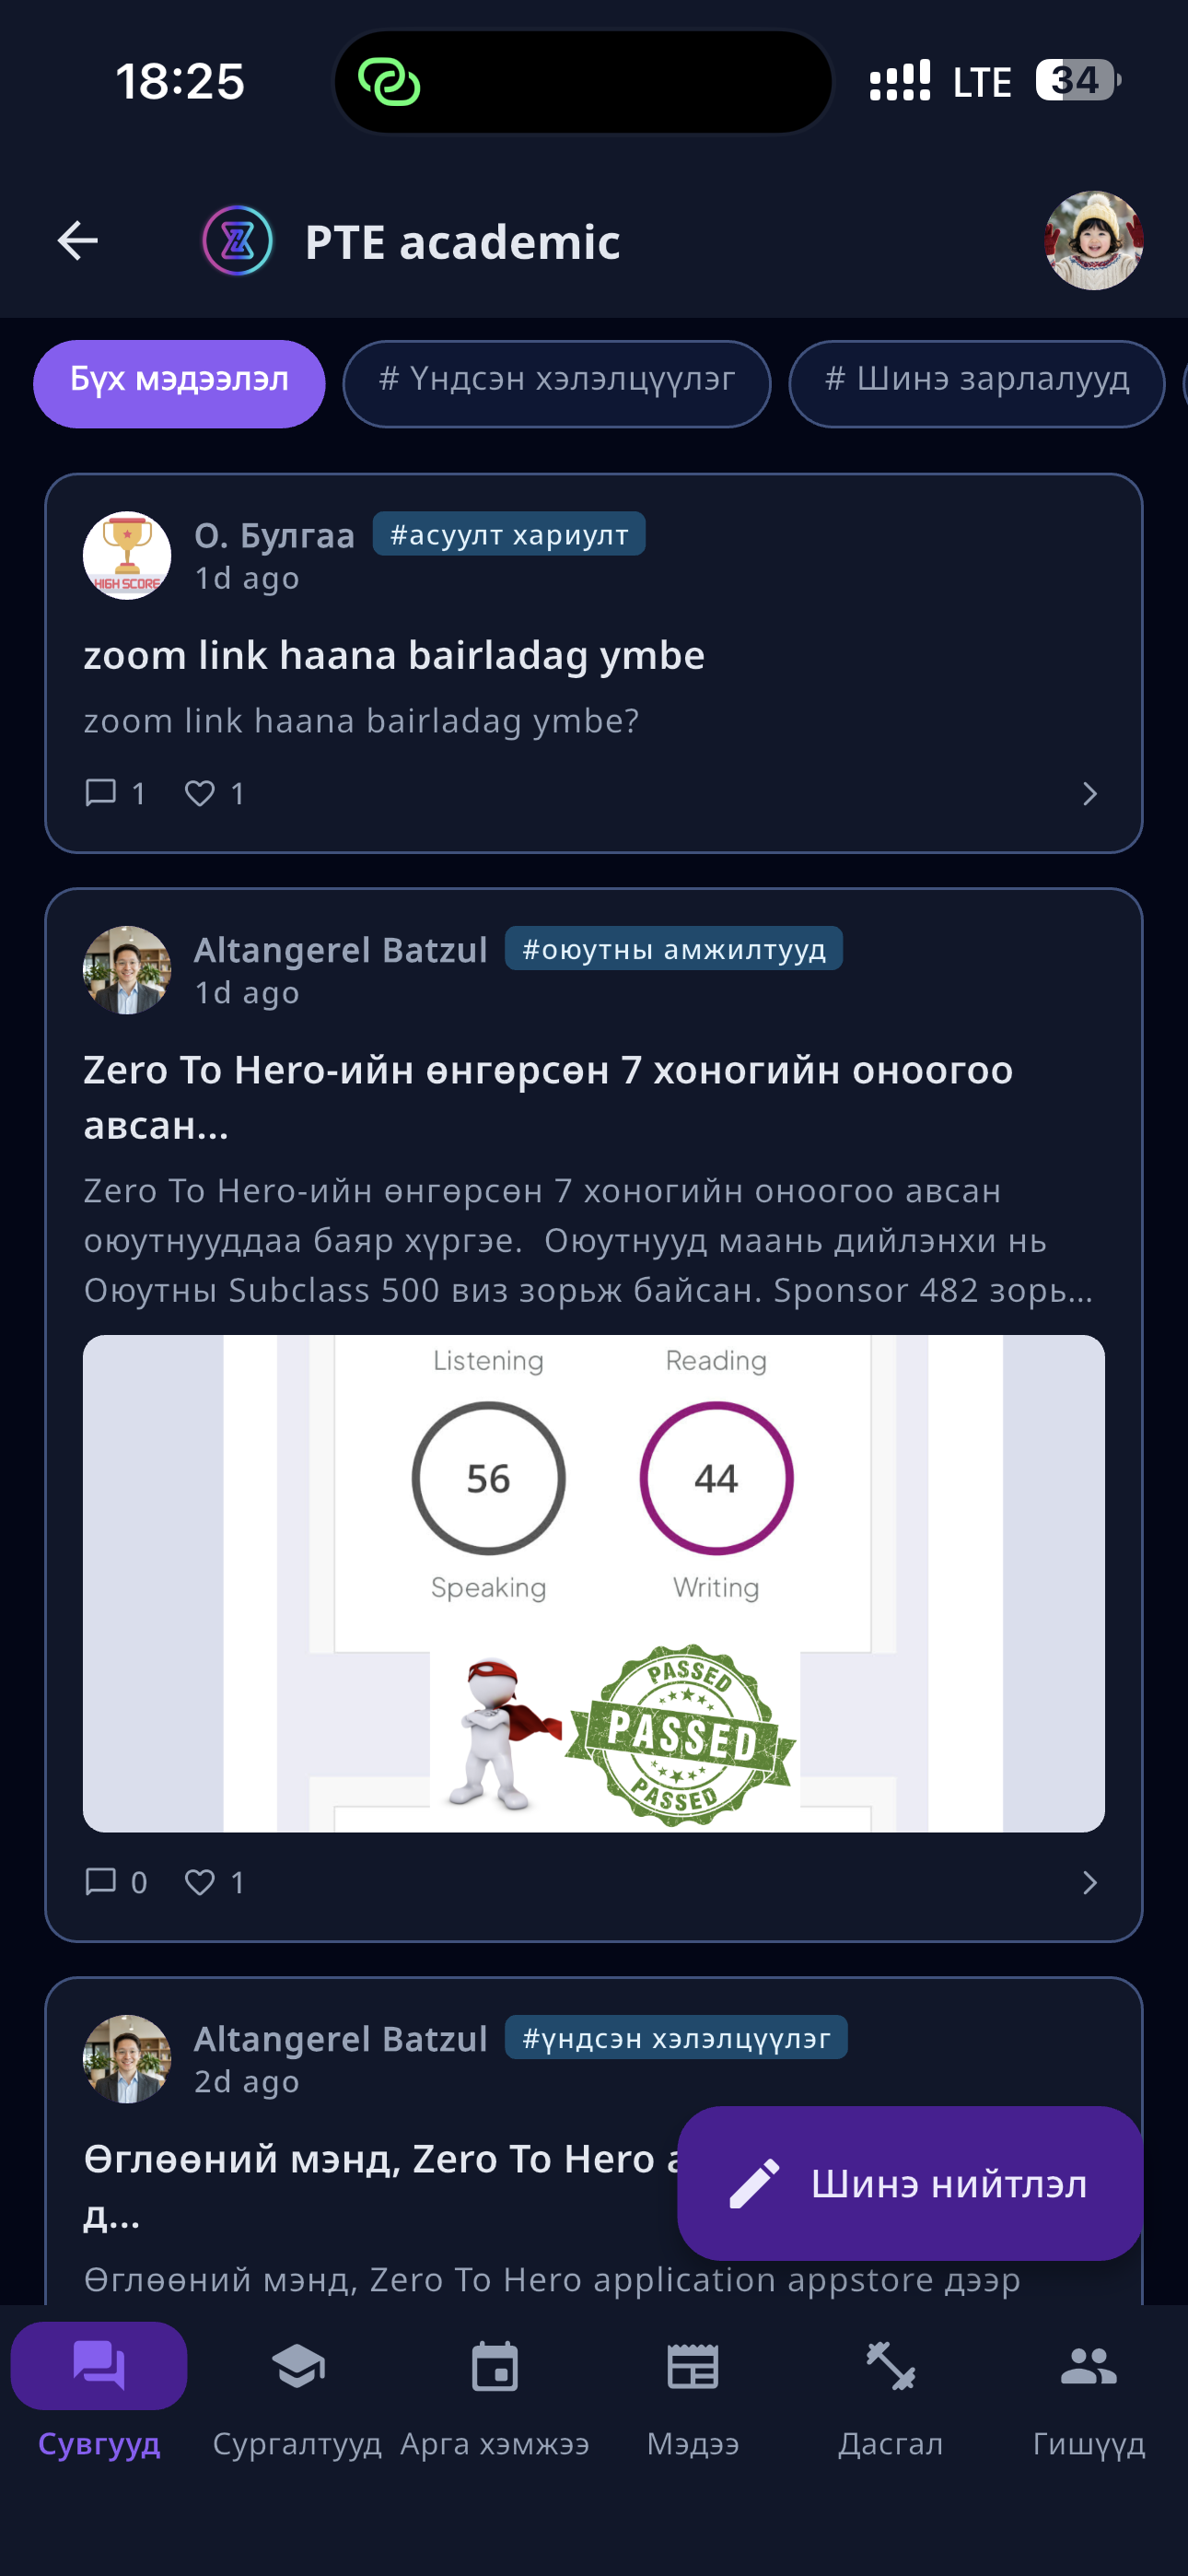
7. Courses
7.1 Course list
- Click Courses in the left sidebar.
- Free, paid, and already-enrolled courses all appear on one page.
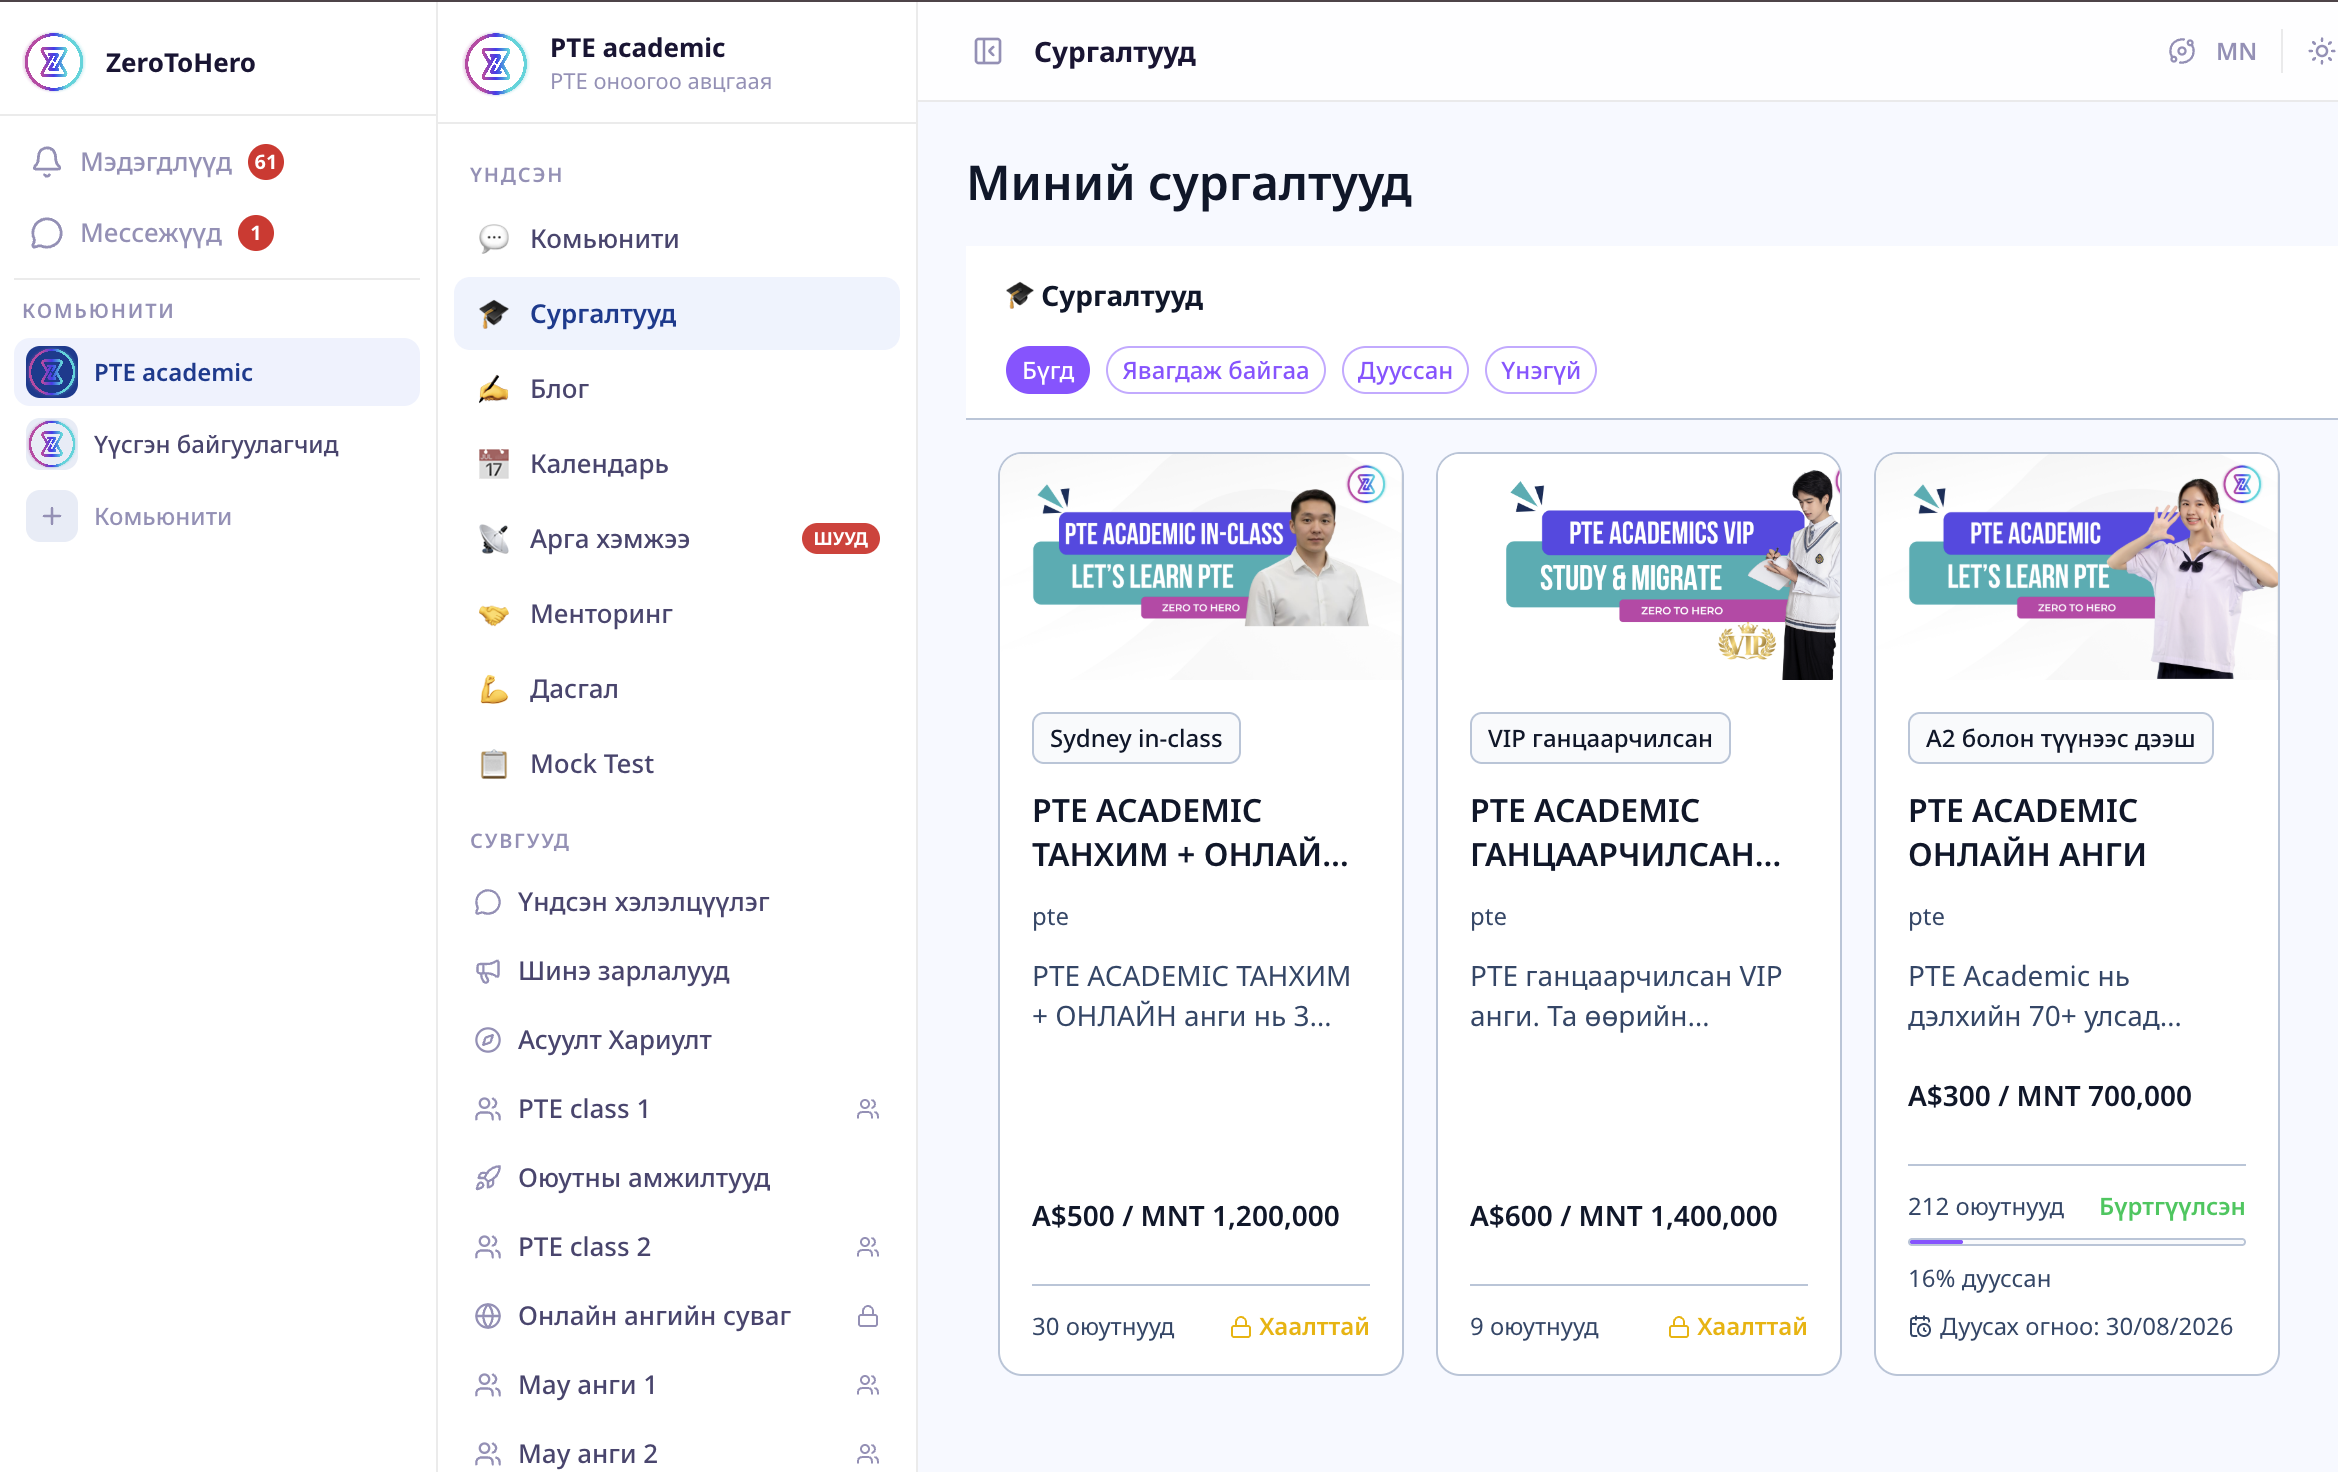
7.2 Enrolling in a course
- Click a course you're interested in.
- Review the description, syllabus, and instructor info.
- Click "Enroll".
- For paid courses you'll be redirected to checkout. Full course access unlocks once payment is confirmed.
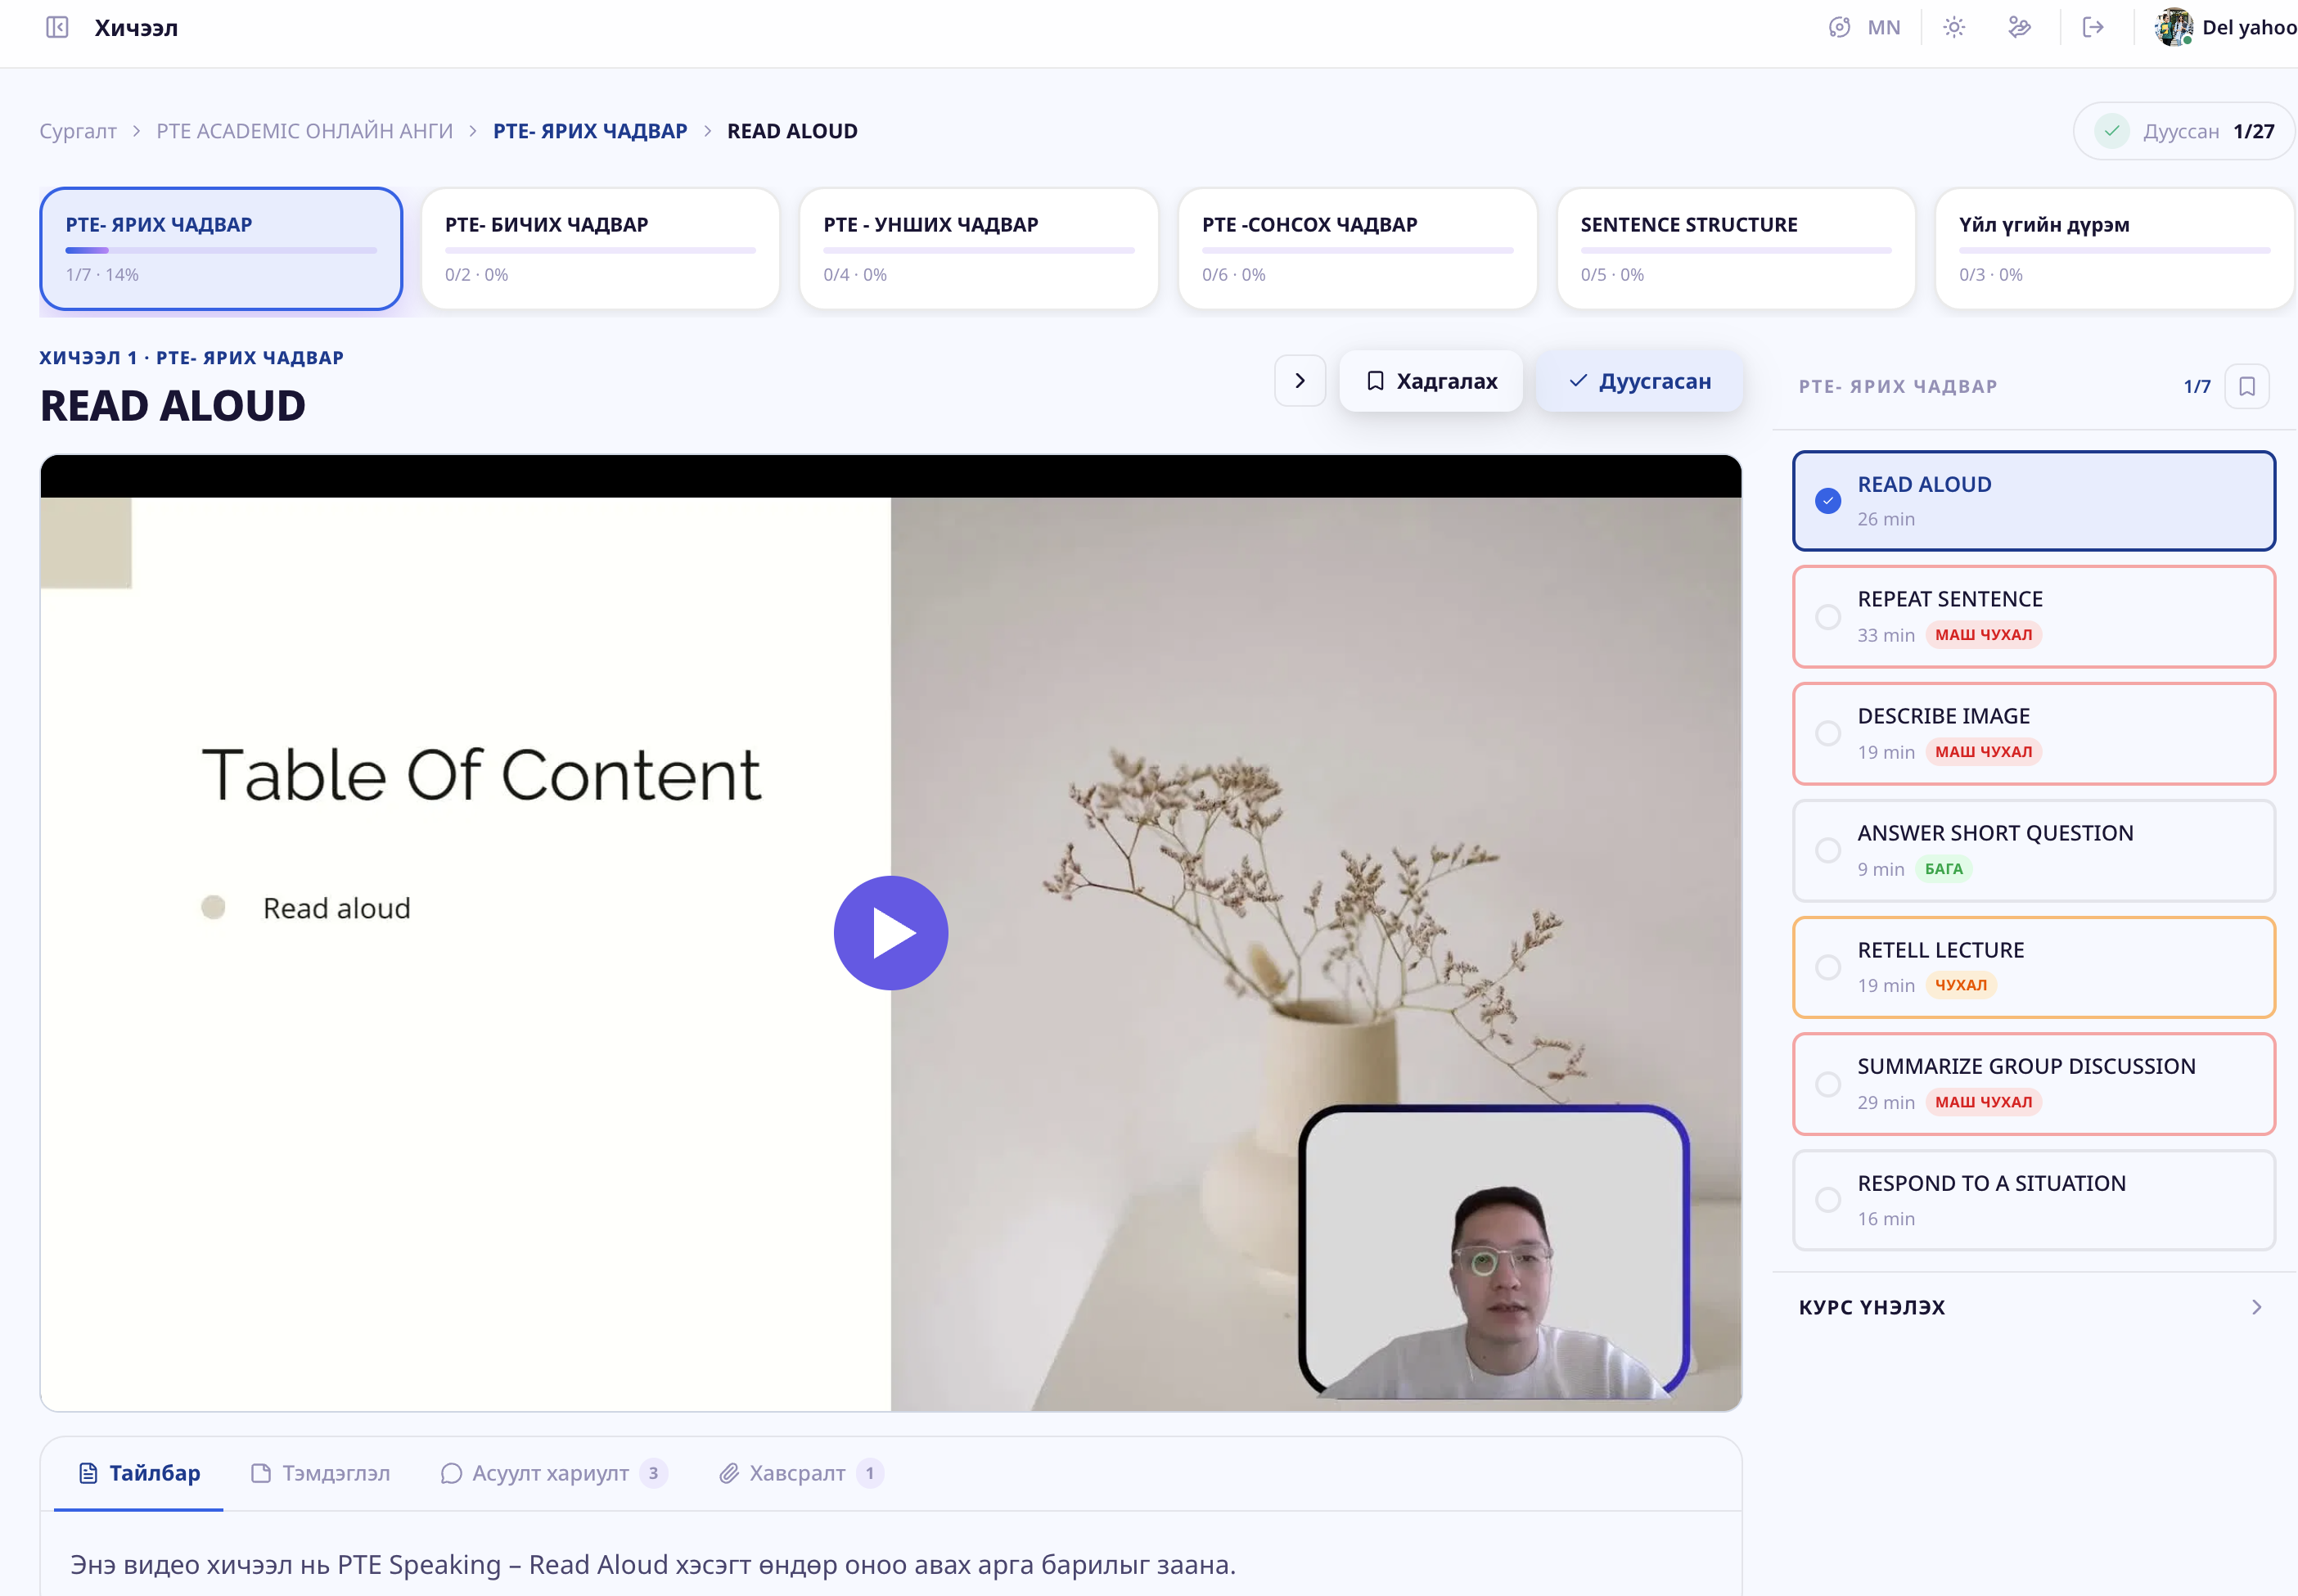
7.3 Watching lessons
- The curriculum (sections and lessons) appears on the left.
- Click a lesson to watch the video.
- Click "Mark complete" when done to save your progress.
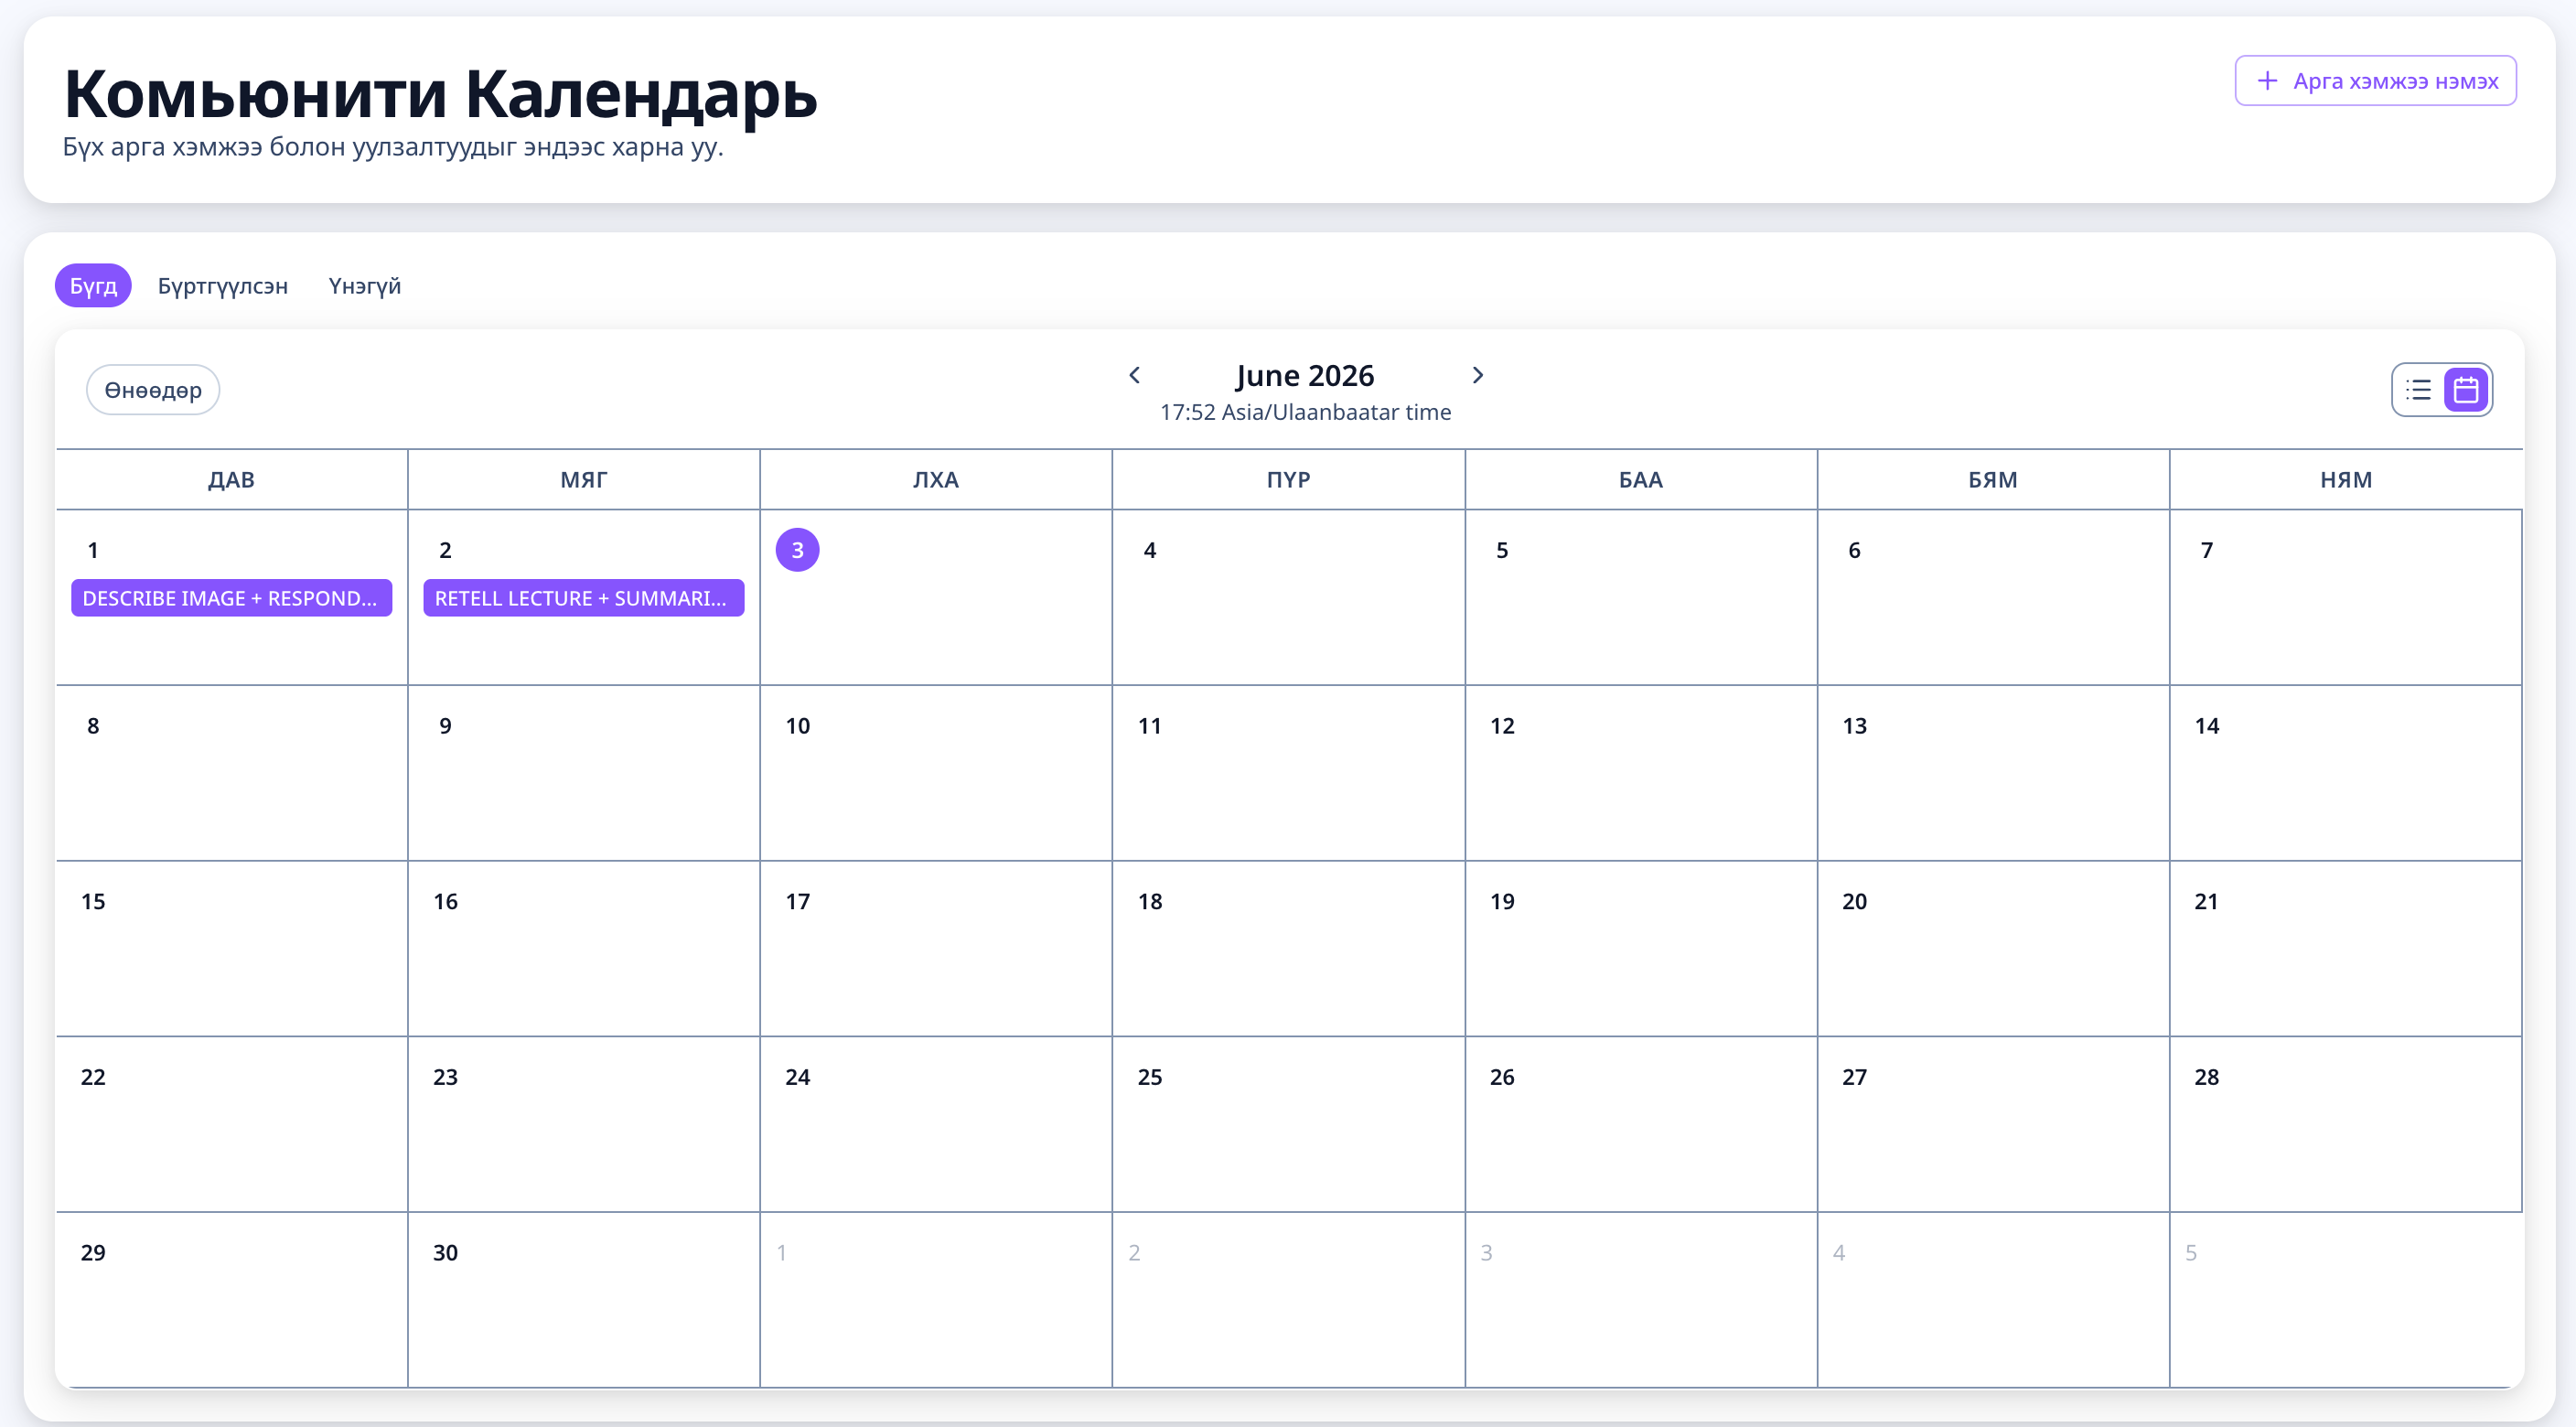
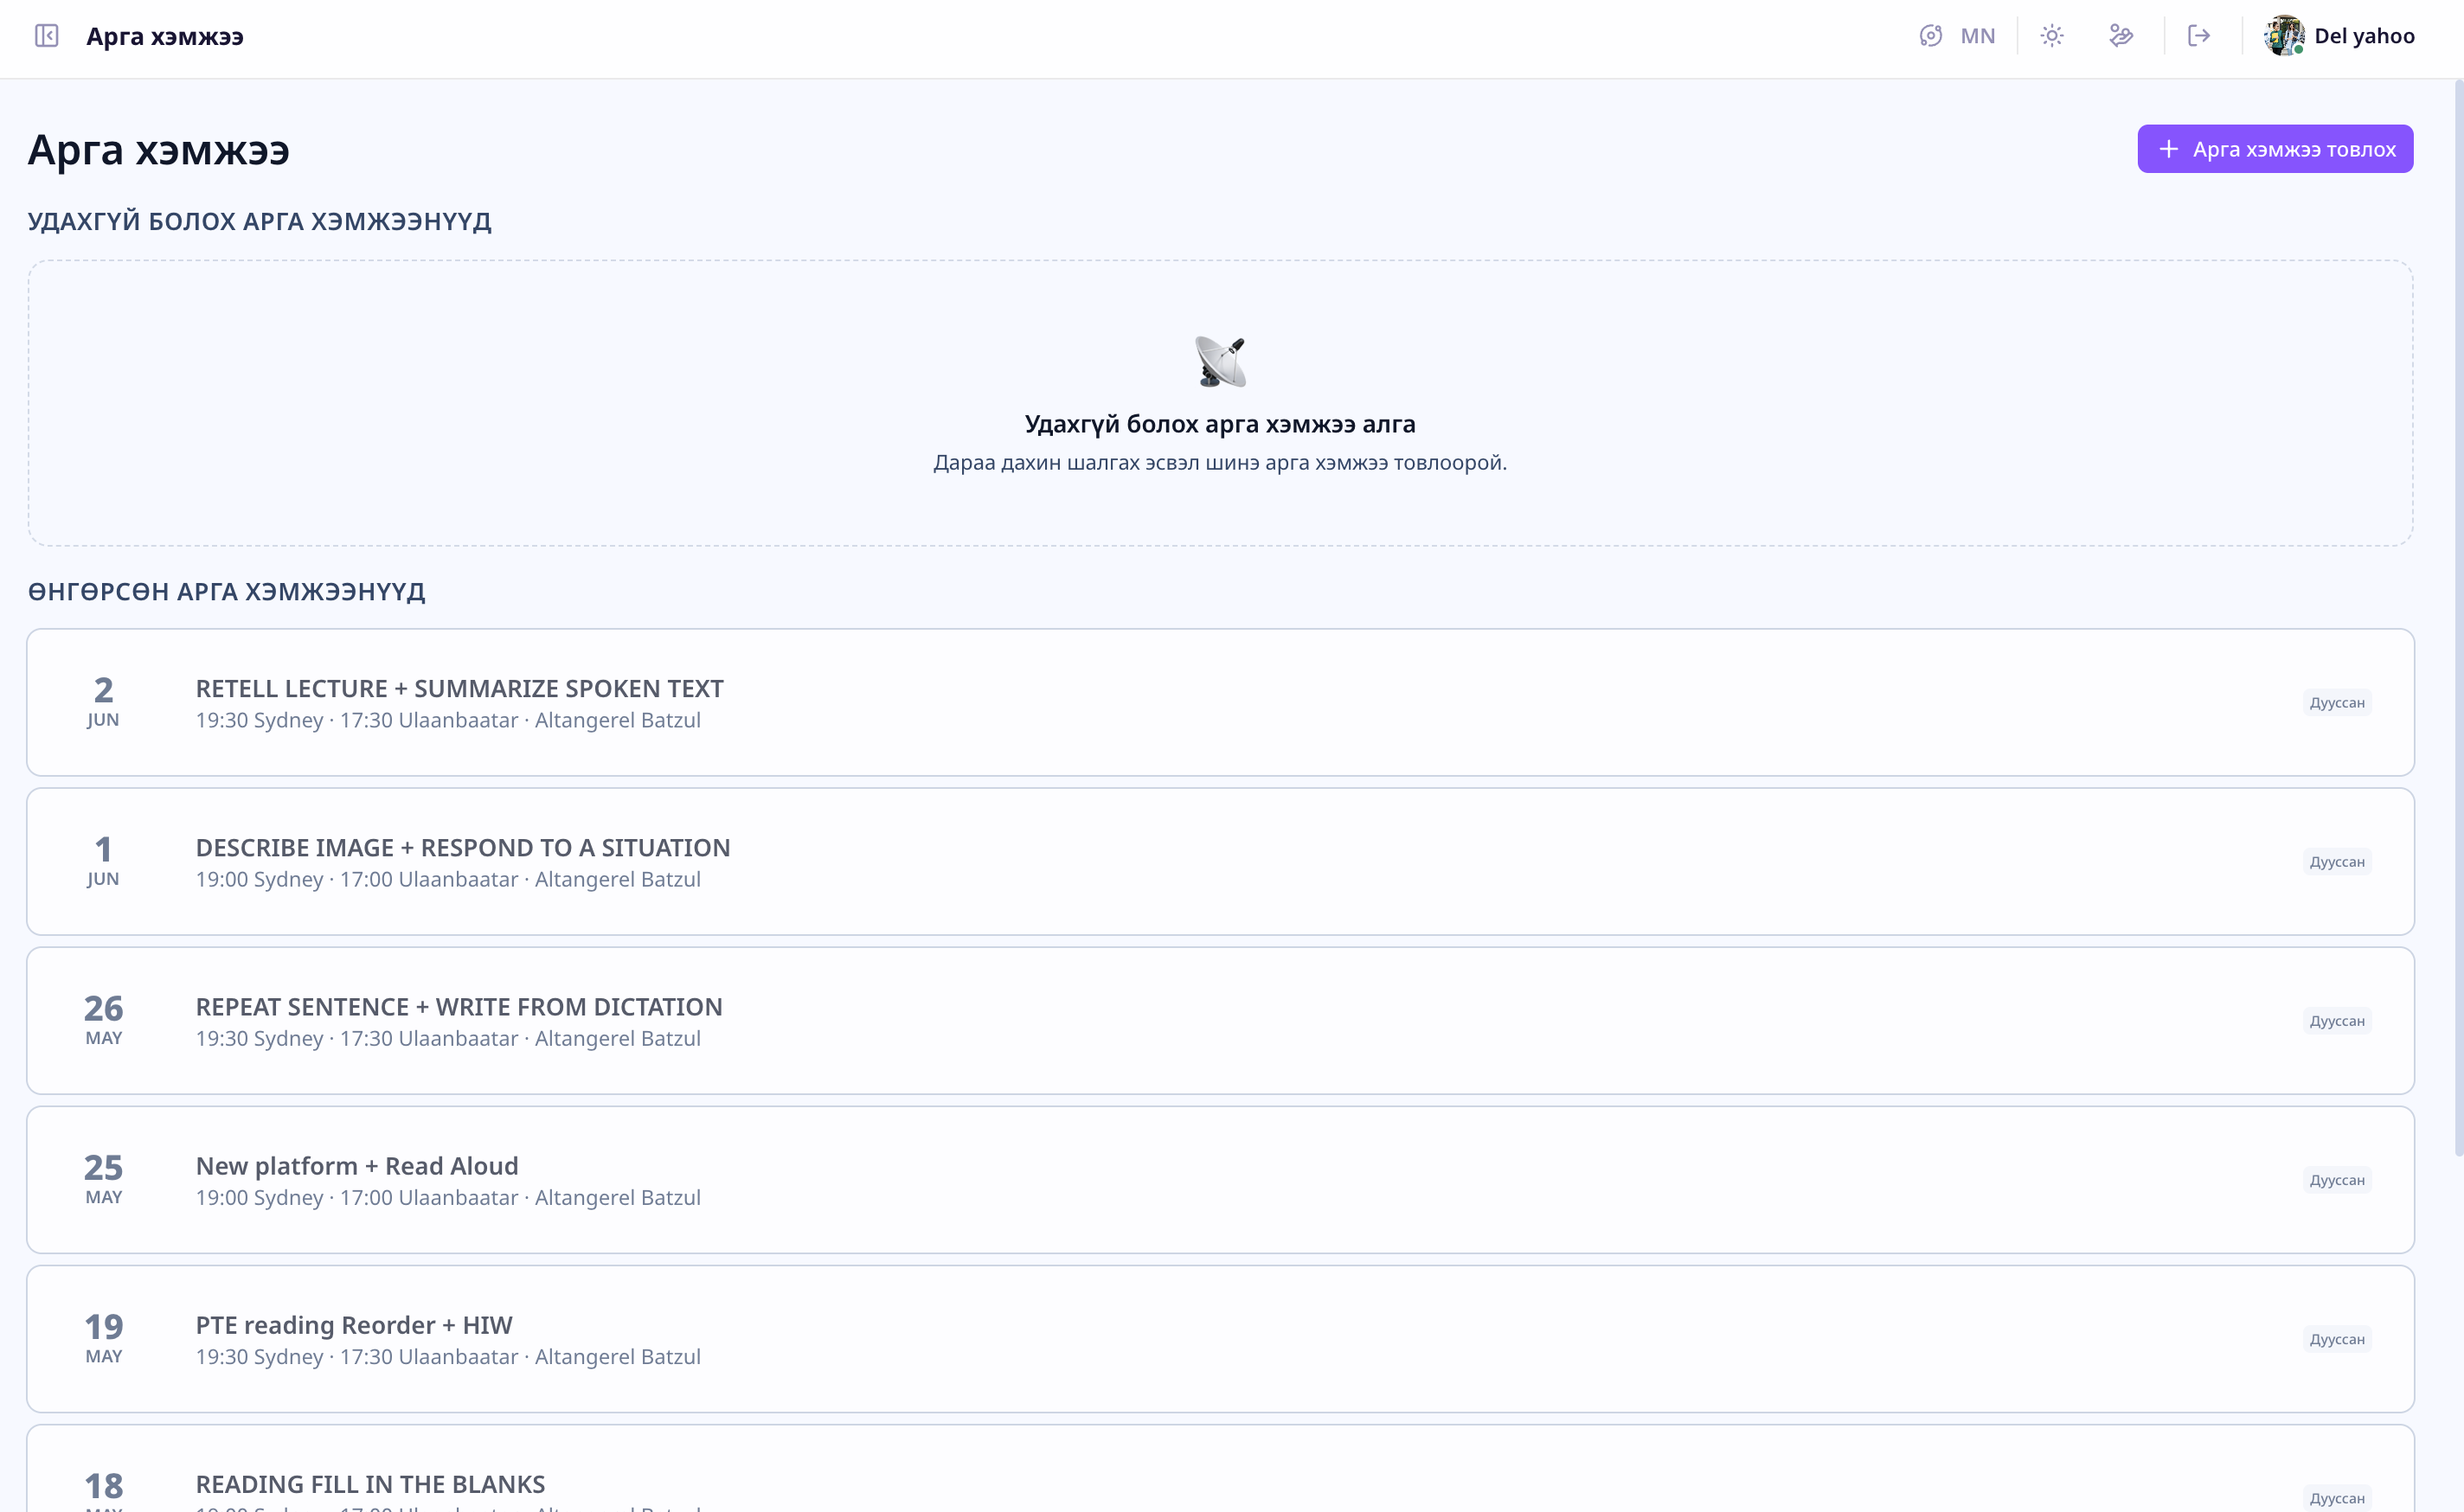
8. Calendar
The calendar shows all of the community's events, live classes, and booked mentoring sessions in one view.
- Click Calendar in the left sidebar.
- Toggle between month, week, and day views.
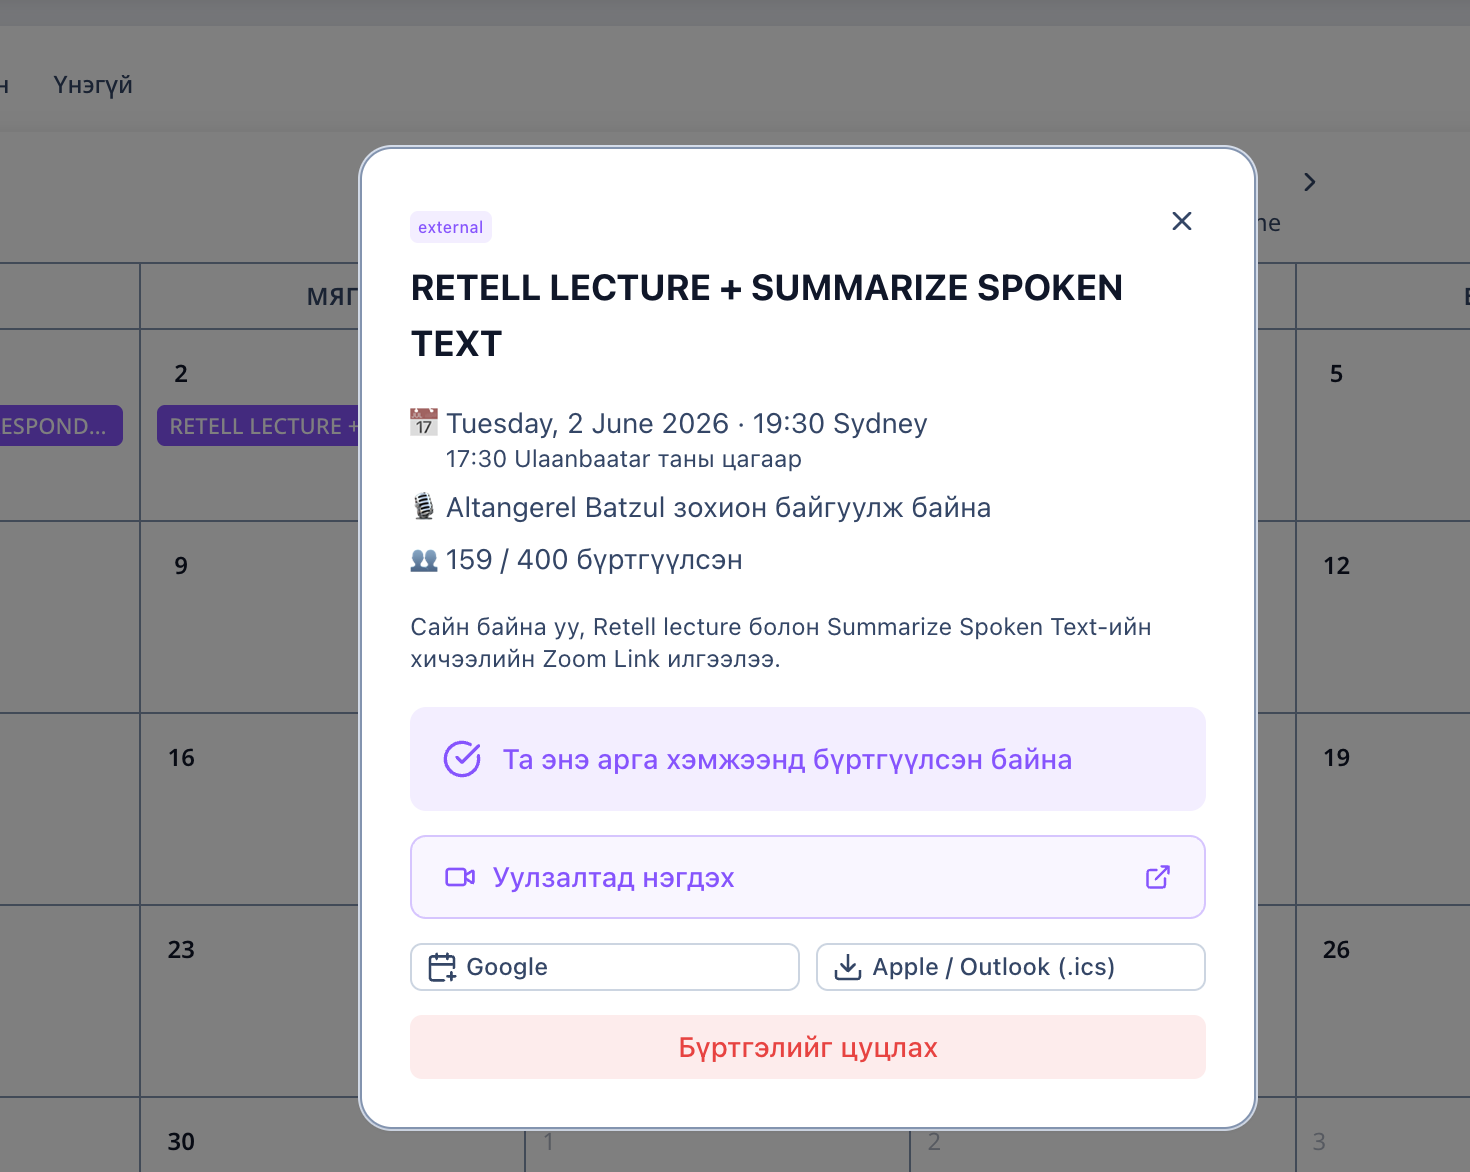
- Click an event to open its details — short description, start time, and join link.
- Click "RSVP" if you plan to attend.
9. News
Official announcements and updates from the community admin/owner are posted here.
- Click News in the left sidebar.
- Pick an item from the list to read the full article.
- You can leave a comment or react with "Like" at the bottom.
10. Live Events
Live events run on Zoom or directly inside the platform.
10.1 Event list
- Click Live in the left sidebar.
- Upcoming and past events are split into two sections.
10.2 Joining an event
- Click an event to view its details.
- The "Join" button activates when the event is about to start.
- Clicking Join opens Zoom or the in-platform video room.
10.3 Watching recordings
If a recording is uploaded after the event, you can play it back from the same event page.
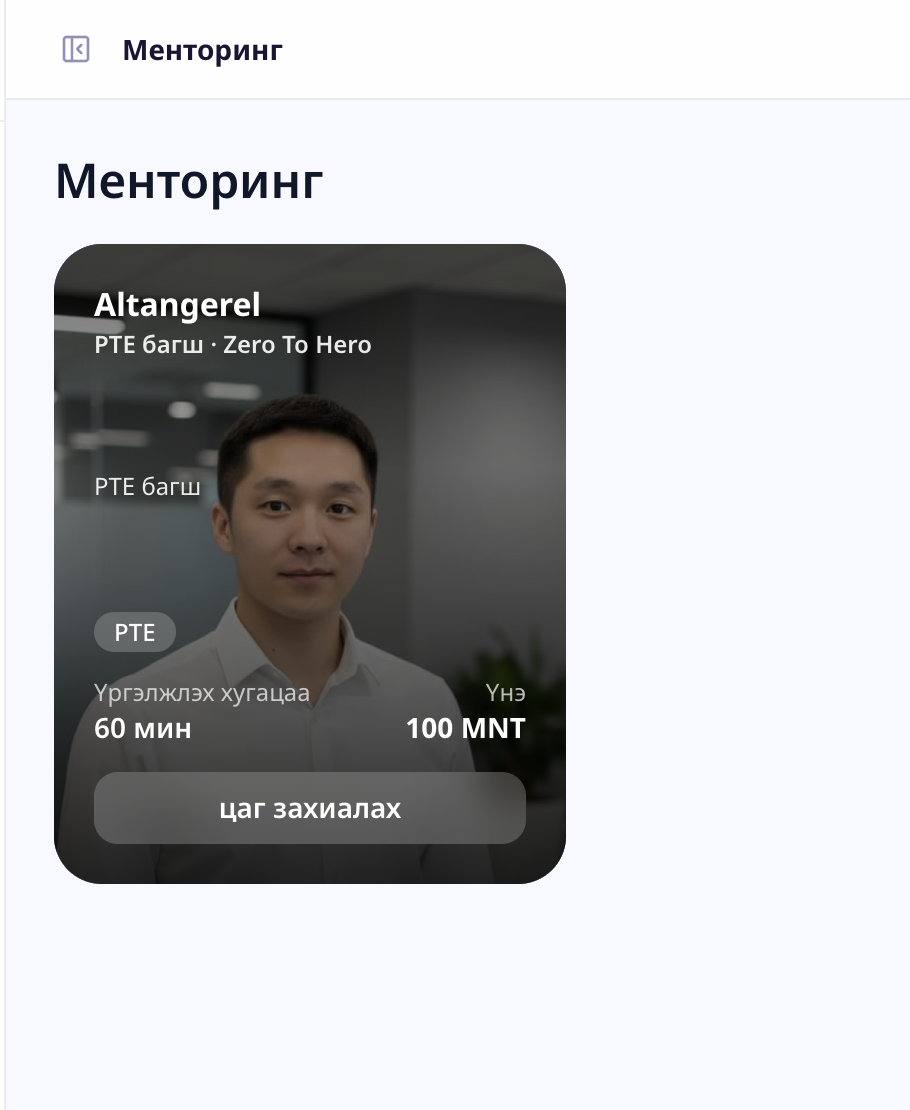
11. Mentoring
11.1 Mentor list
- Click Mentoring in the left sidebar.
- You'll see mentor photos, areas of expertise, and prices.
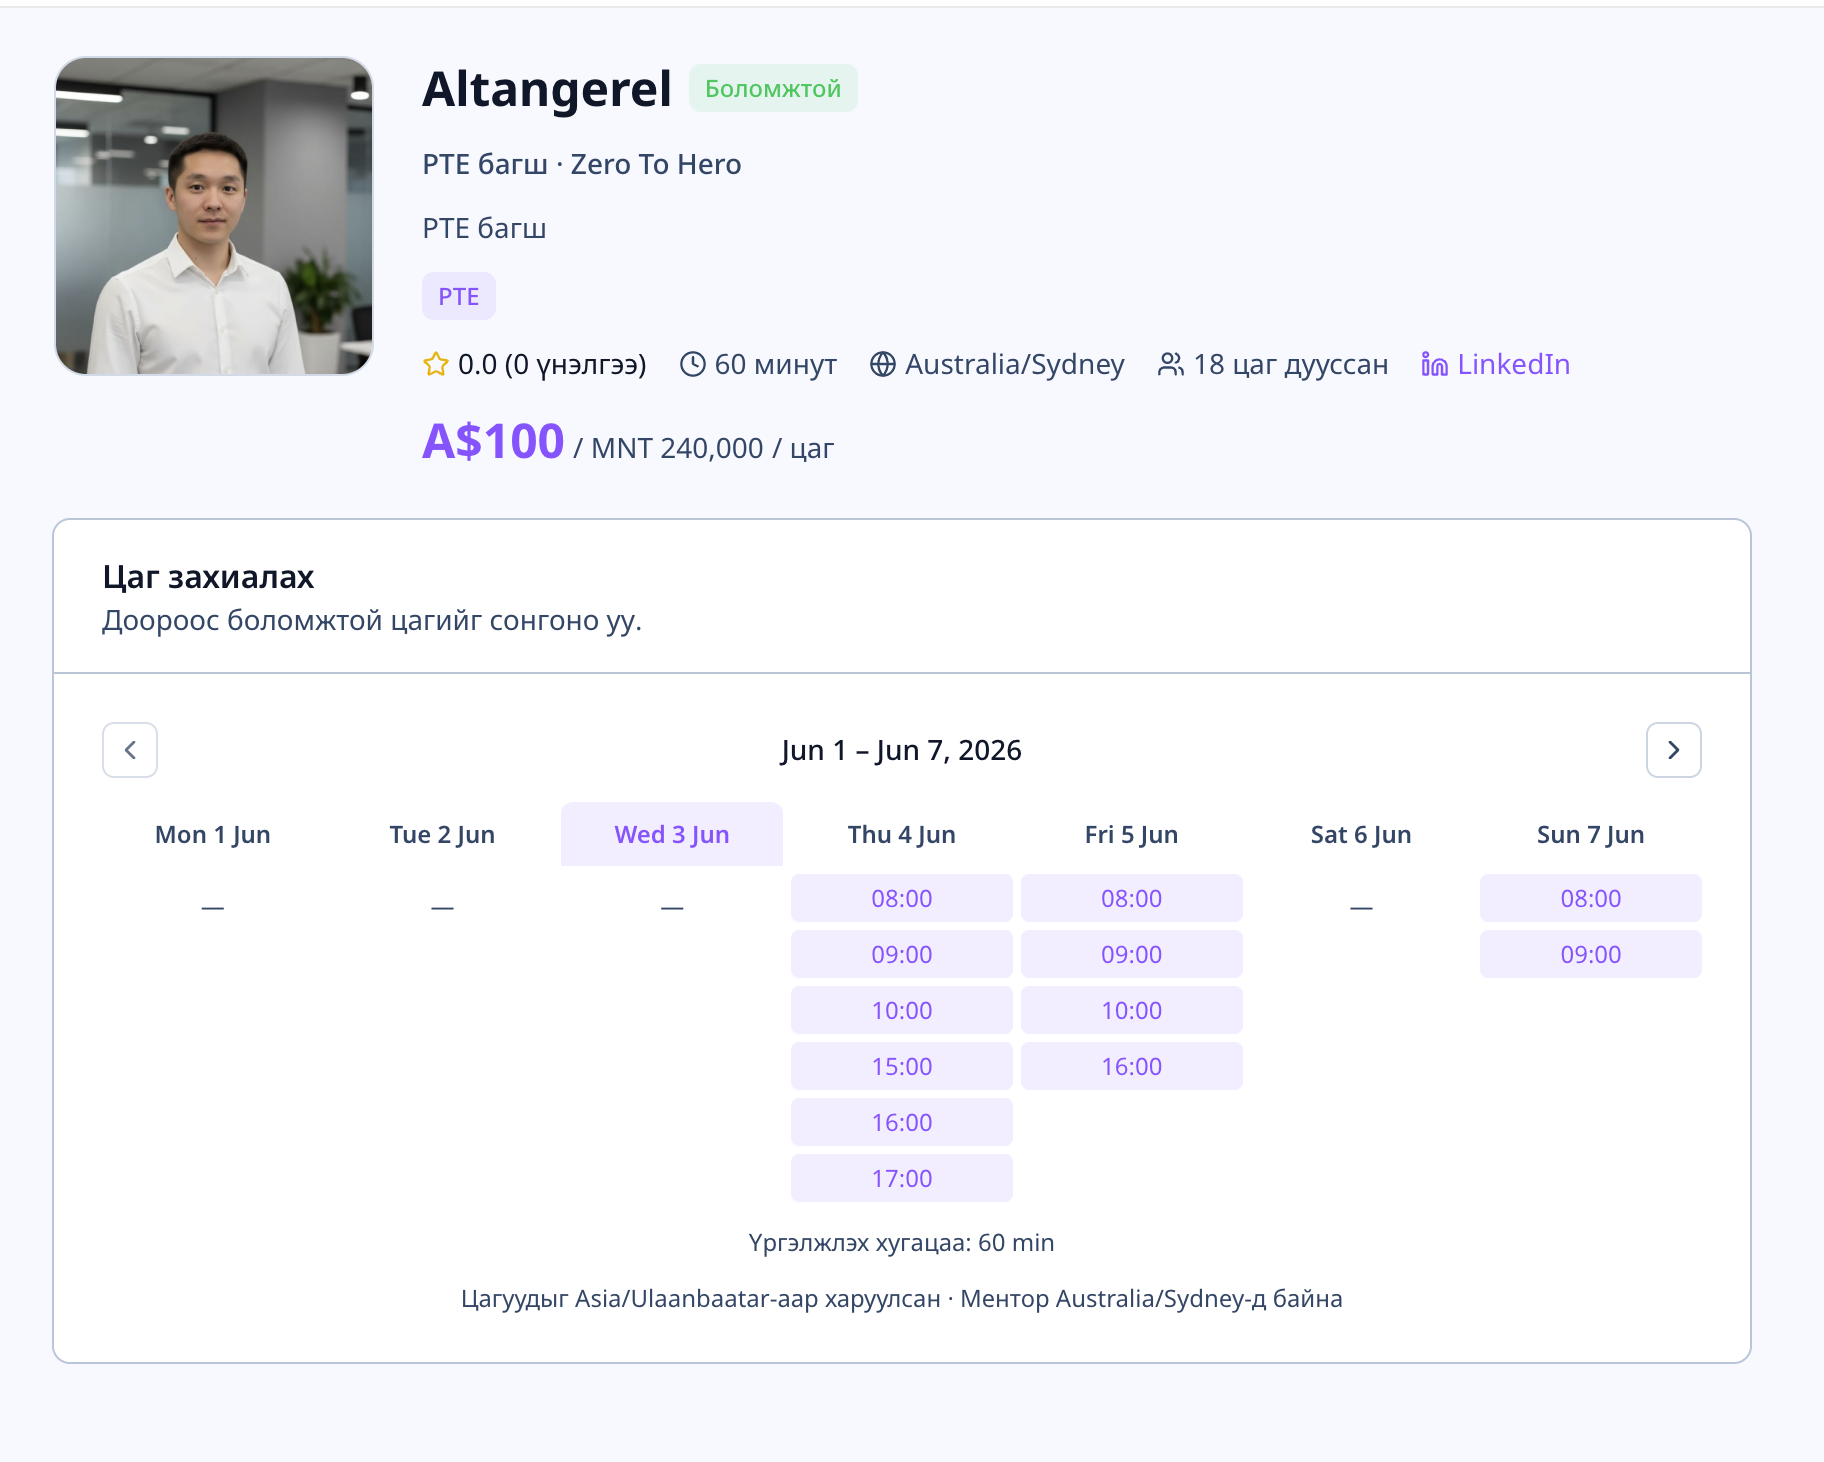
11.2 Booking a 1:1 session
- Click the mentor you want to work with.
- You'll see their bio and available time slots.
- Pick a slot and click "Book".
- Complete the payment. Once confirmed, the meeting link (Google Meet or Zoom) arrives via email and in-app notification.
11.3 Attending the session
When it's time:
- The booking appears in your Calendar.
- Click "Join" to enter the video session.
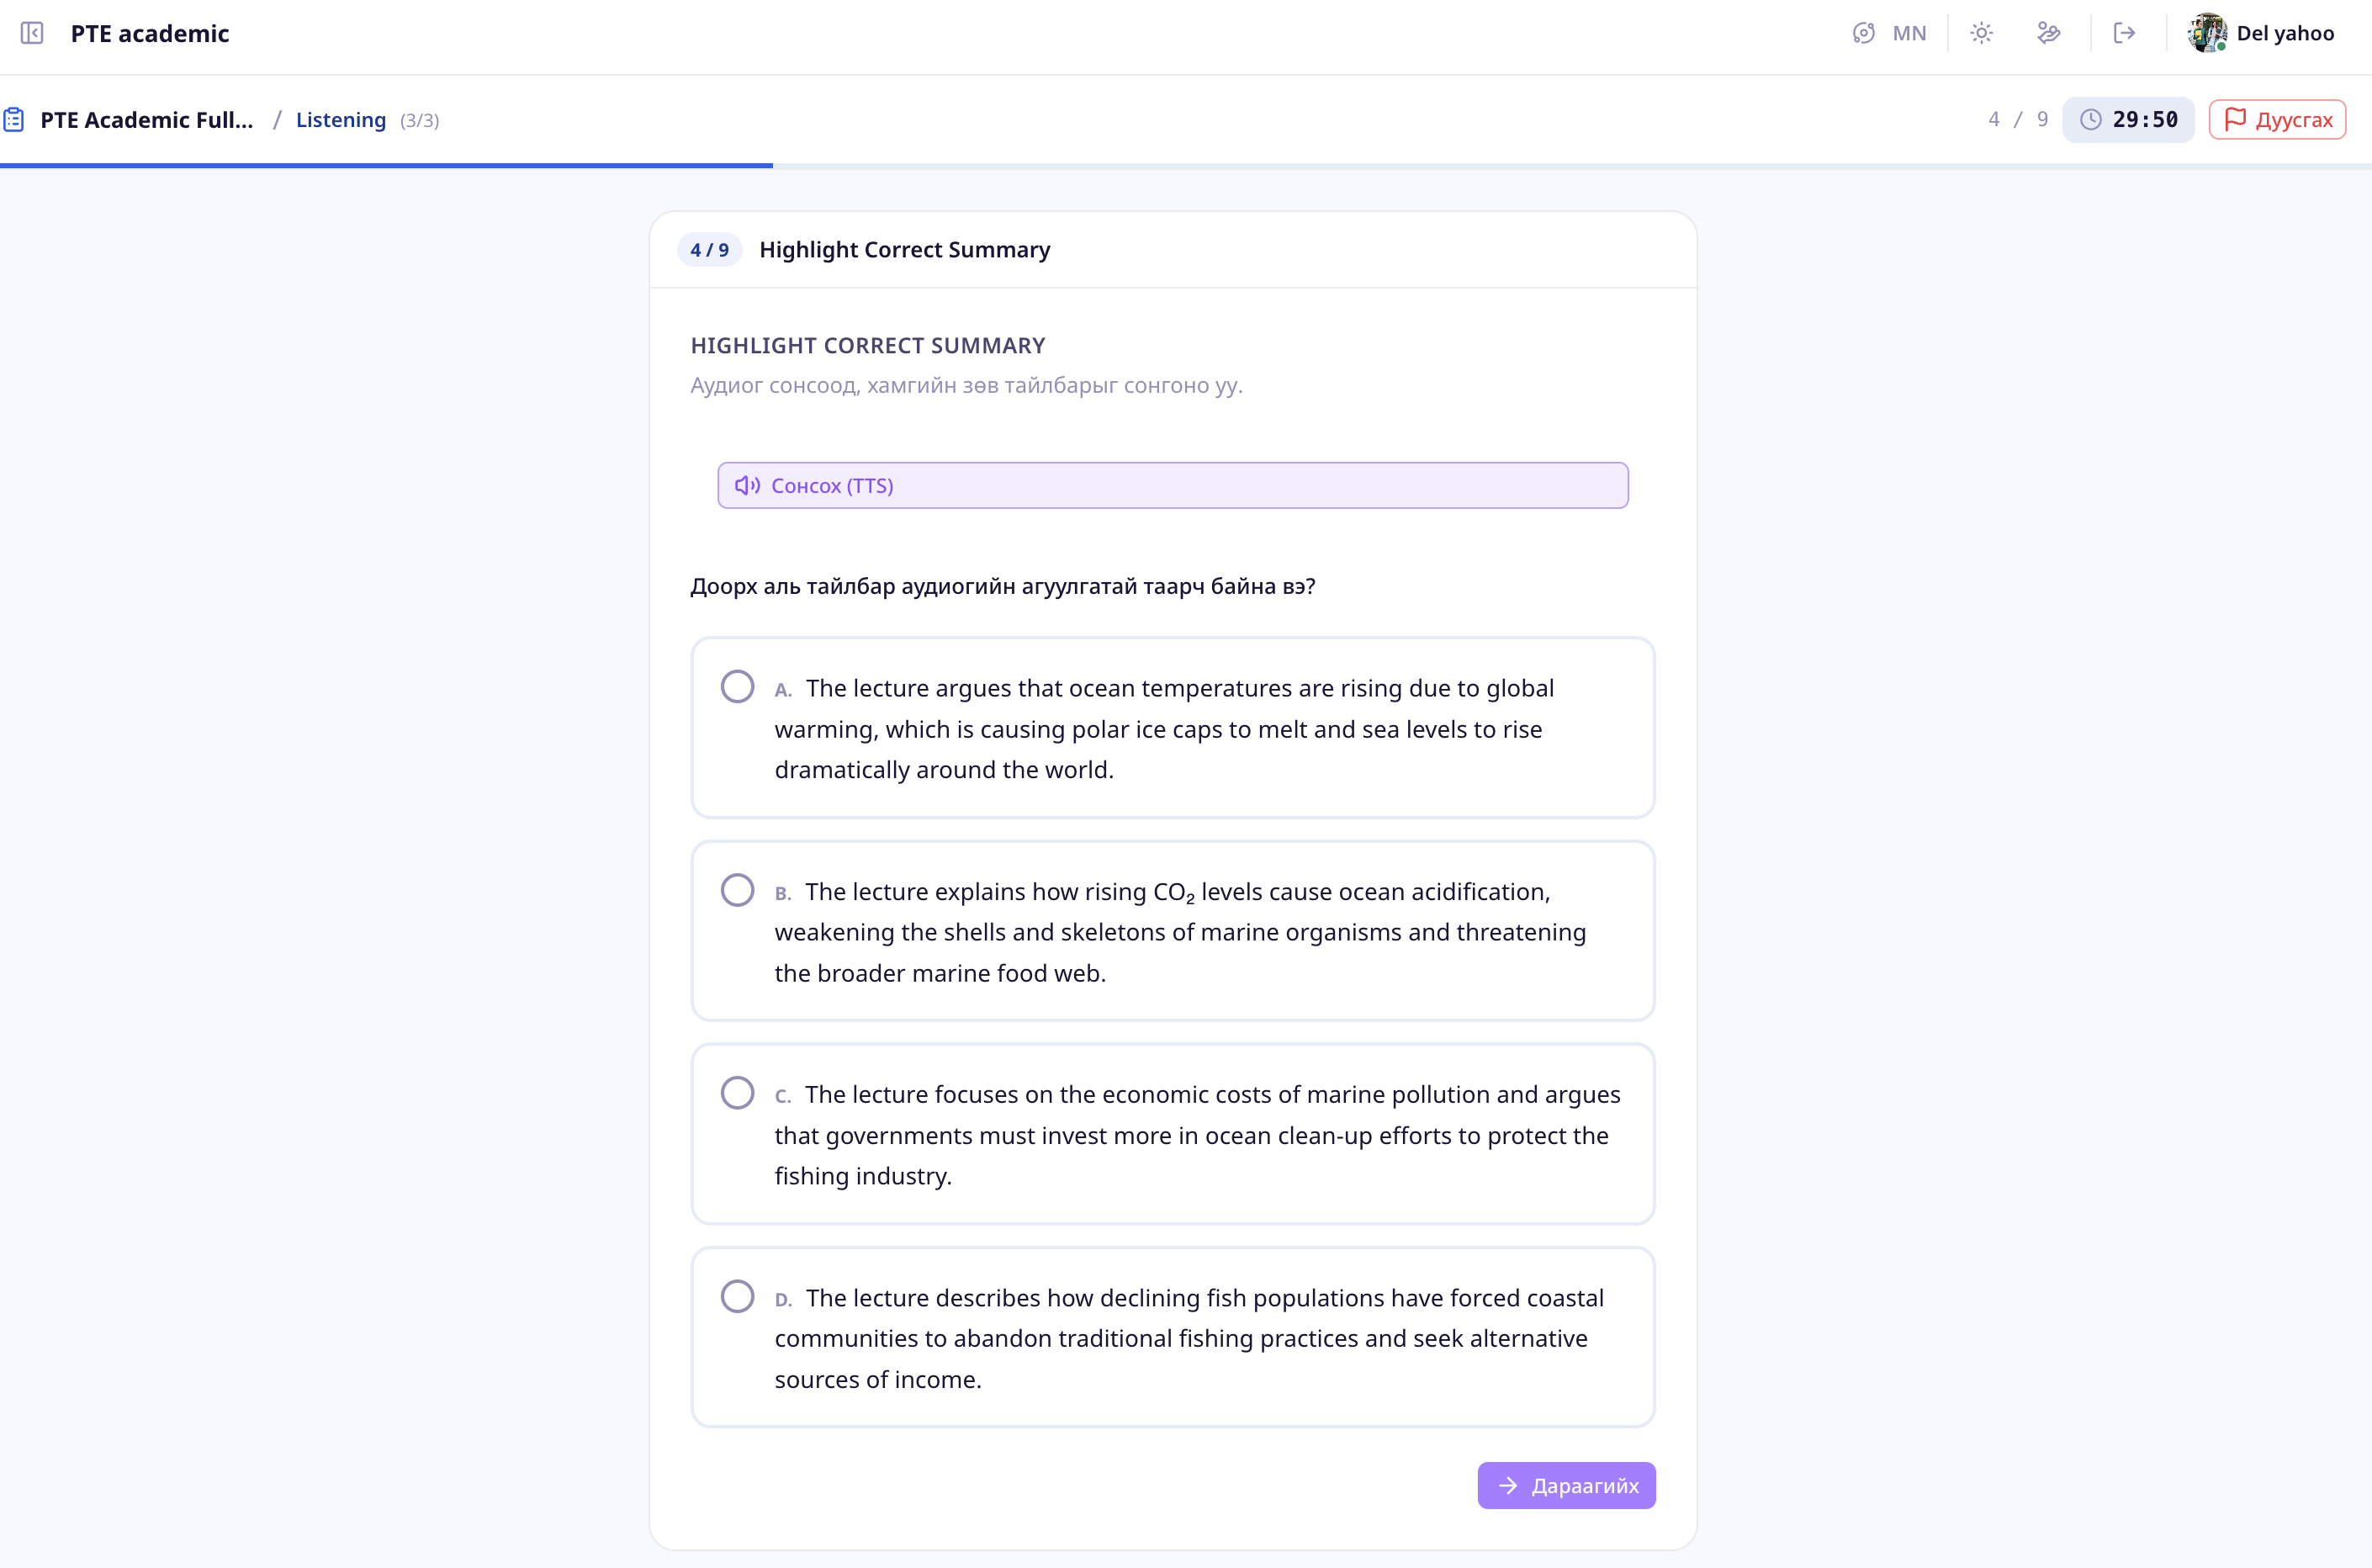
12. Mock Test
A Mock Test is a full-length practice test built by your community's teacher. It's timed and combines multiple question types.
12.1 Choosing a test
- Click Mock Test in the left sidebar.
- Browse the list of available tests.
- Click a test to see its duration, question count, and scoring.
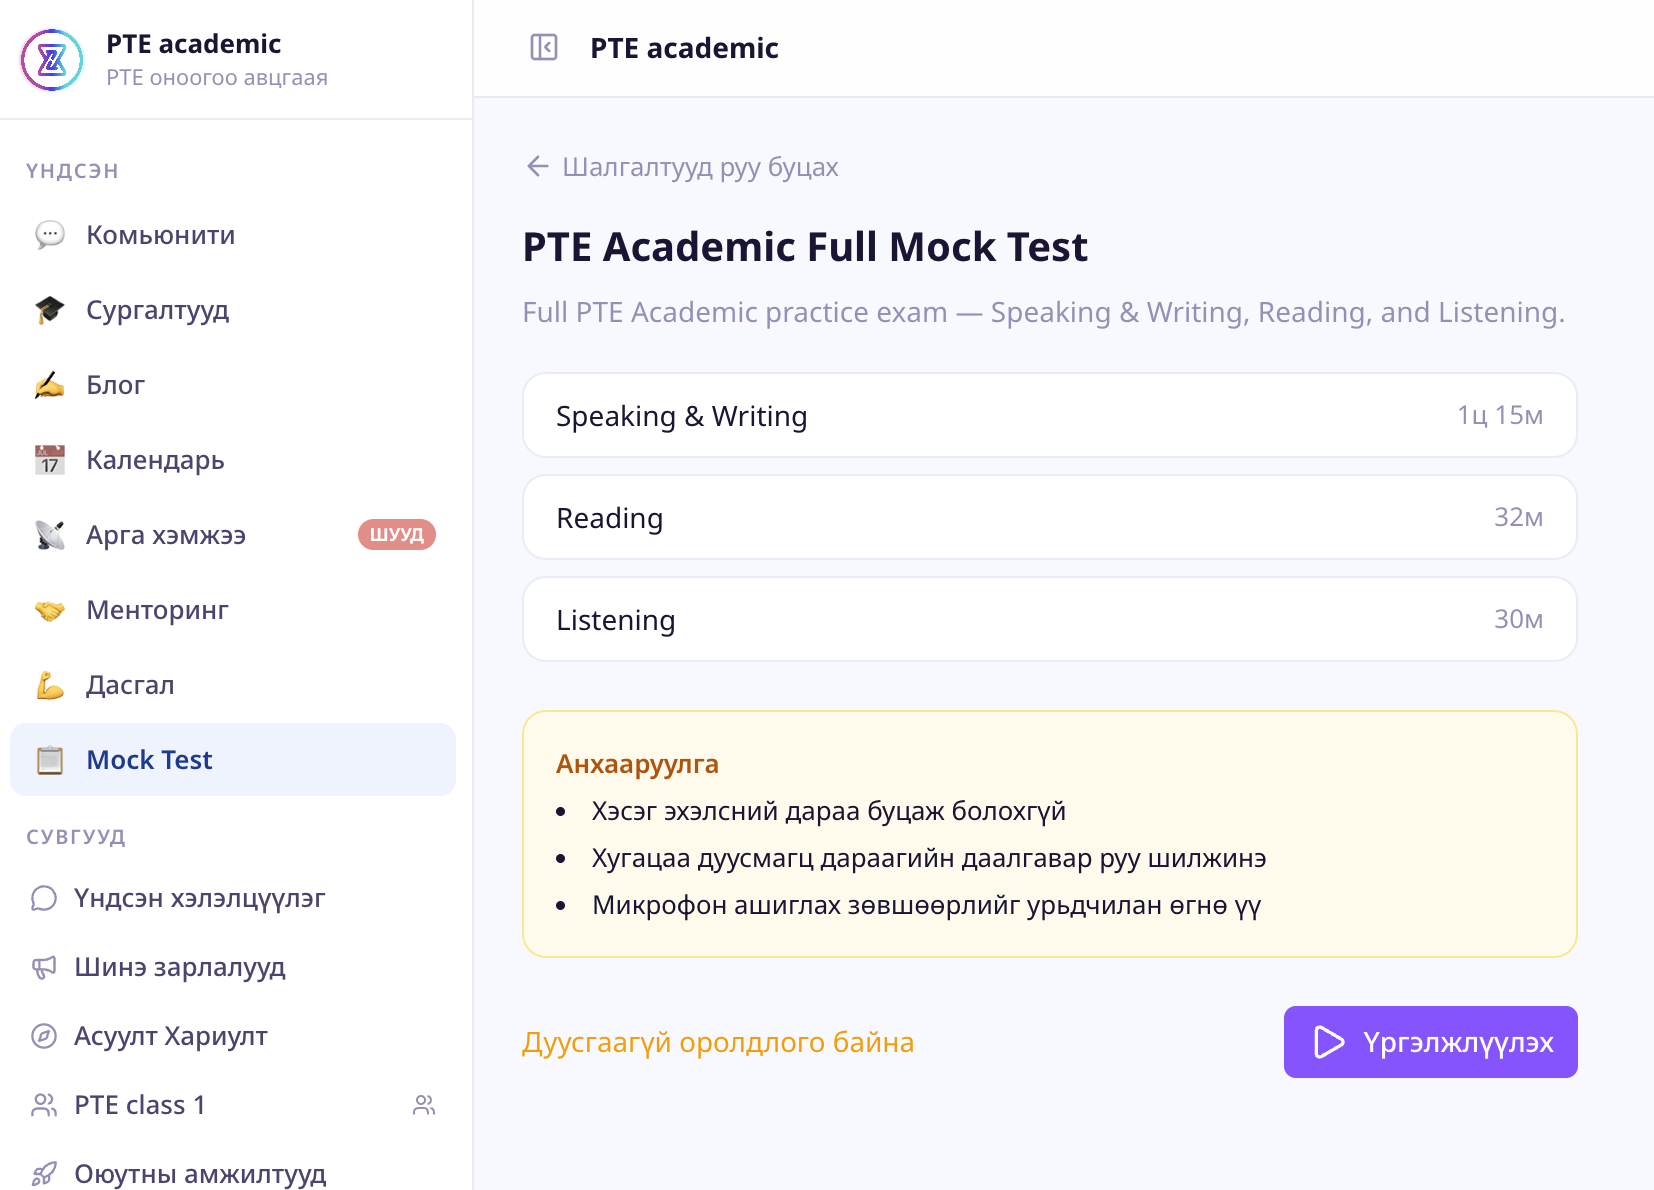
12.2 Taking a test
- Click "Start". The timer begins.
- Answer each question, then click "Next".
- At the end, click "Submit" to finish.
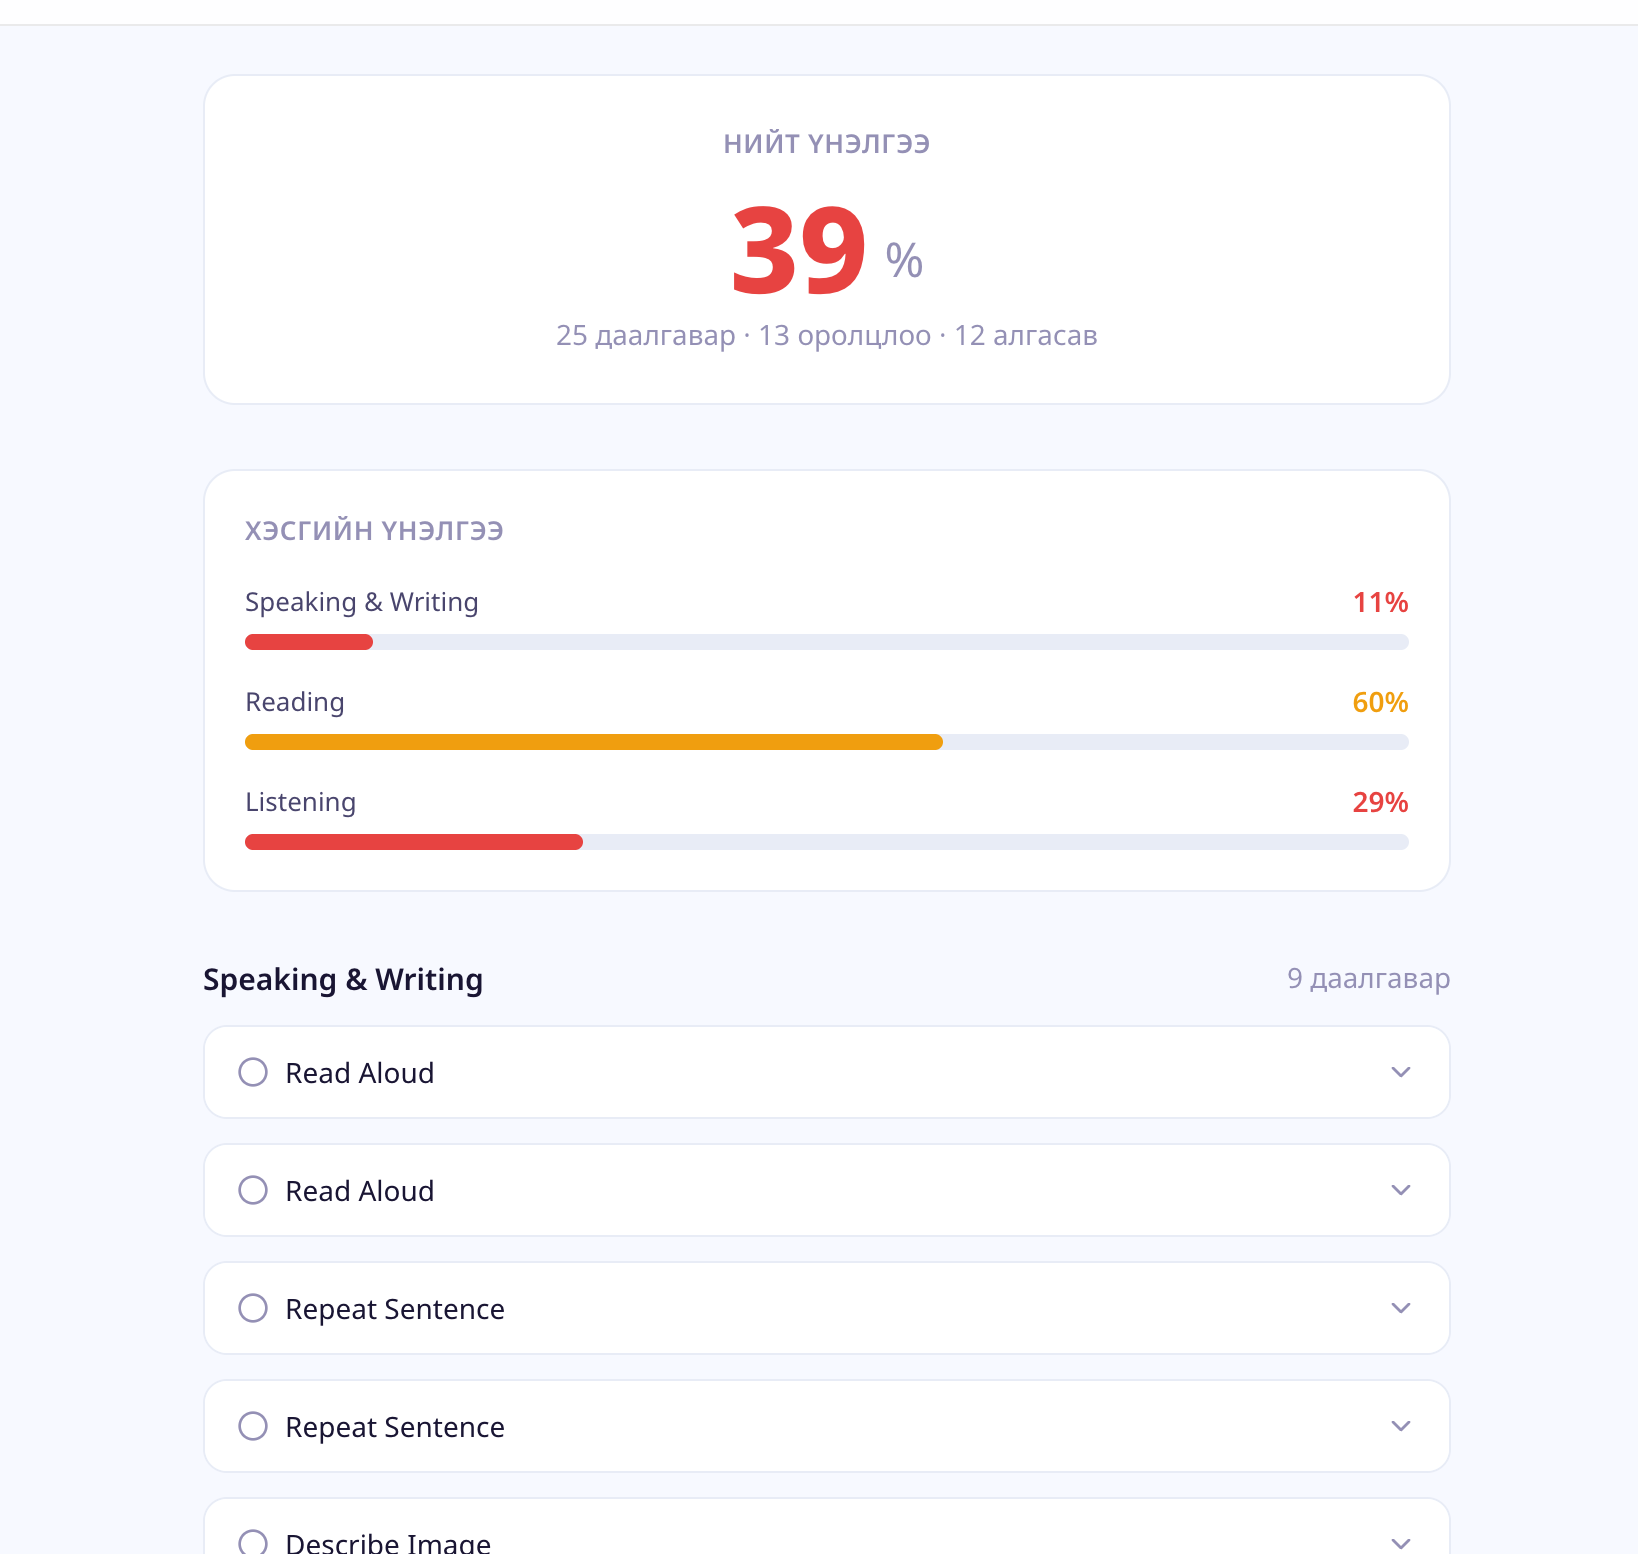
12.3 Viewing results
Right after submitting you're taken to the results page, which shows:
- Total score and percentage
- Correct / incorrect answers
- Explanations for each question
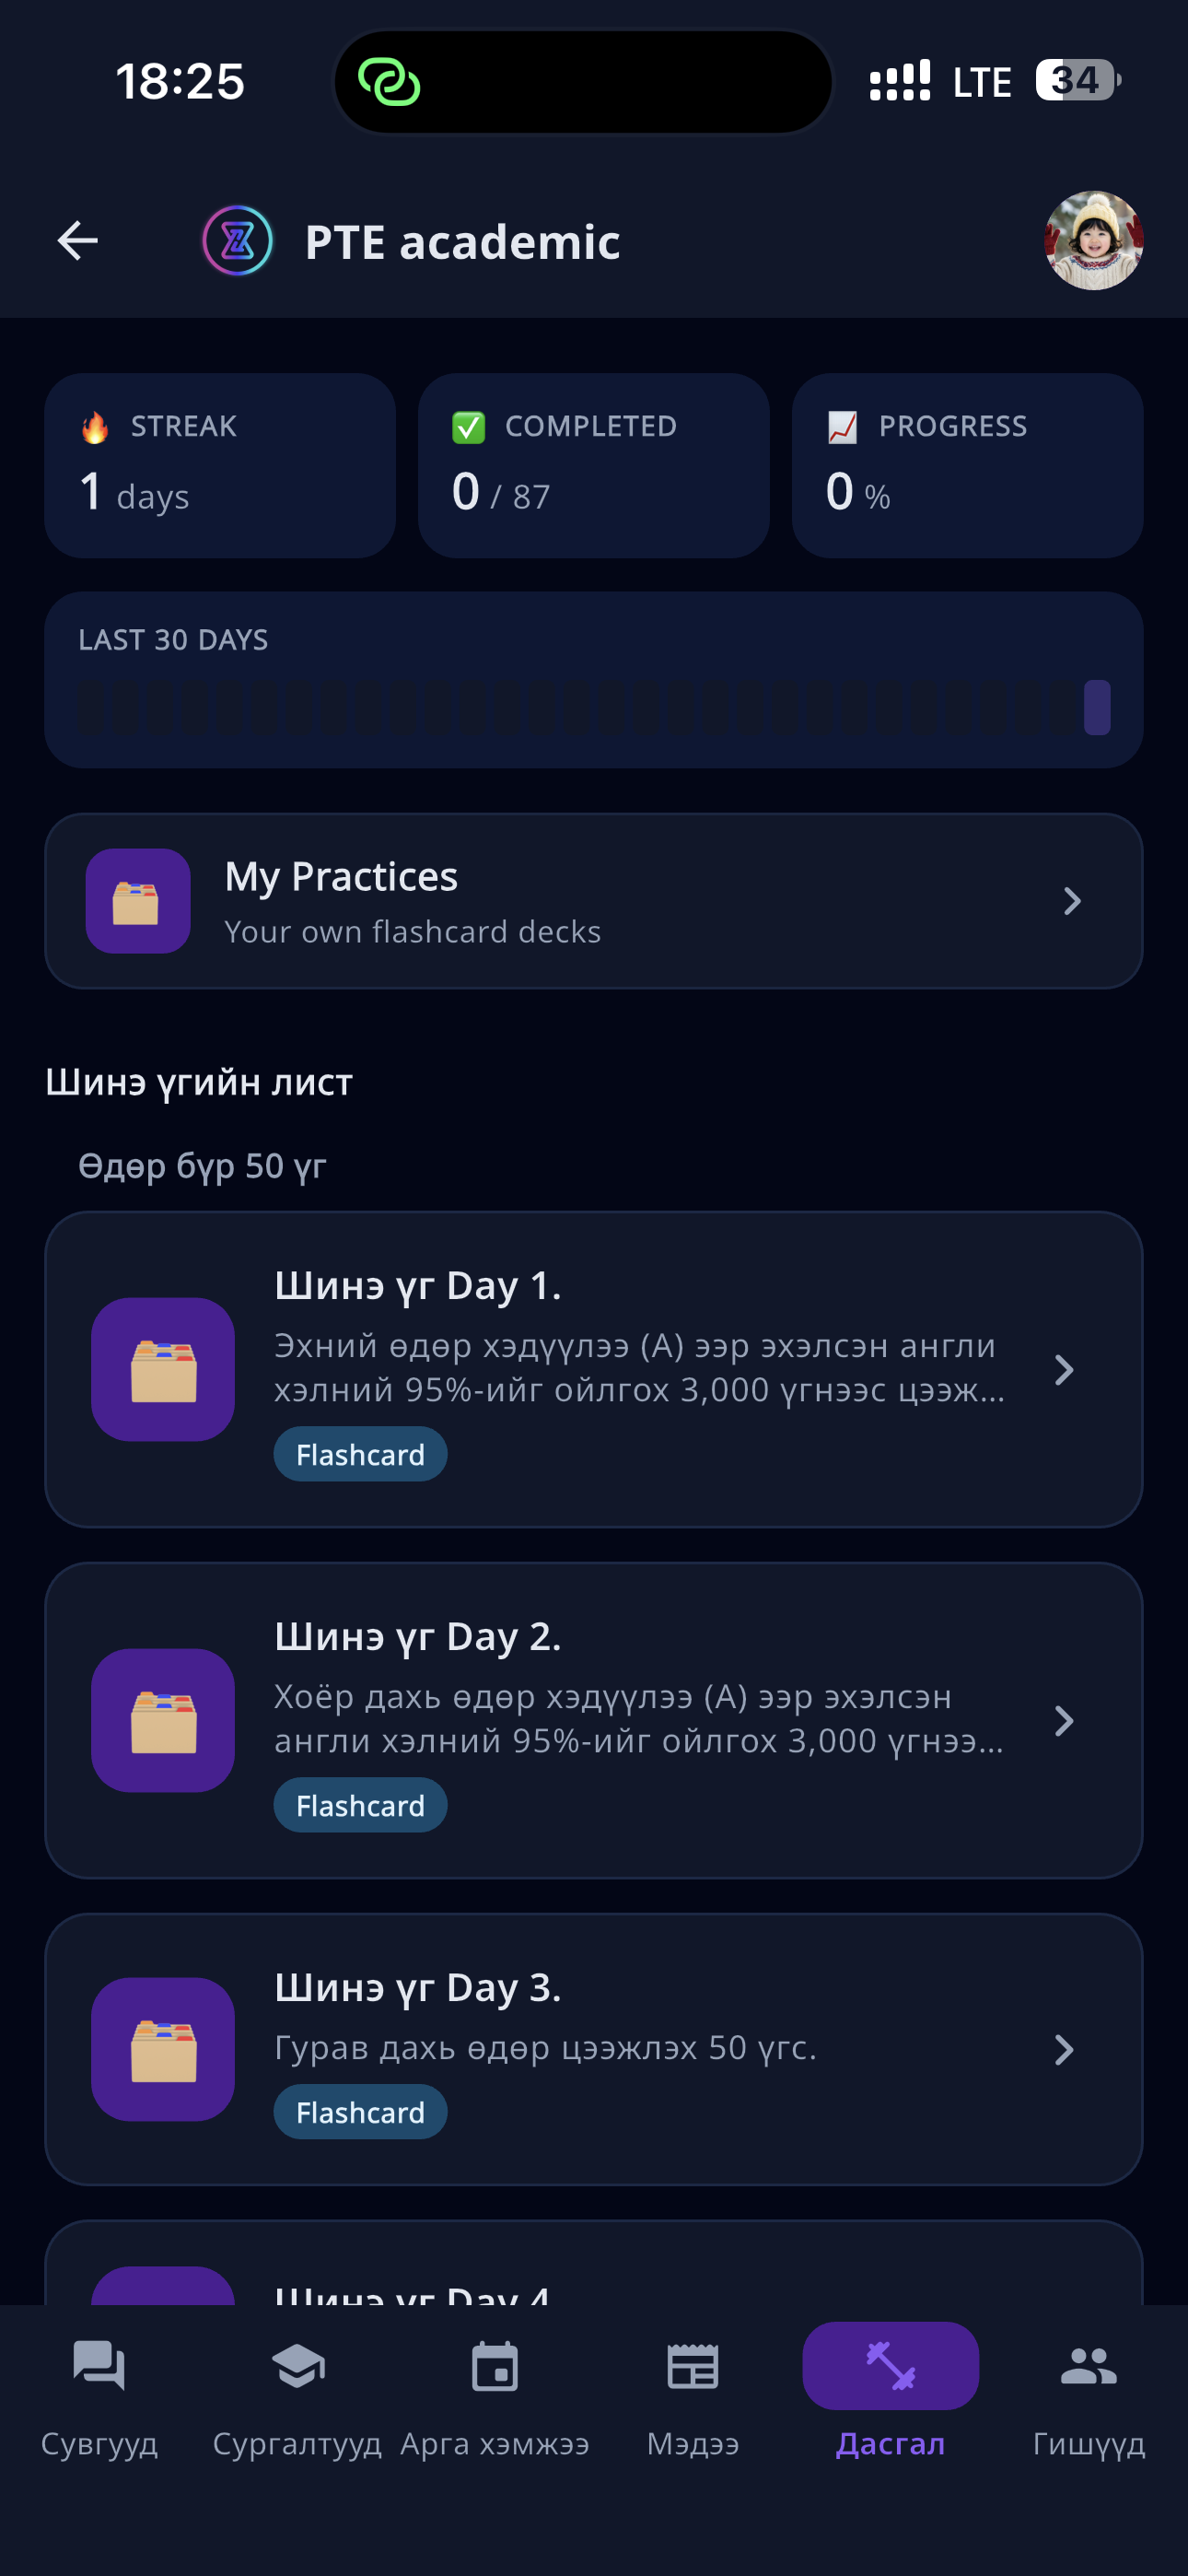
13. Practice
The Practice module is one of the most important parts of the platform. Short, repetitive exercises help you build mastery — flashcards, quizzes, writing, speaking, listening, and more.
13.1 Practice types (overview)
Open the Practice section to see all available exercises, organized by type and difficulty.
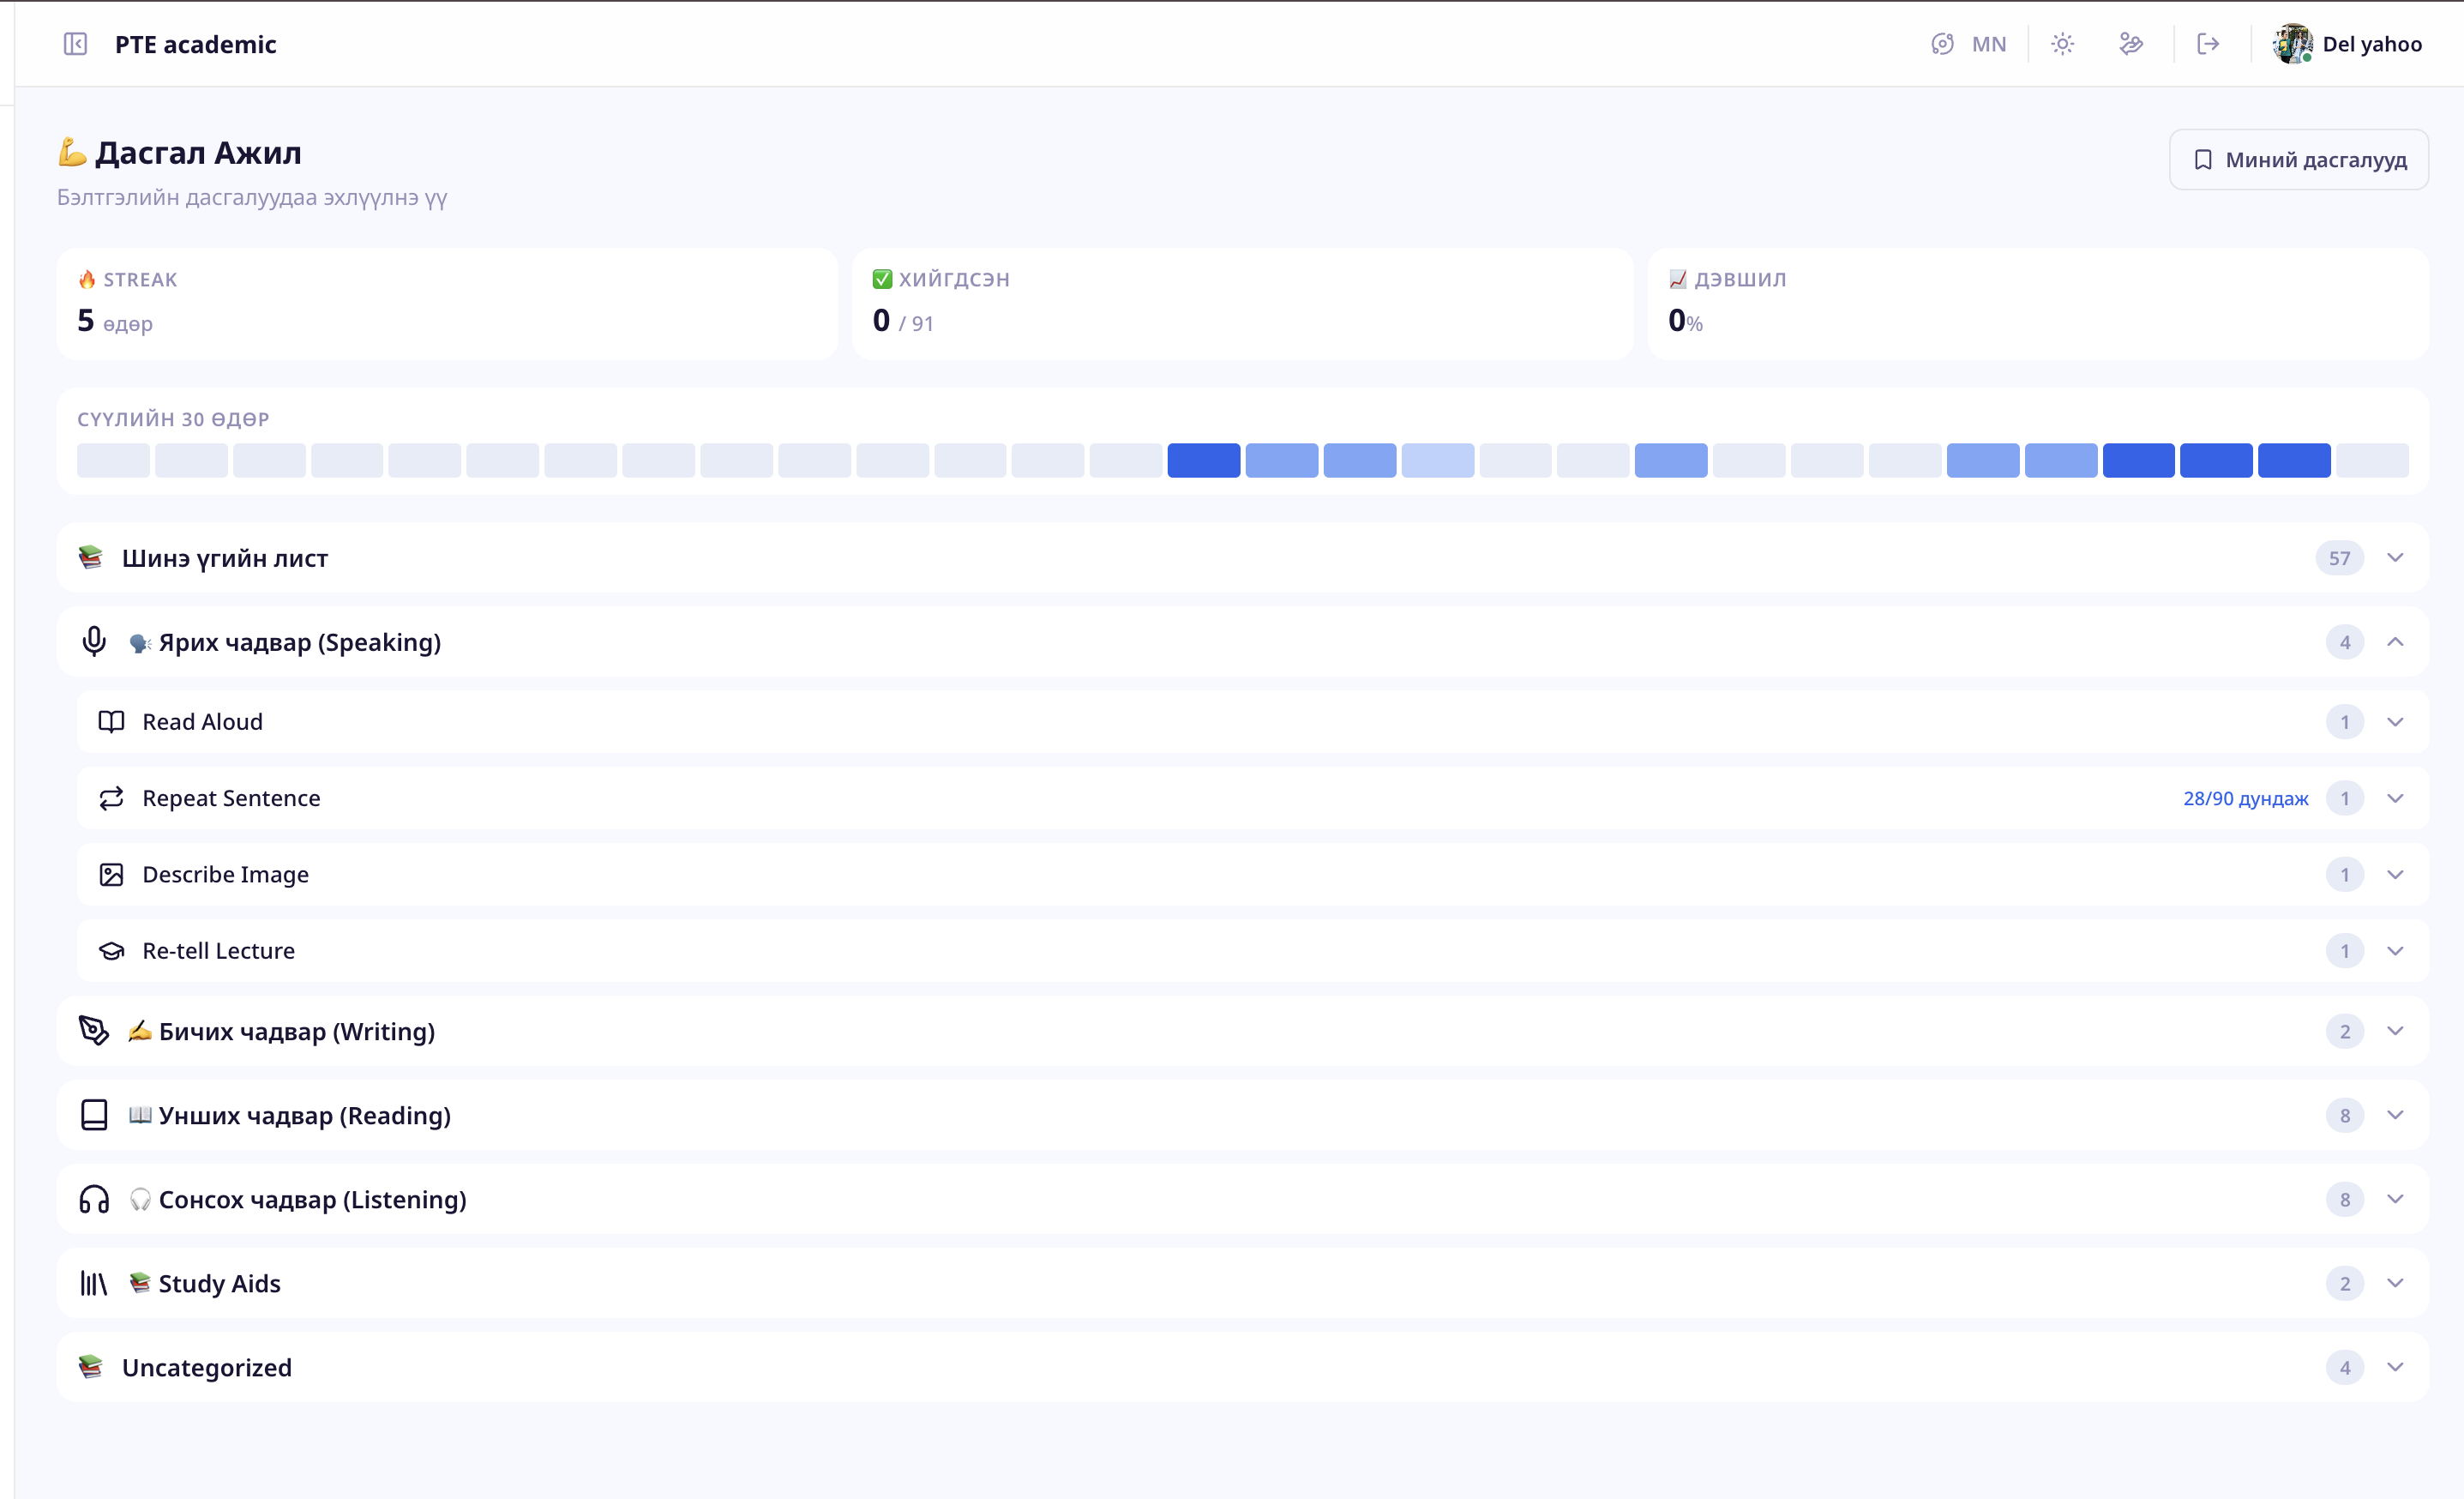
The platform supports the following exercise types:
- Flashcard — memorize words and definitions with cards
- Multiple Choice (single) — pick one correct answer
- Multiple Choice (multi) — pick all correct answers
- Fill Blanks (drag) — drag words into the right blank
- Fill Blanks (select) — pick the right word from a dropdown
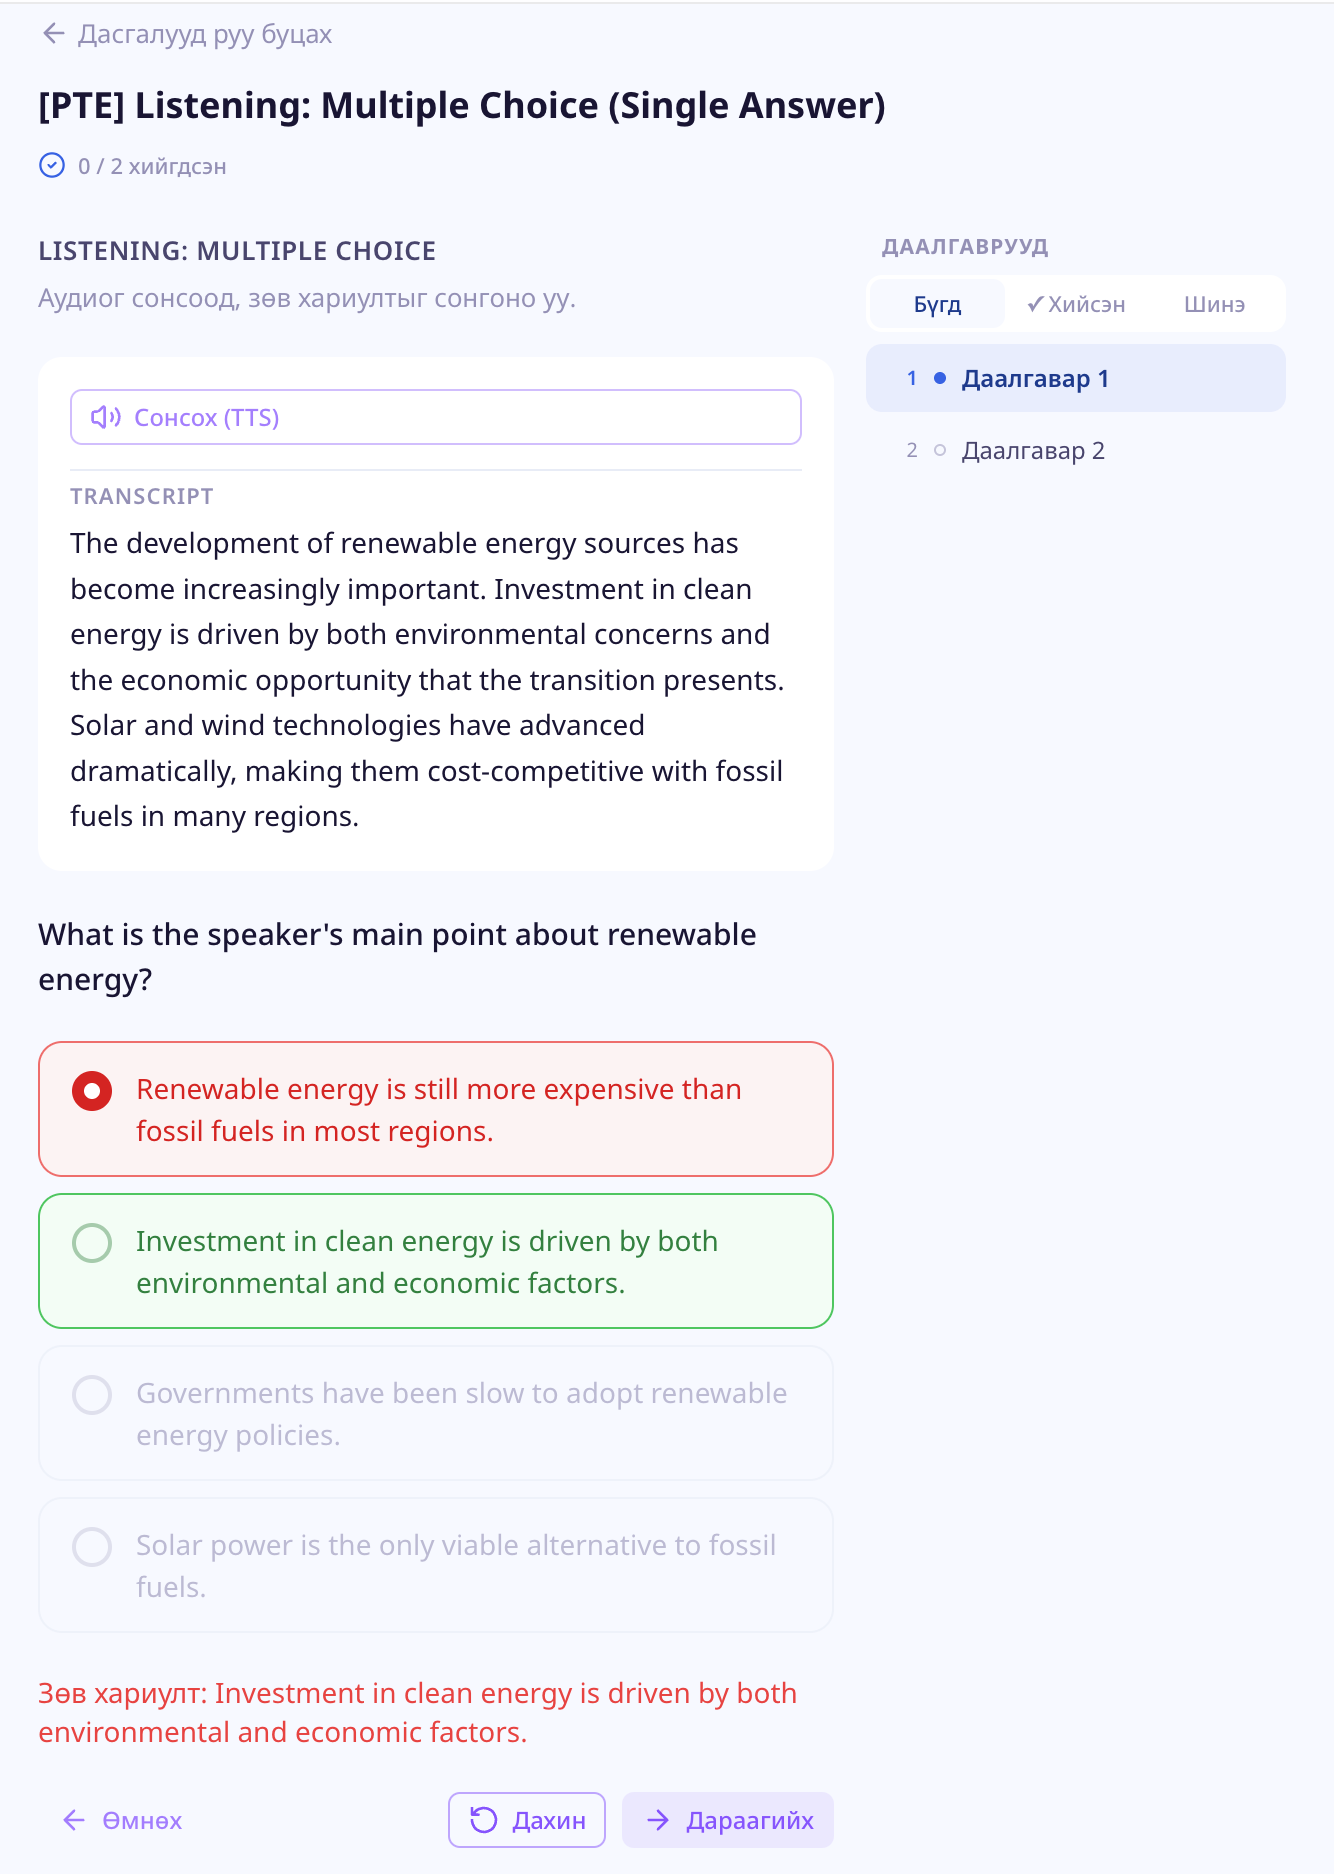
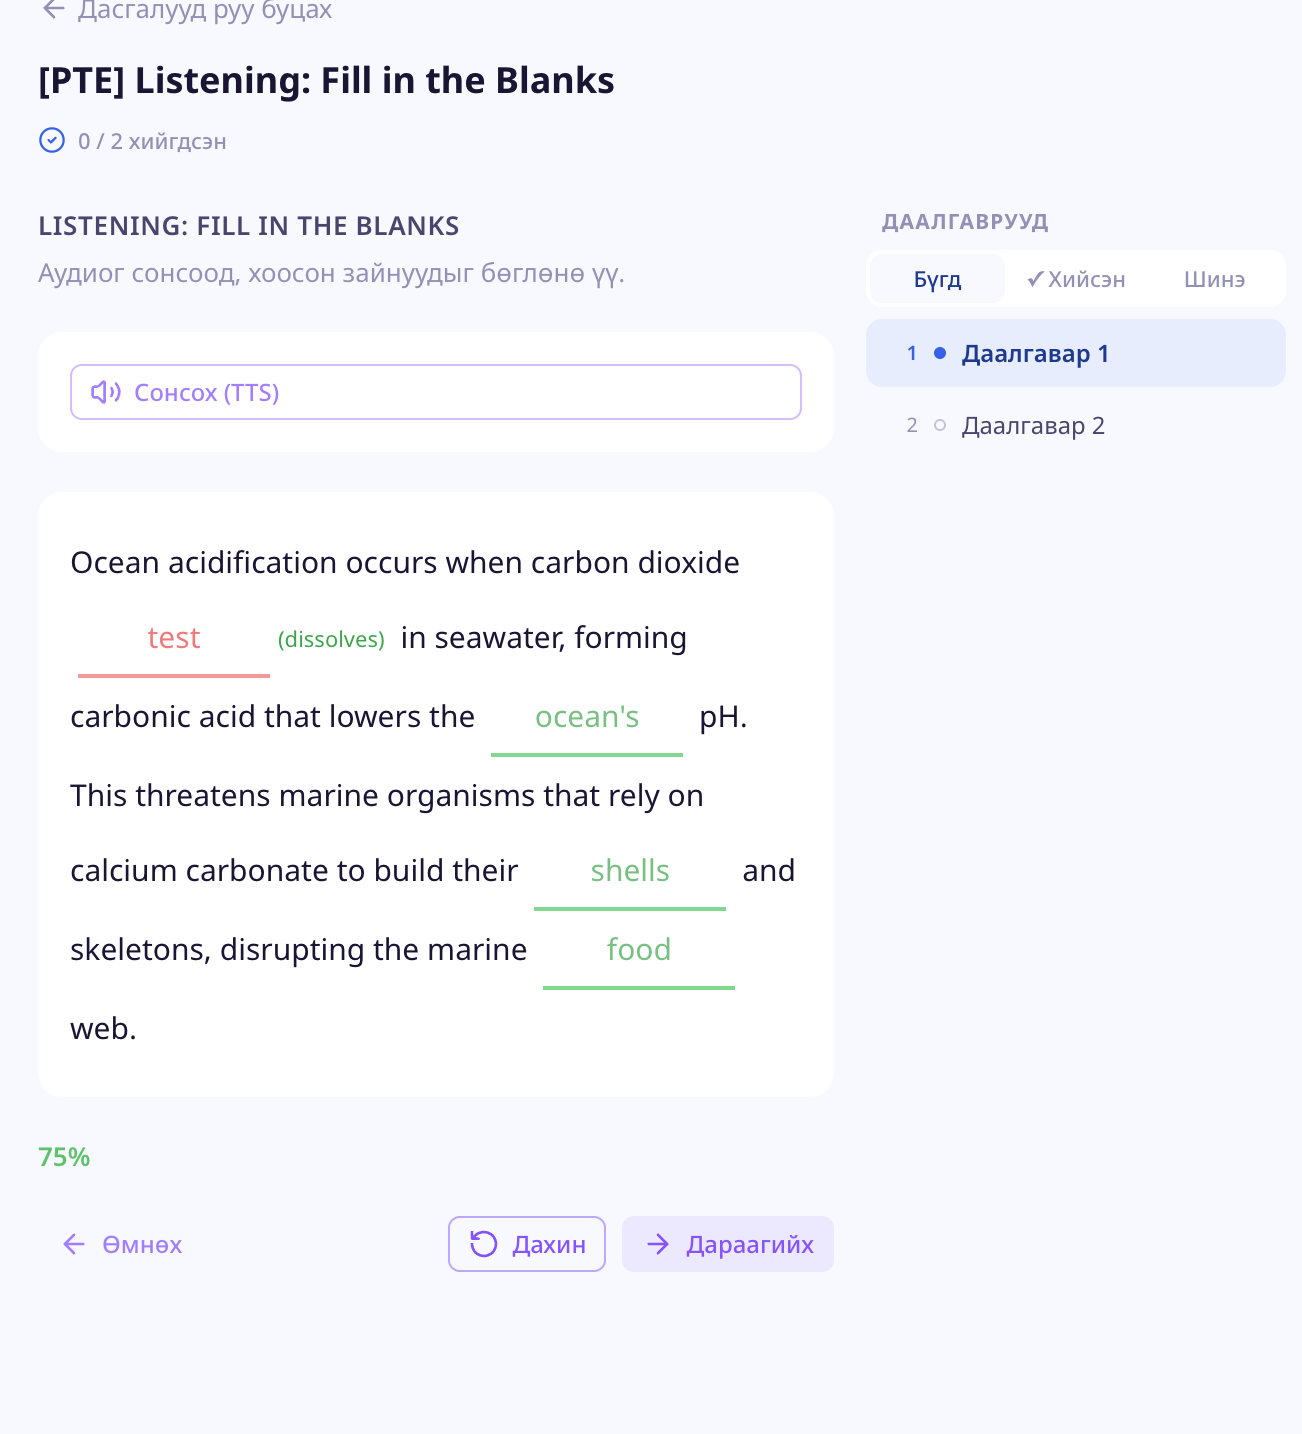
- Listening Fill Blanks — listen to audio, then fill in blanks
- Listening Multiple Choice — listen and answer
- Highlight Words — mark matching words in a text
- Reorder Paragraphs — put paragraphs in the right order
- Select Missing Word — pick the missing word
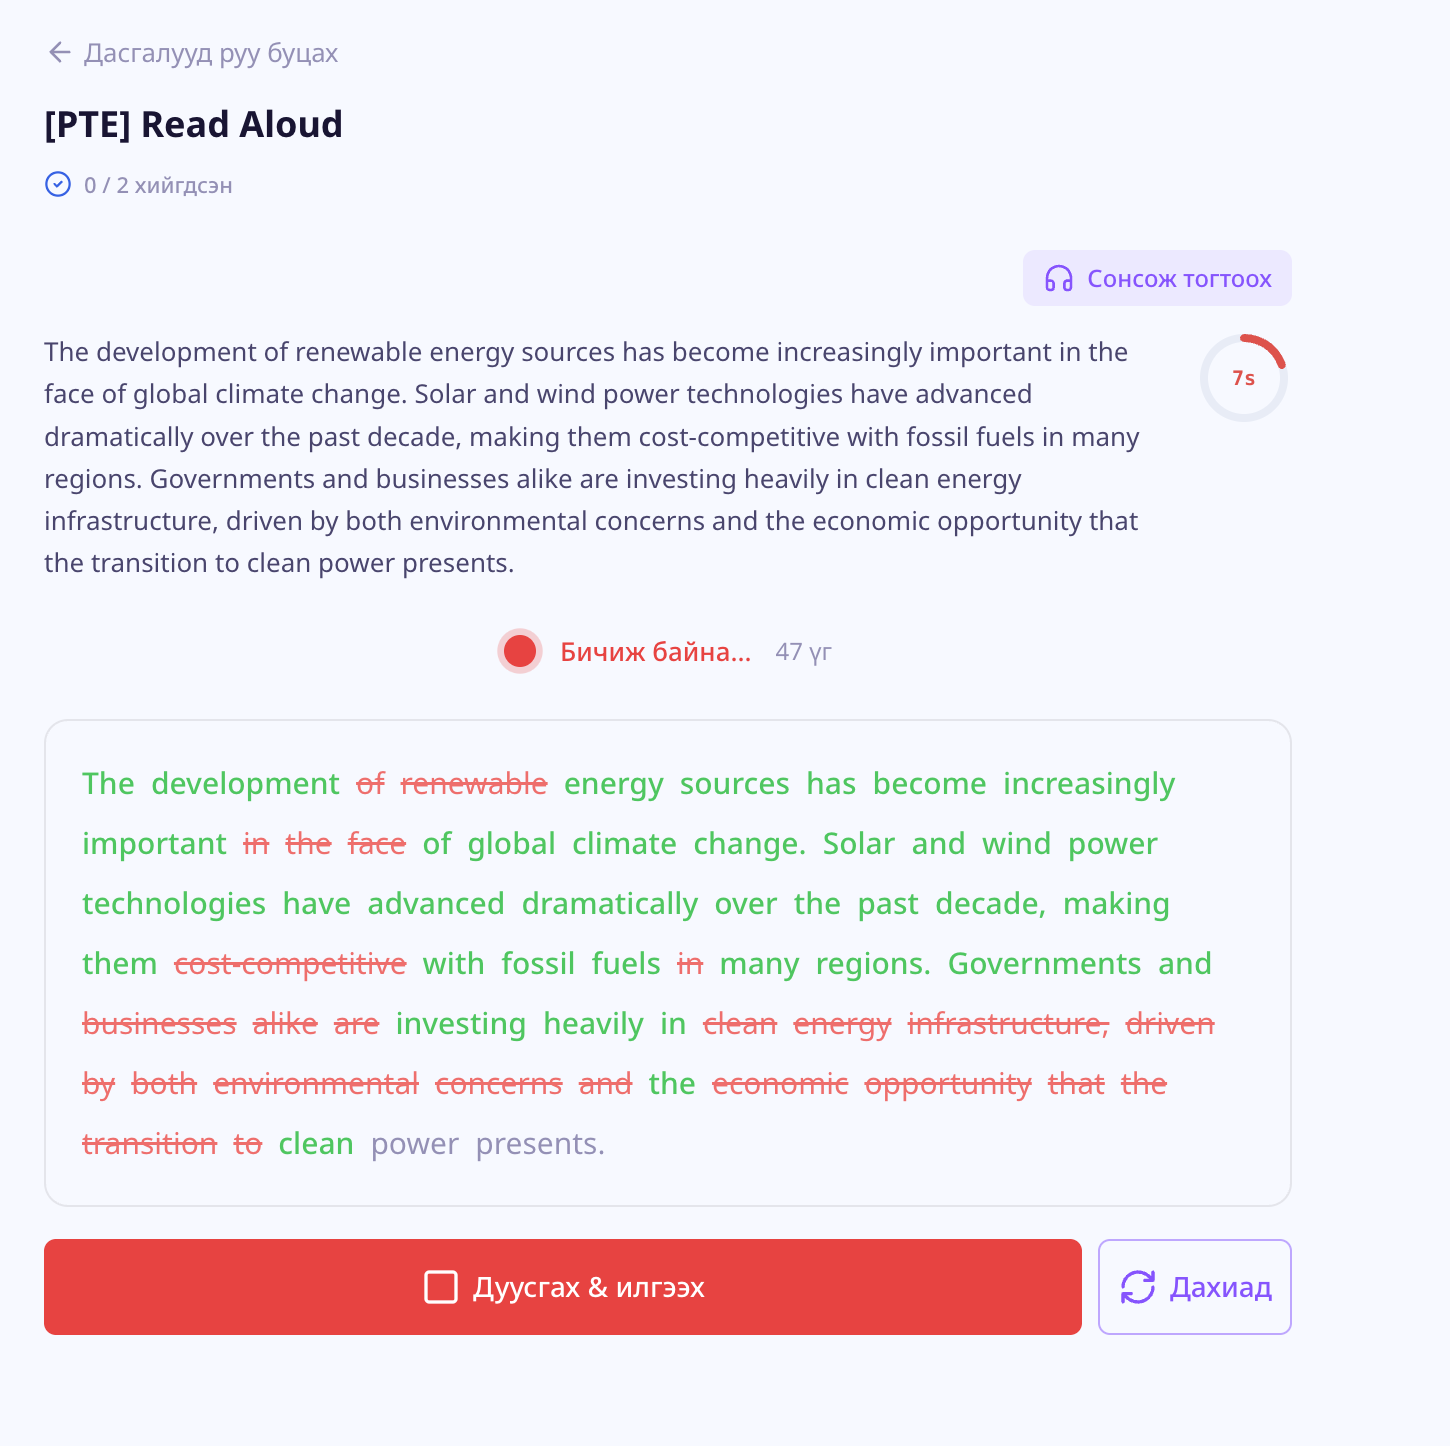
- Speaking — record yourself answering and submit
- Describe Image — talk through what's in an image
- Respond to Situation — respond verbally to a written scenario
- Audio Response — answer an audio question by voice
- Retell Lecture — listen to a lecture, then retell it in your own words
- Summarize Spoken — summarize spoken audio
- Summarize Written — summarize a written passage
- Highlight Correct Summary — pick the correct summary
- Summarize Group Discussion — summarize a group discussion
- Write Dictation — type what you hear
- Timed Writing — write an essay within a time limit
- Answer Short Question — short-answer questions
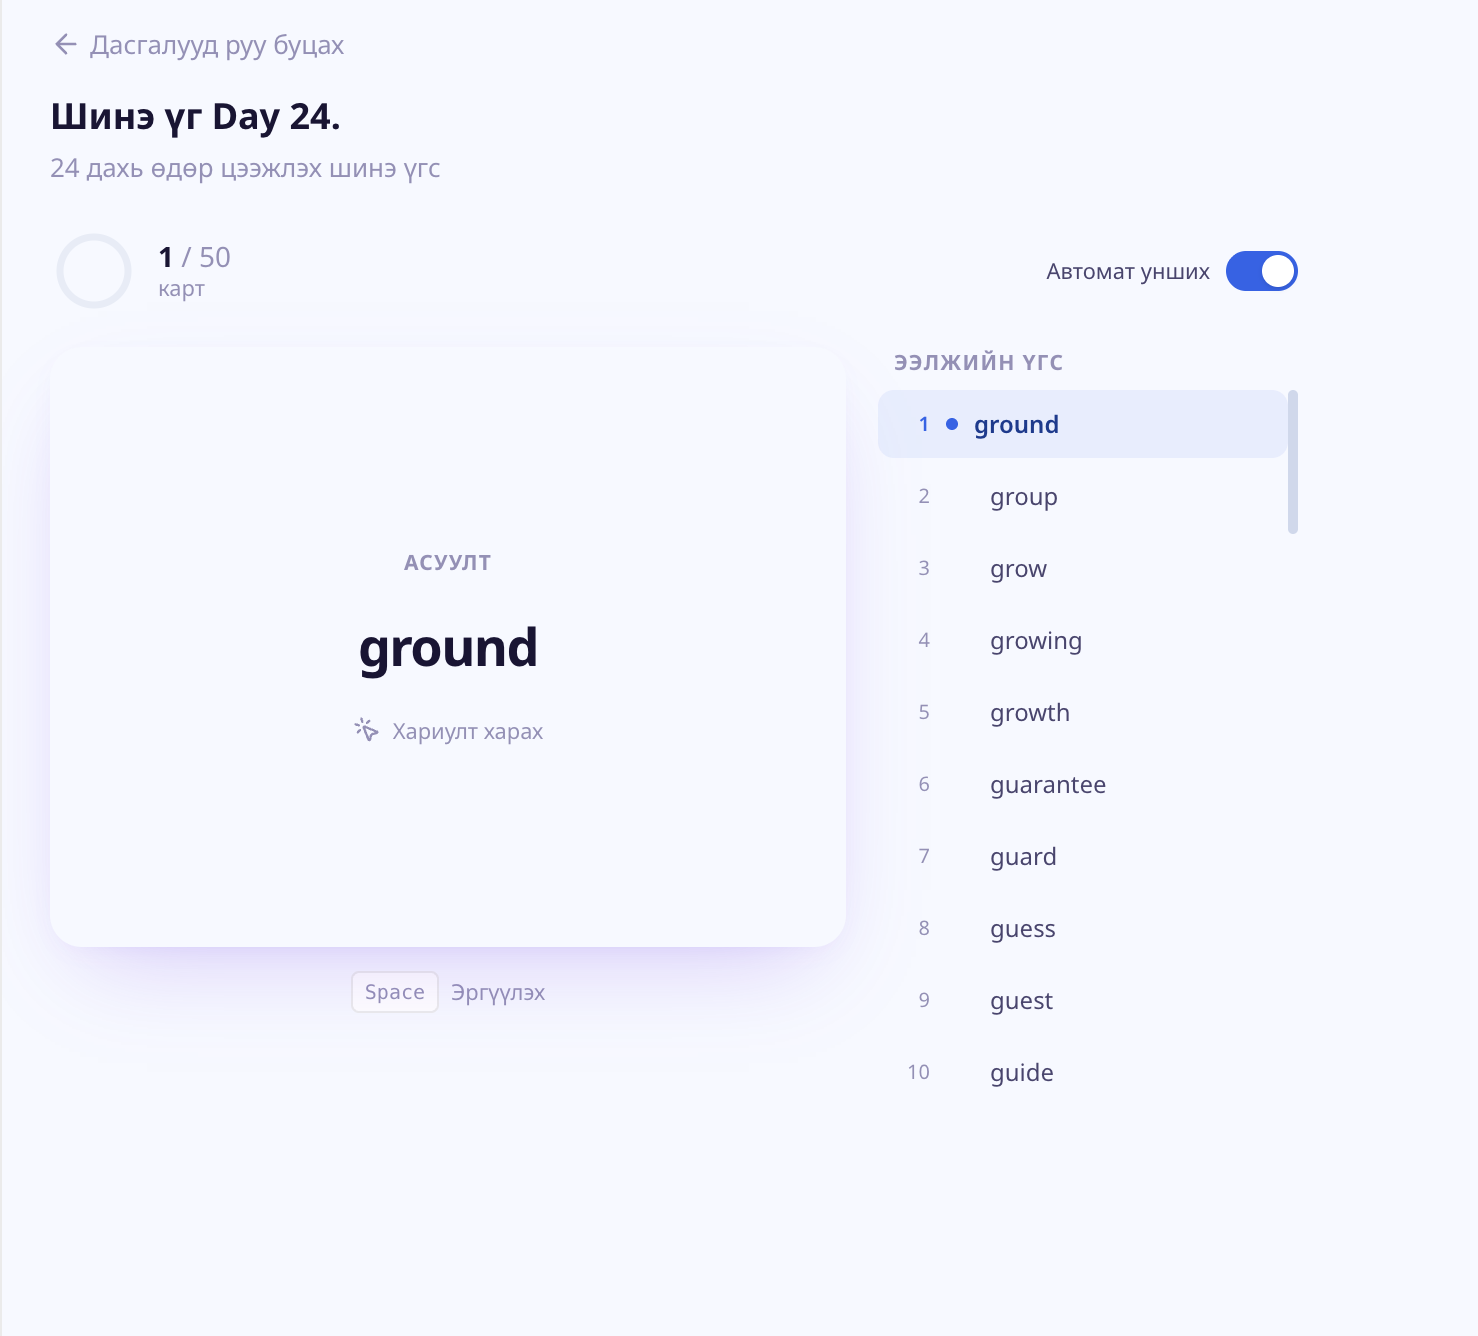
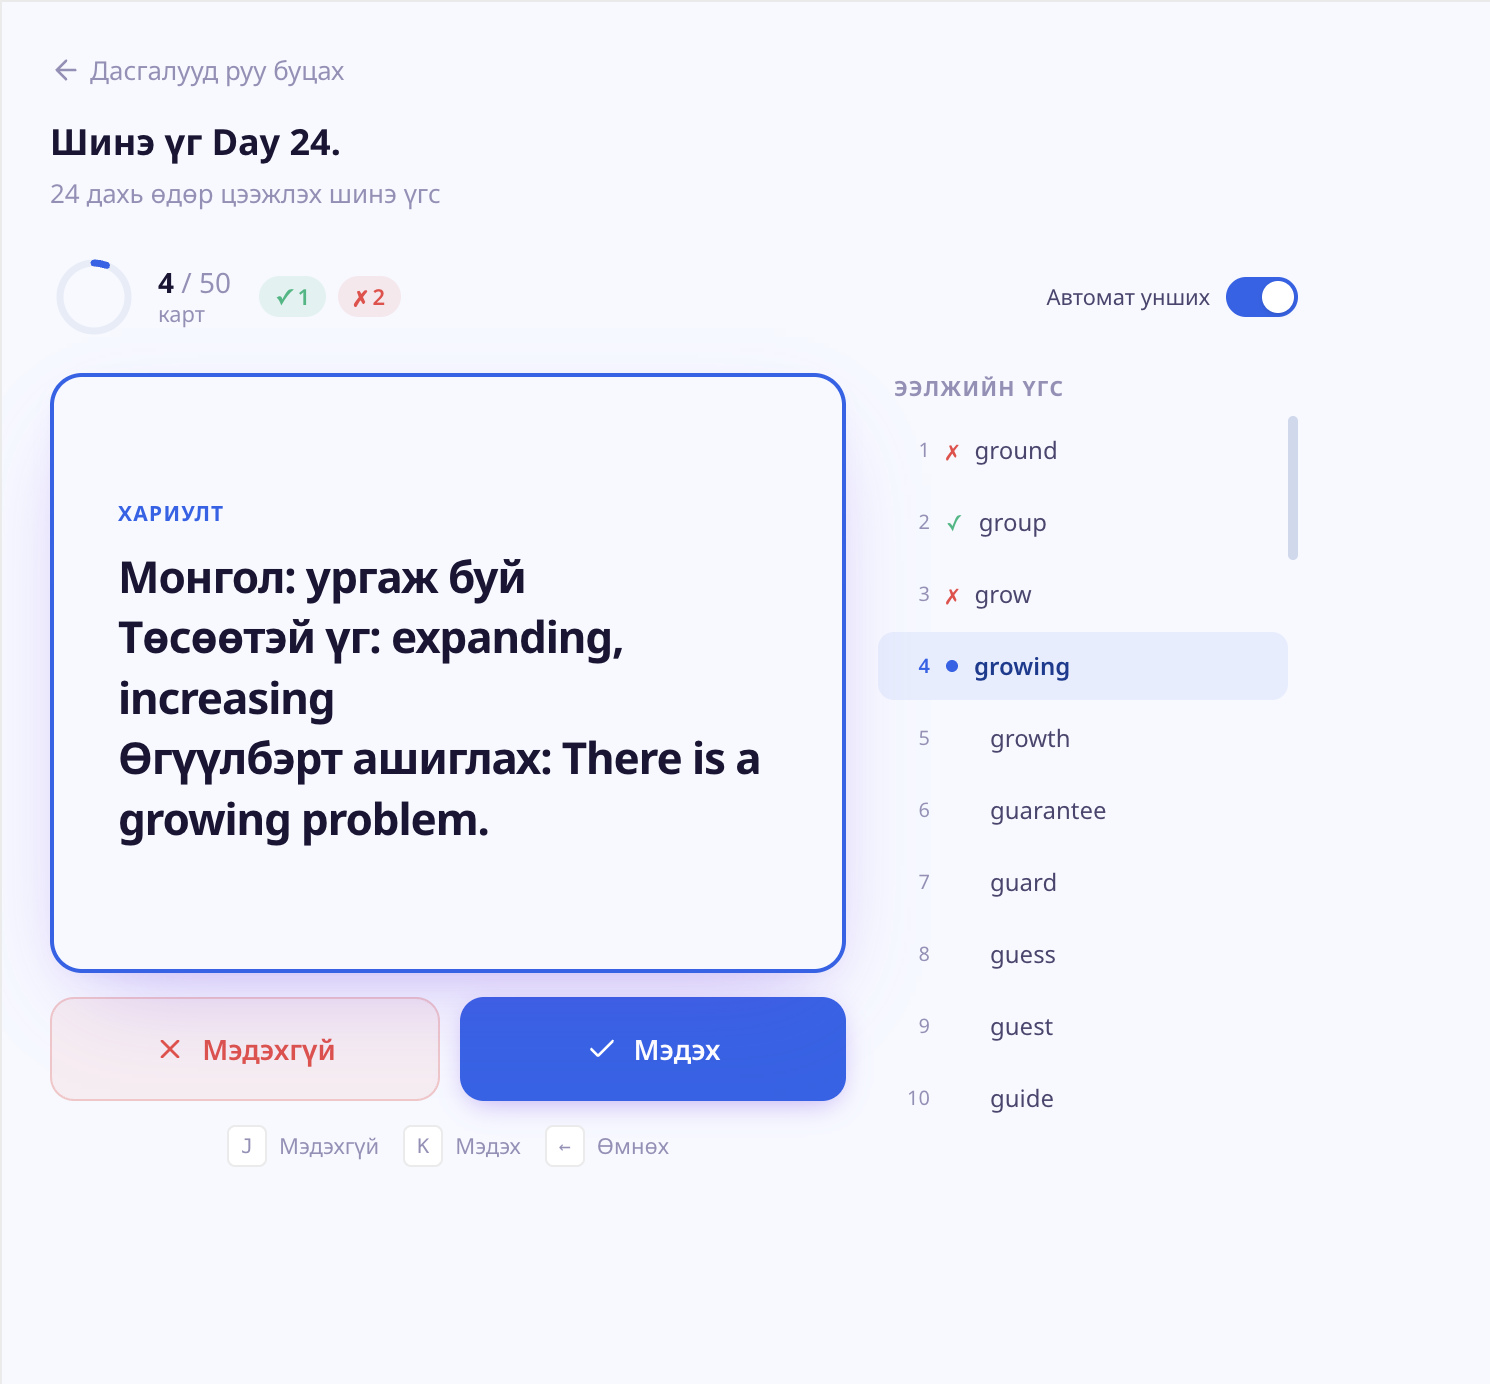
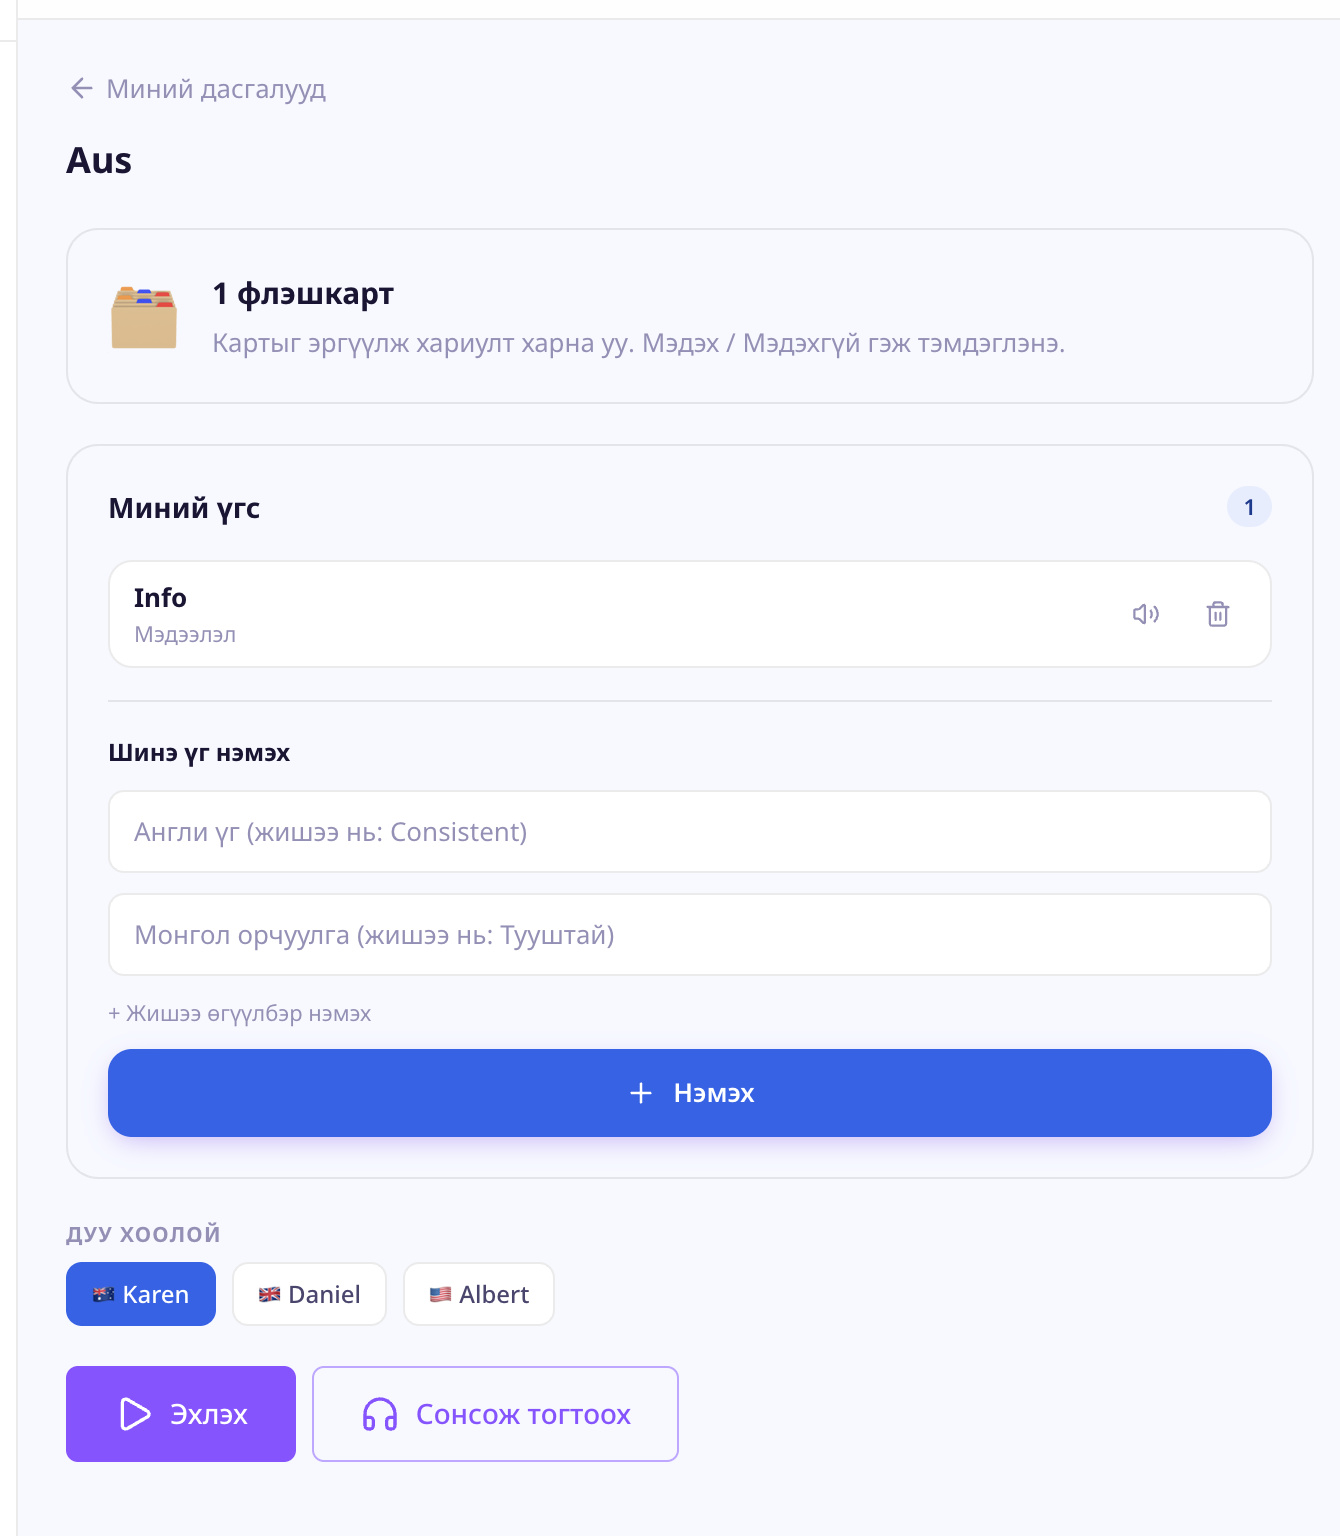
13.2 Flashcard — detailed walkthrough
Flashcards are the most effective way to memorize vocabulary and concepts.
- Open any Flashcard exercise to start.
- A card appears (front: prompt; back: answer).
- Click the card to flip it and check the answer.
- After seeing the answer, choose:
- Know — the card returns less frequently
- Don't know — the card returns sooner
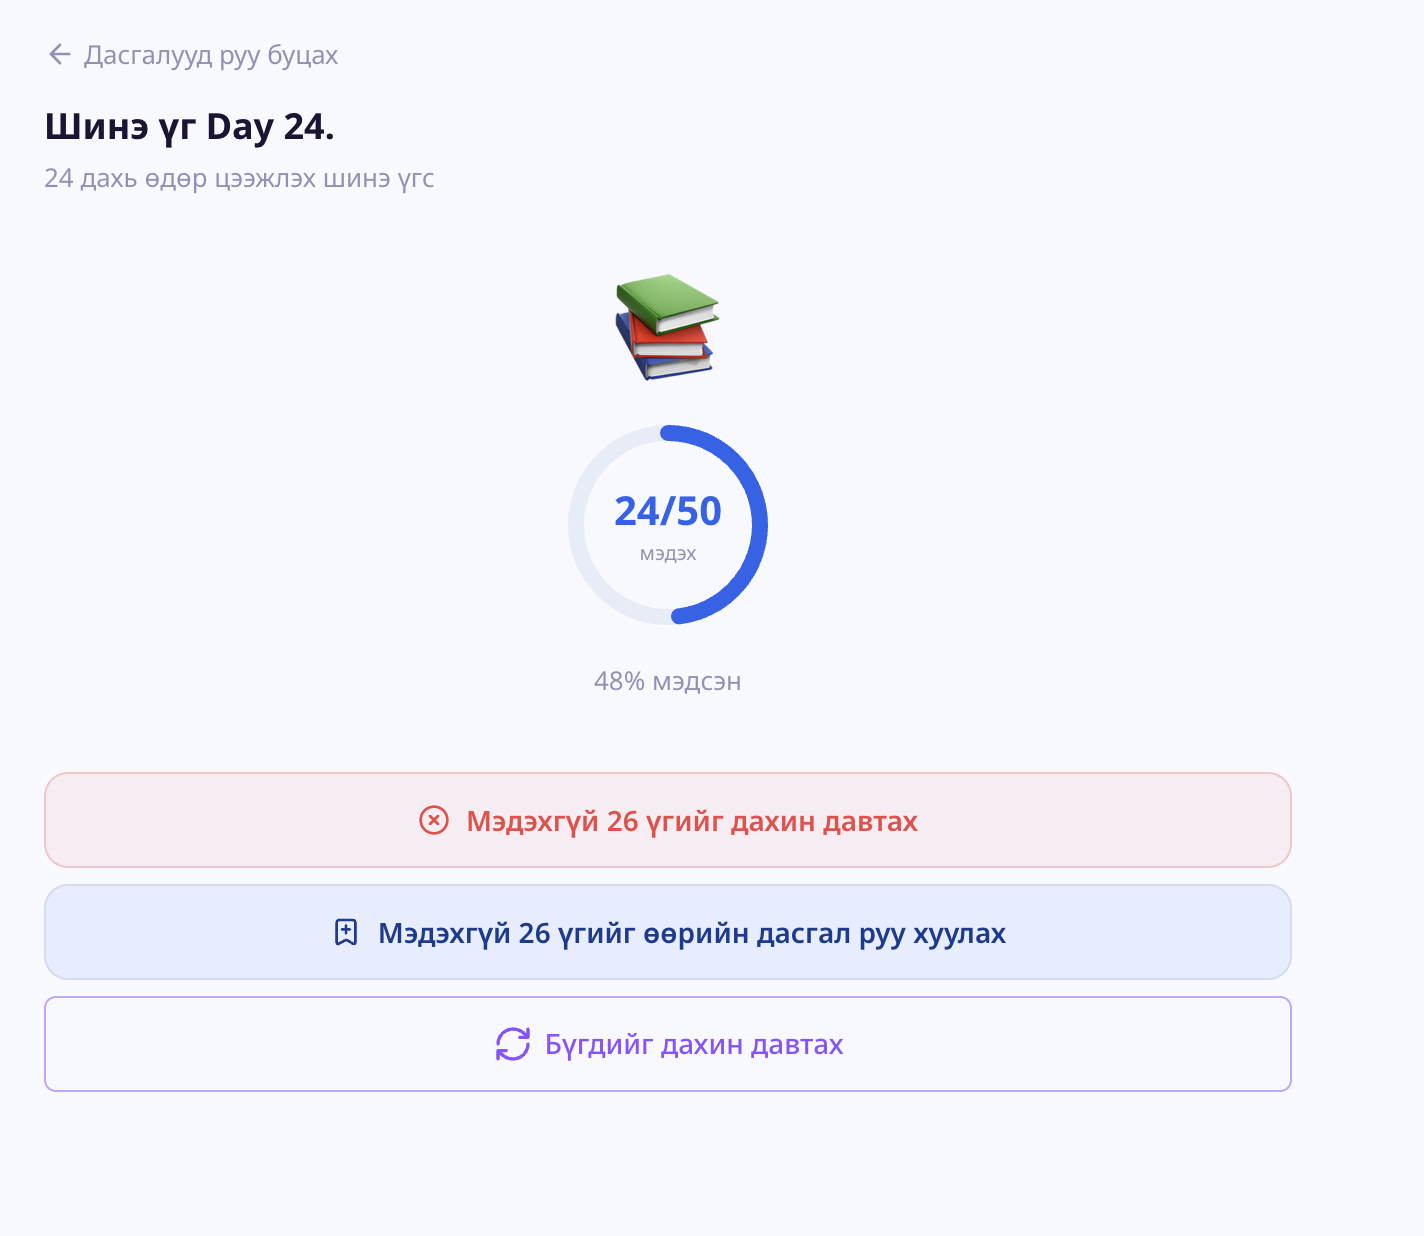
- Once you've finished the deck, you'll see your total score and the count of cards that need more review.
13.3 Quiz types (Multiple Choice, Listening MC, Select Missing Word)
- Start the exercise.
- Read (or listen to) the question and click the correct option.
- Single: only one option is correct.
- Multi: several options may be correct — pick all of them.
- Click "Check" to confirm your answer.
- Move to the next question. Your score appears at the end.
13.4 Fill blanks variants
- Fill Blanks (drag) — drag words from the word bank below into the right blanks.
- Fill Blanks (select) — pick from a dropdown at each blank.
- Listening Fill Blanks — first listen to the audio, then fill the blanks. You can replay the audio 2–3 times.
13.5 Writing tasks (Write Dictation, Timed Writing, Summarize Written)
- Write Dictation — listen to audio and type what you hear. Spelling is checked automatically.
- Timed Writing — write an essay on the given topic within a time limit. A word counter is shown on screen.
- Summarize Written — read a passage and write a short summary.

13.6 Speaking tasks
Speaking tasks require your microphone. The first time you use one, allow microphone access in your browser or app.
- Speaking (general) — speak on the given topic.
- Describe Image — describe what's in the image.
- Respond to Situation — read a scenario, then respond out loud.
- Audio Response — listen to an audio prompt and respond by voice.
- Retell Lecture — listen to a lecture and retell it in your own words.
- Click the Record button.
- Finish speaking, then click again to stop.
- Play it back to check — re-record if you're not satisfied.
- Click Submit when ready.
13.7 Other task types
- Highlight Words — highlight specific words within a passage.
- Reorder Paragraphs — drag the shuffled paragraphs into the correct order.
- Highlight Correct Summary — pick the correct summary from several options.
- Answer Short Question — answer short, one-sentence questions.
13.8 My Practices
Every practice attempt is recorded in one place so you can track progress.
- Open "My Practices" inside the Practice section.
- You'll see a history of past attempts with scores and dates.
- Click any entry to resume (if you stopped midway) or restart.
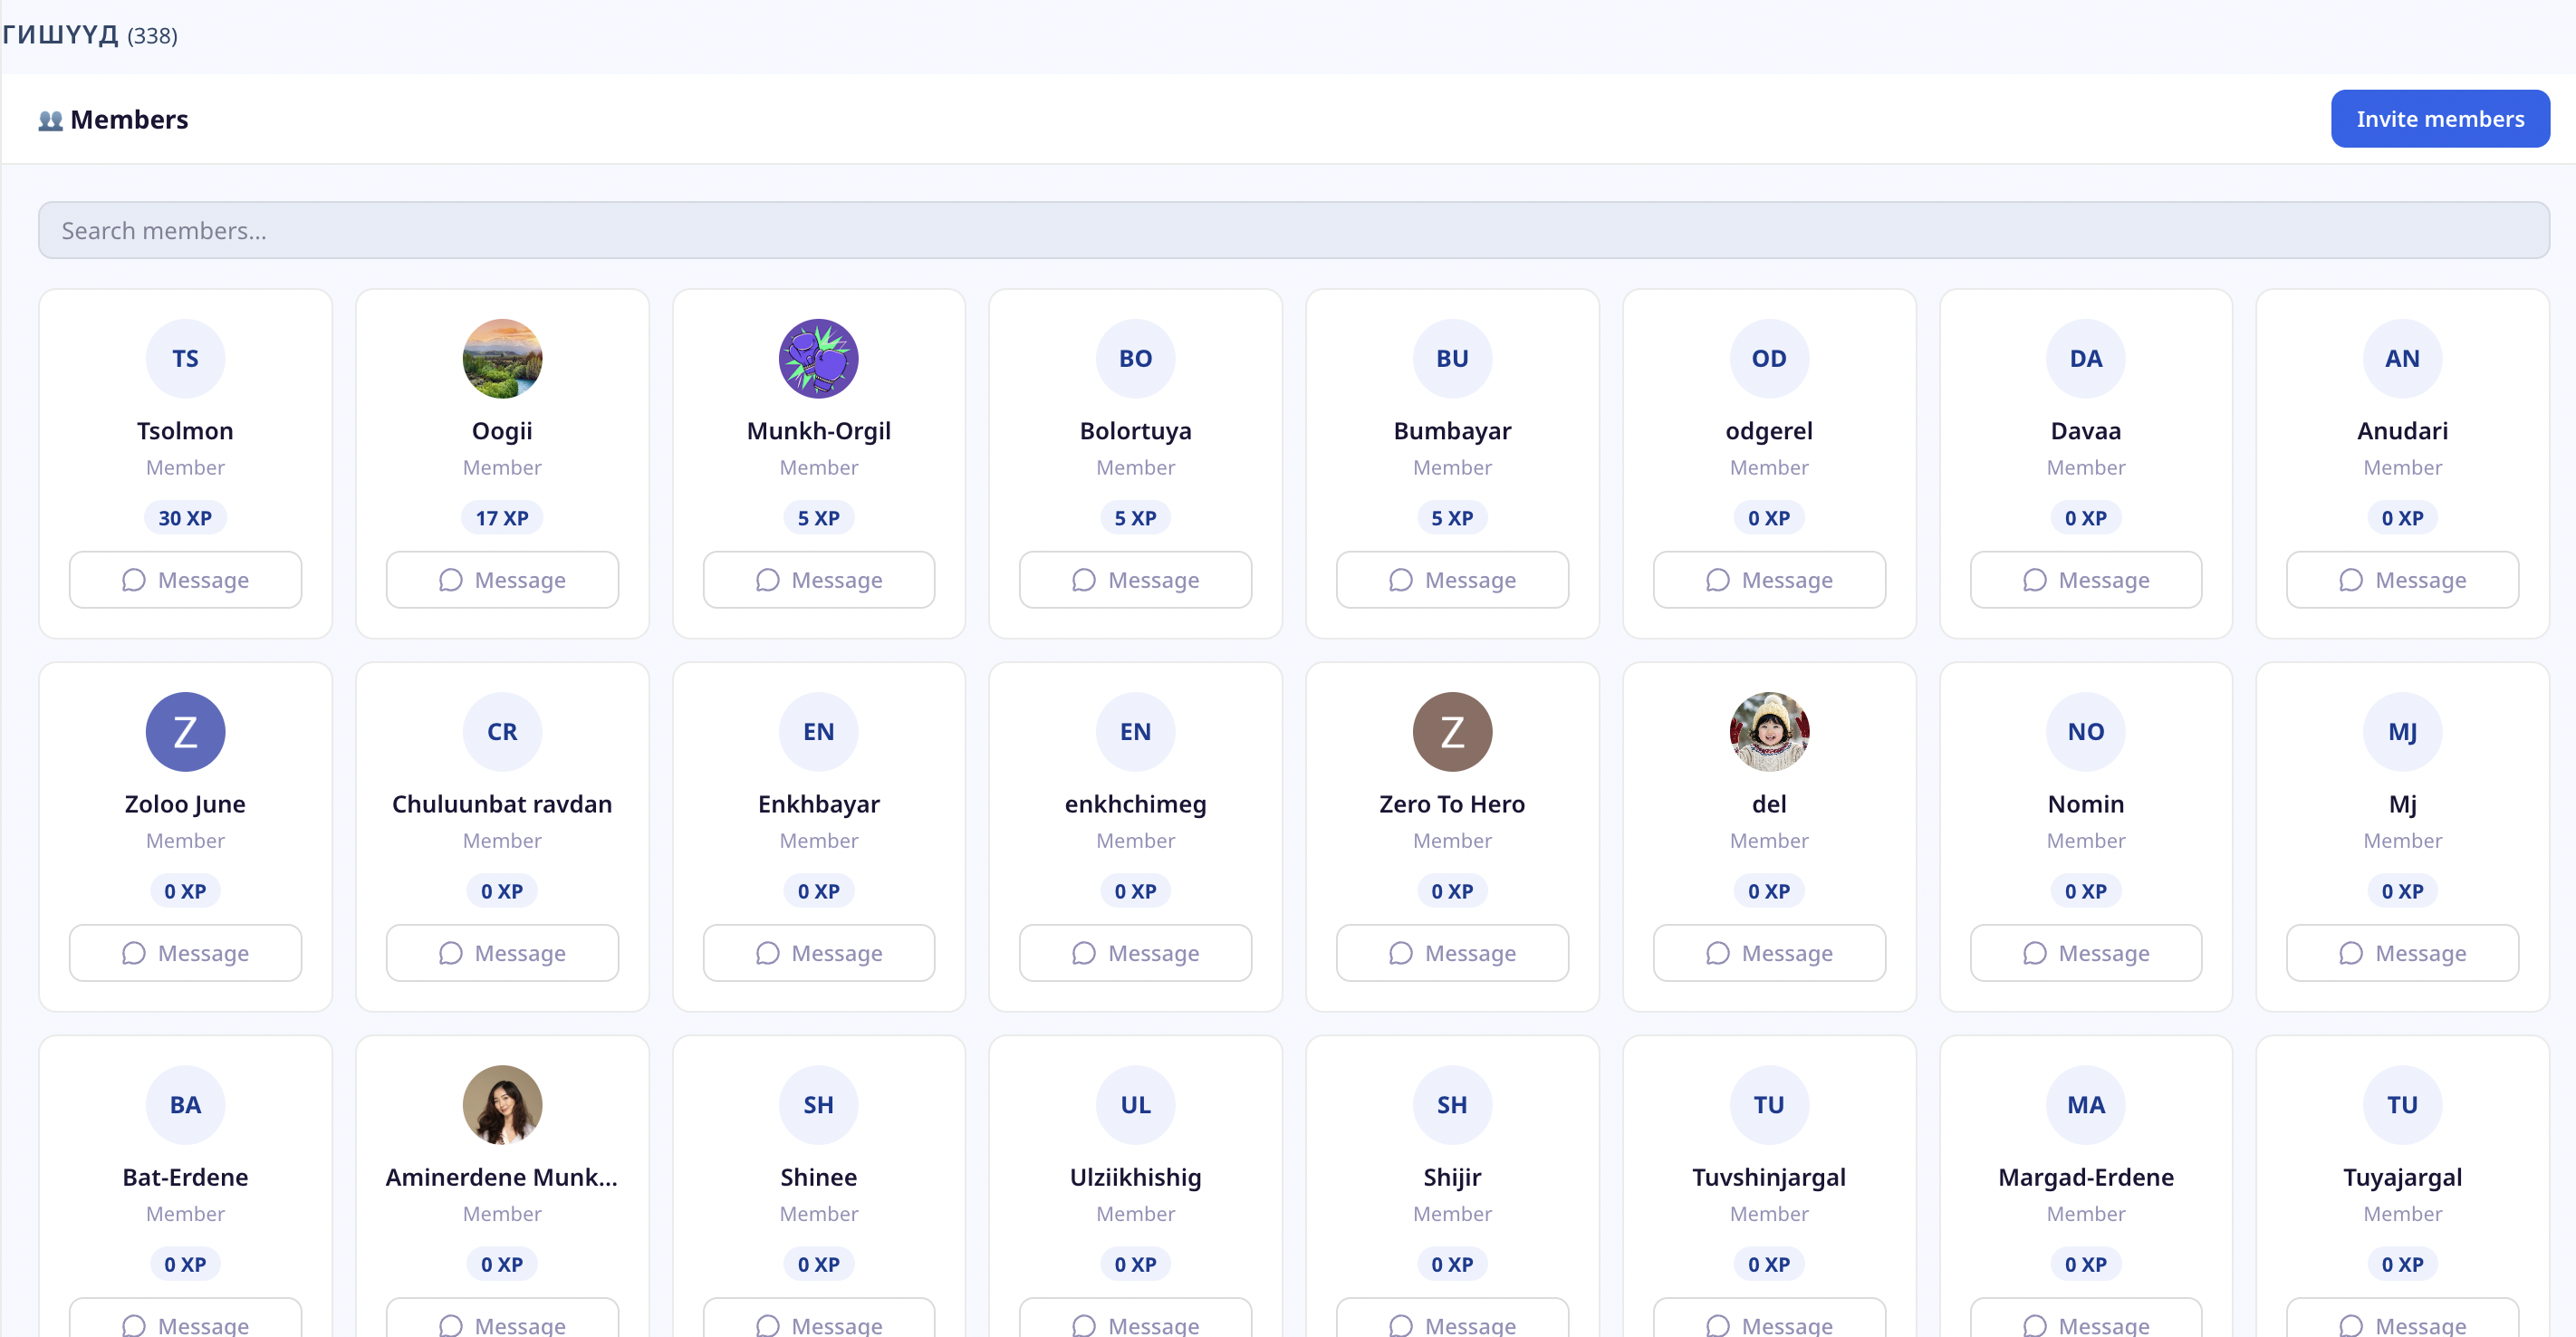
14. Members
- Click Members in the left sidebar.
- You can filter the list by name or join date.
- Click a member's avatar to view their profile.
- The "Message" button on their profile opens a direct chat.

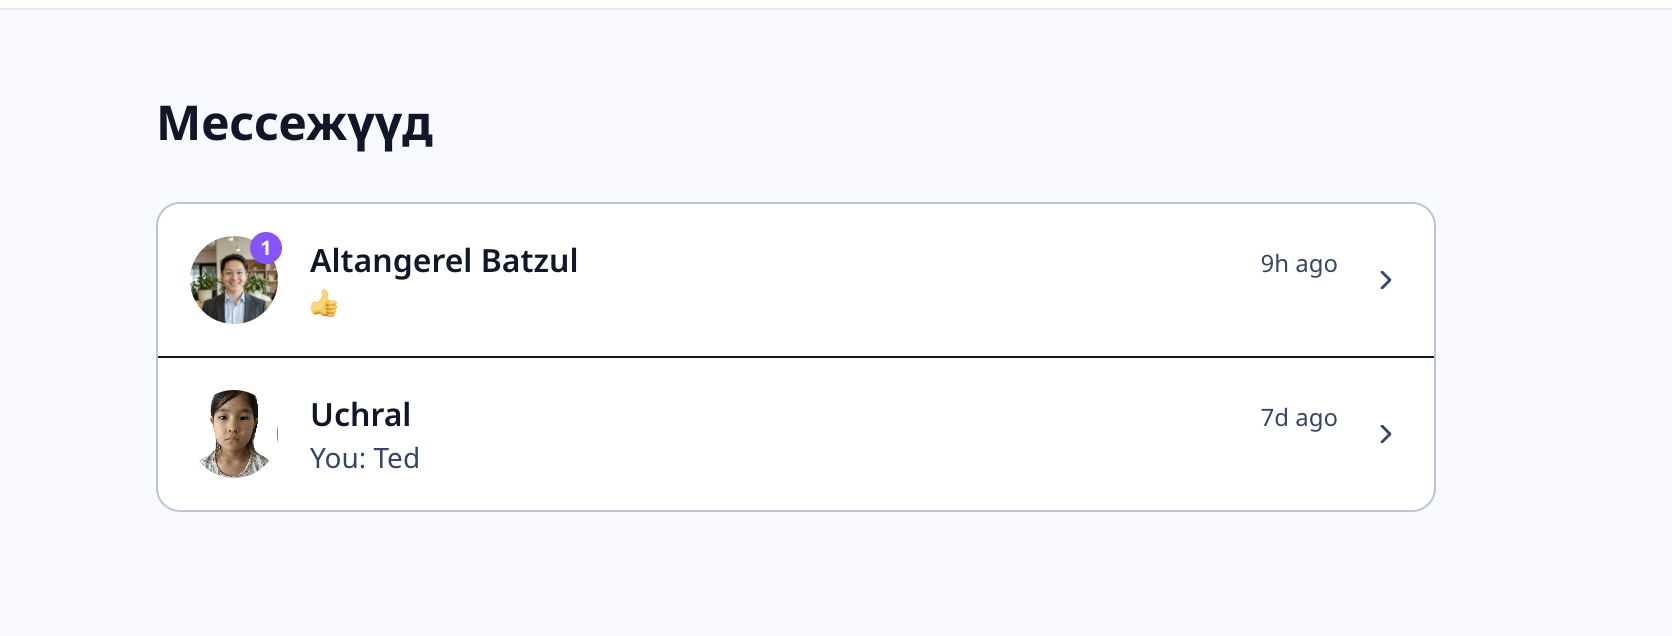
15. Messages
You can message other members, mentors, and community admins directly inside the platform.
15.1 Inbox
- Click the message icon in the top-right corner, or go to
/me/messages. - All conversations appear on the left. Unread counts are highlighted.
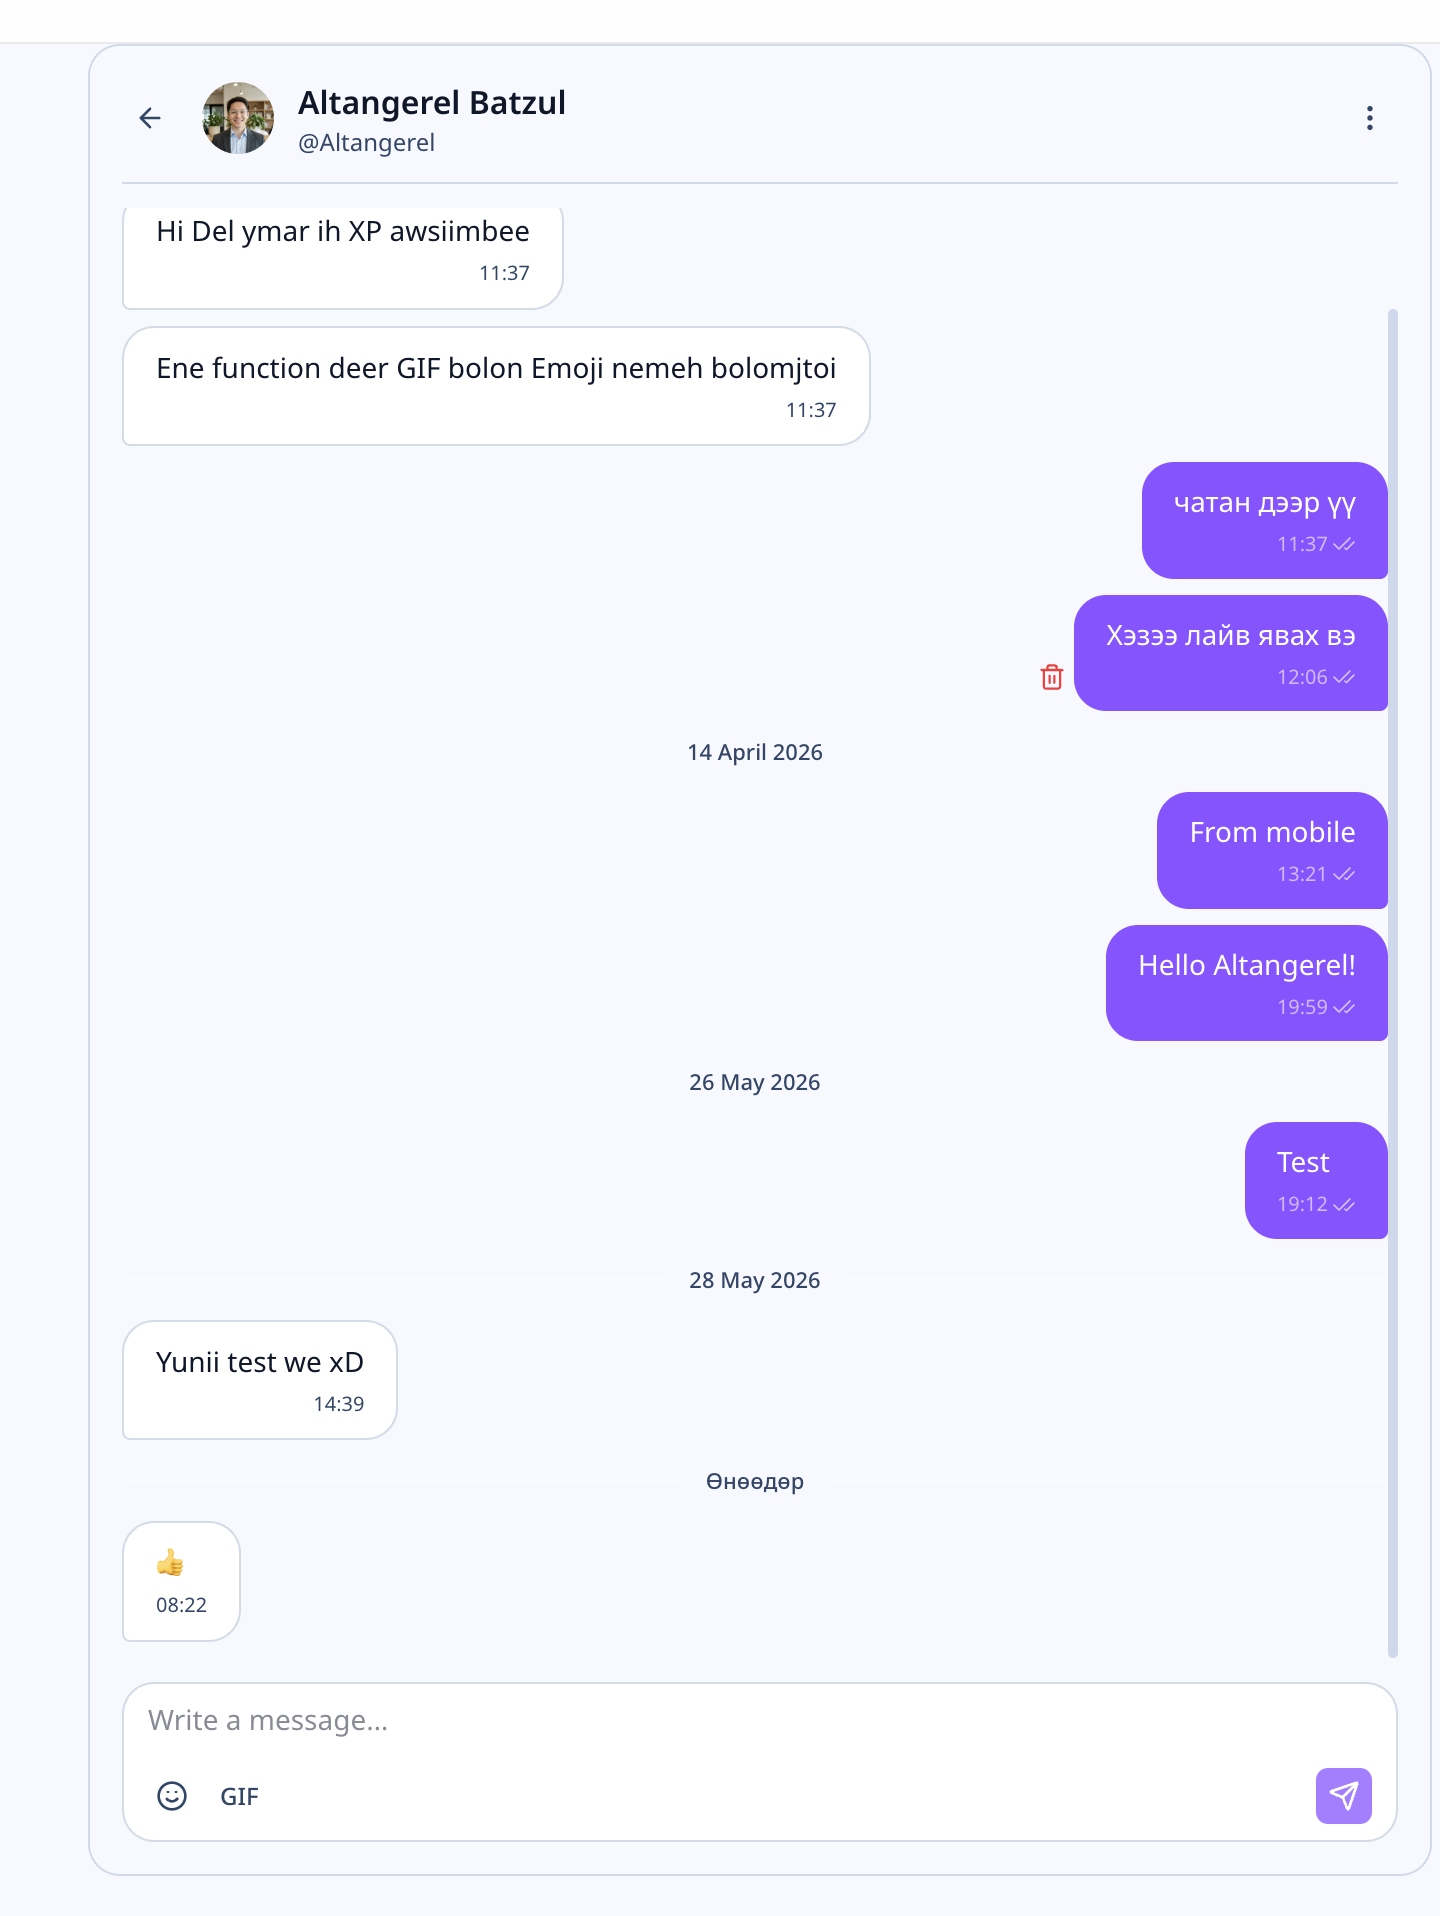
15.2 Messaging a member
- From the Members list or a member's profile, click "Message".
- A new conversation opens with a text box at the bottom.
- Type your message and press Enter or click "Send".
- Click the attachment icon to add images or files.
15.3 Messaging an admin / owner
Two ways to reach a community admin or owner:
- In the Members list, look for the "owner" or "admin" badge and start a chat.
- Or click the owner's avatar on the community page and use "Message" from their profile.
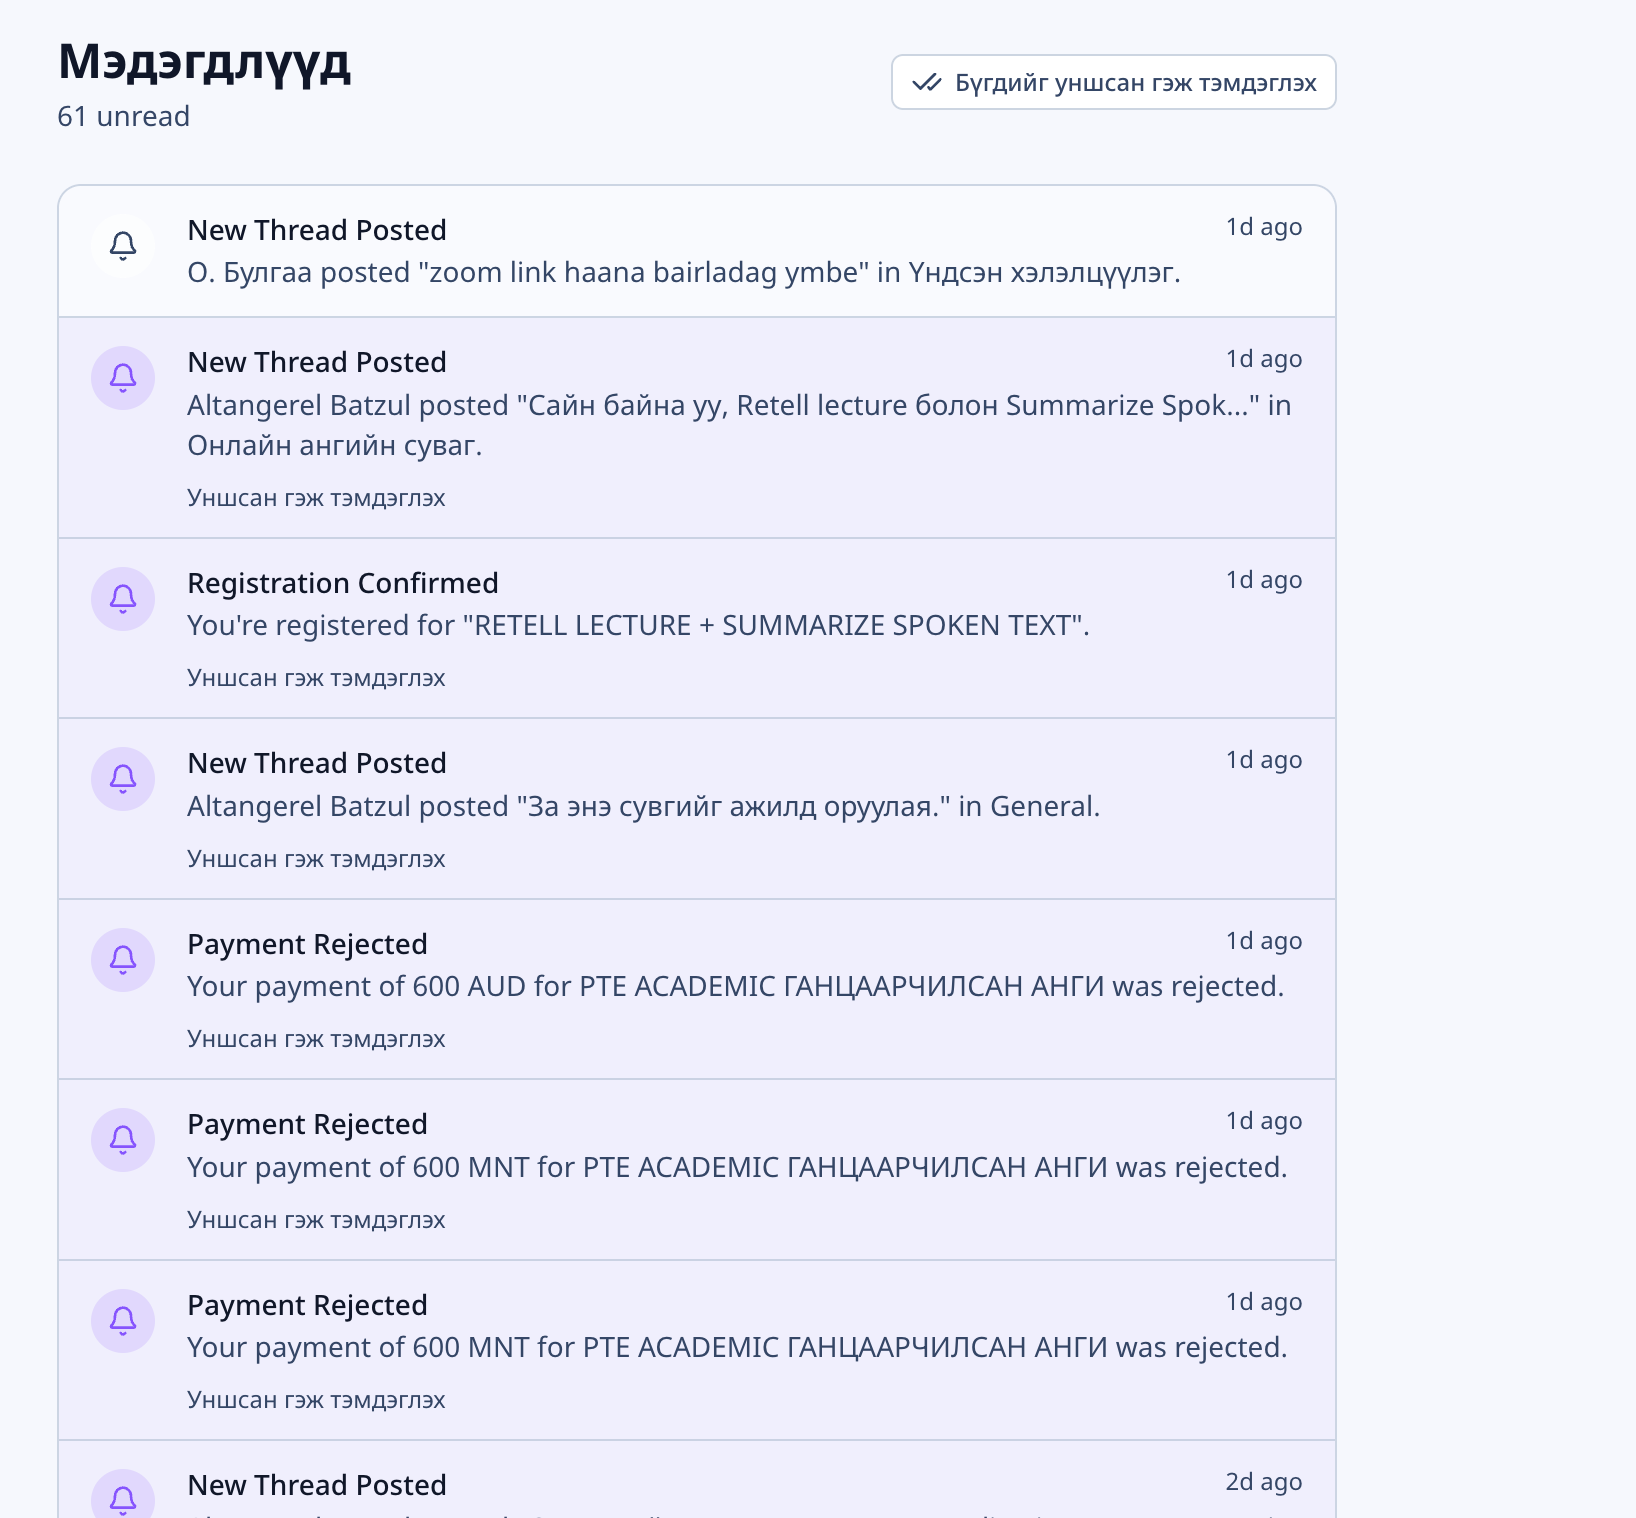
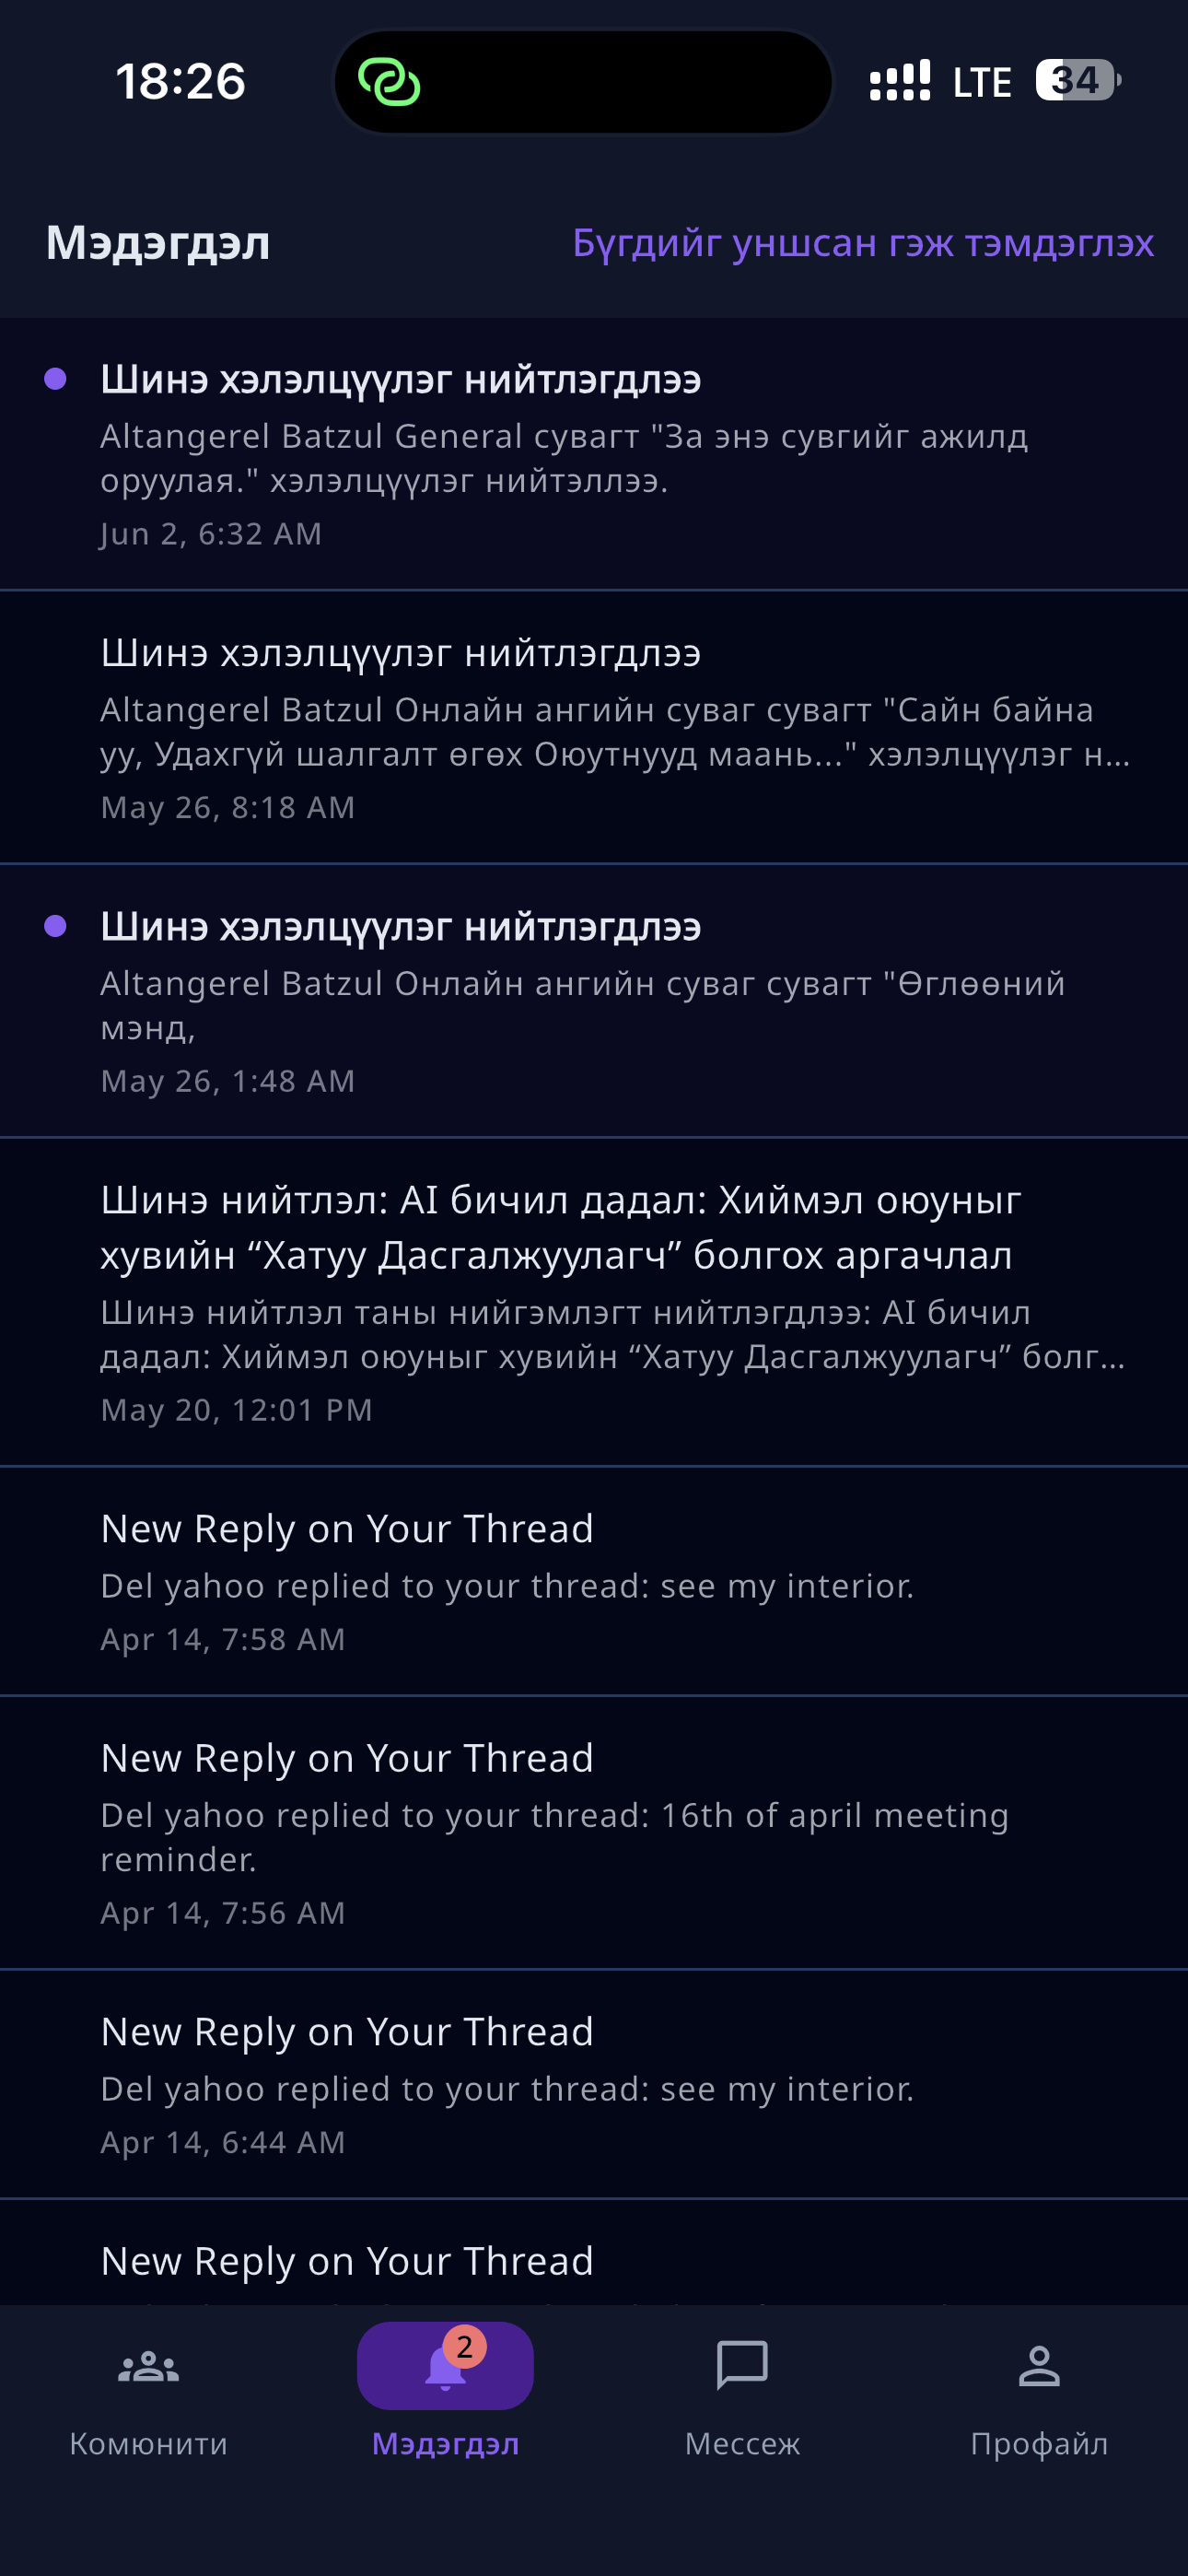
15.4 Notifications
When a new message arrives:
- The badge in the web top-right turns red.
- You get a push notification in the mobile app (if enabled).
- Email notifications can be toggled in profile settings.
16. Testimonials & Blog
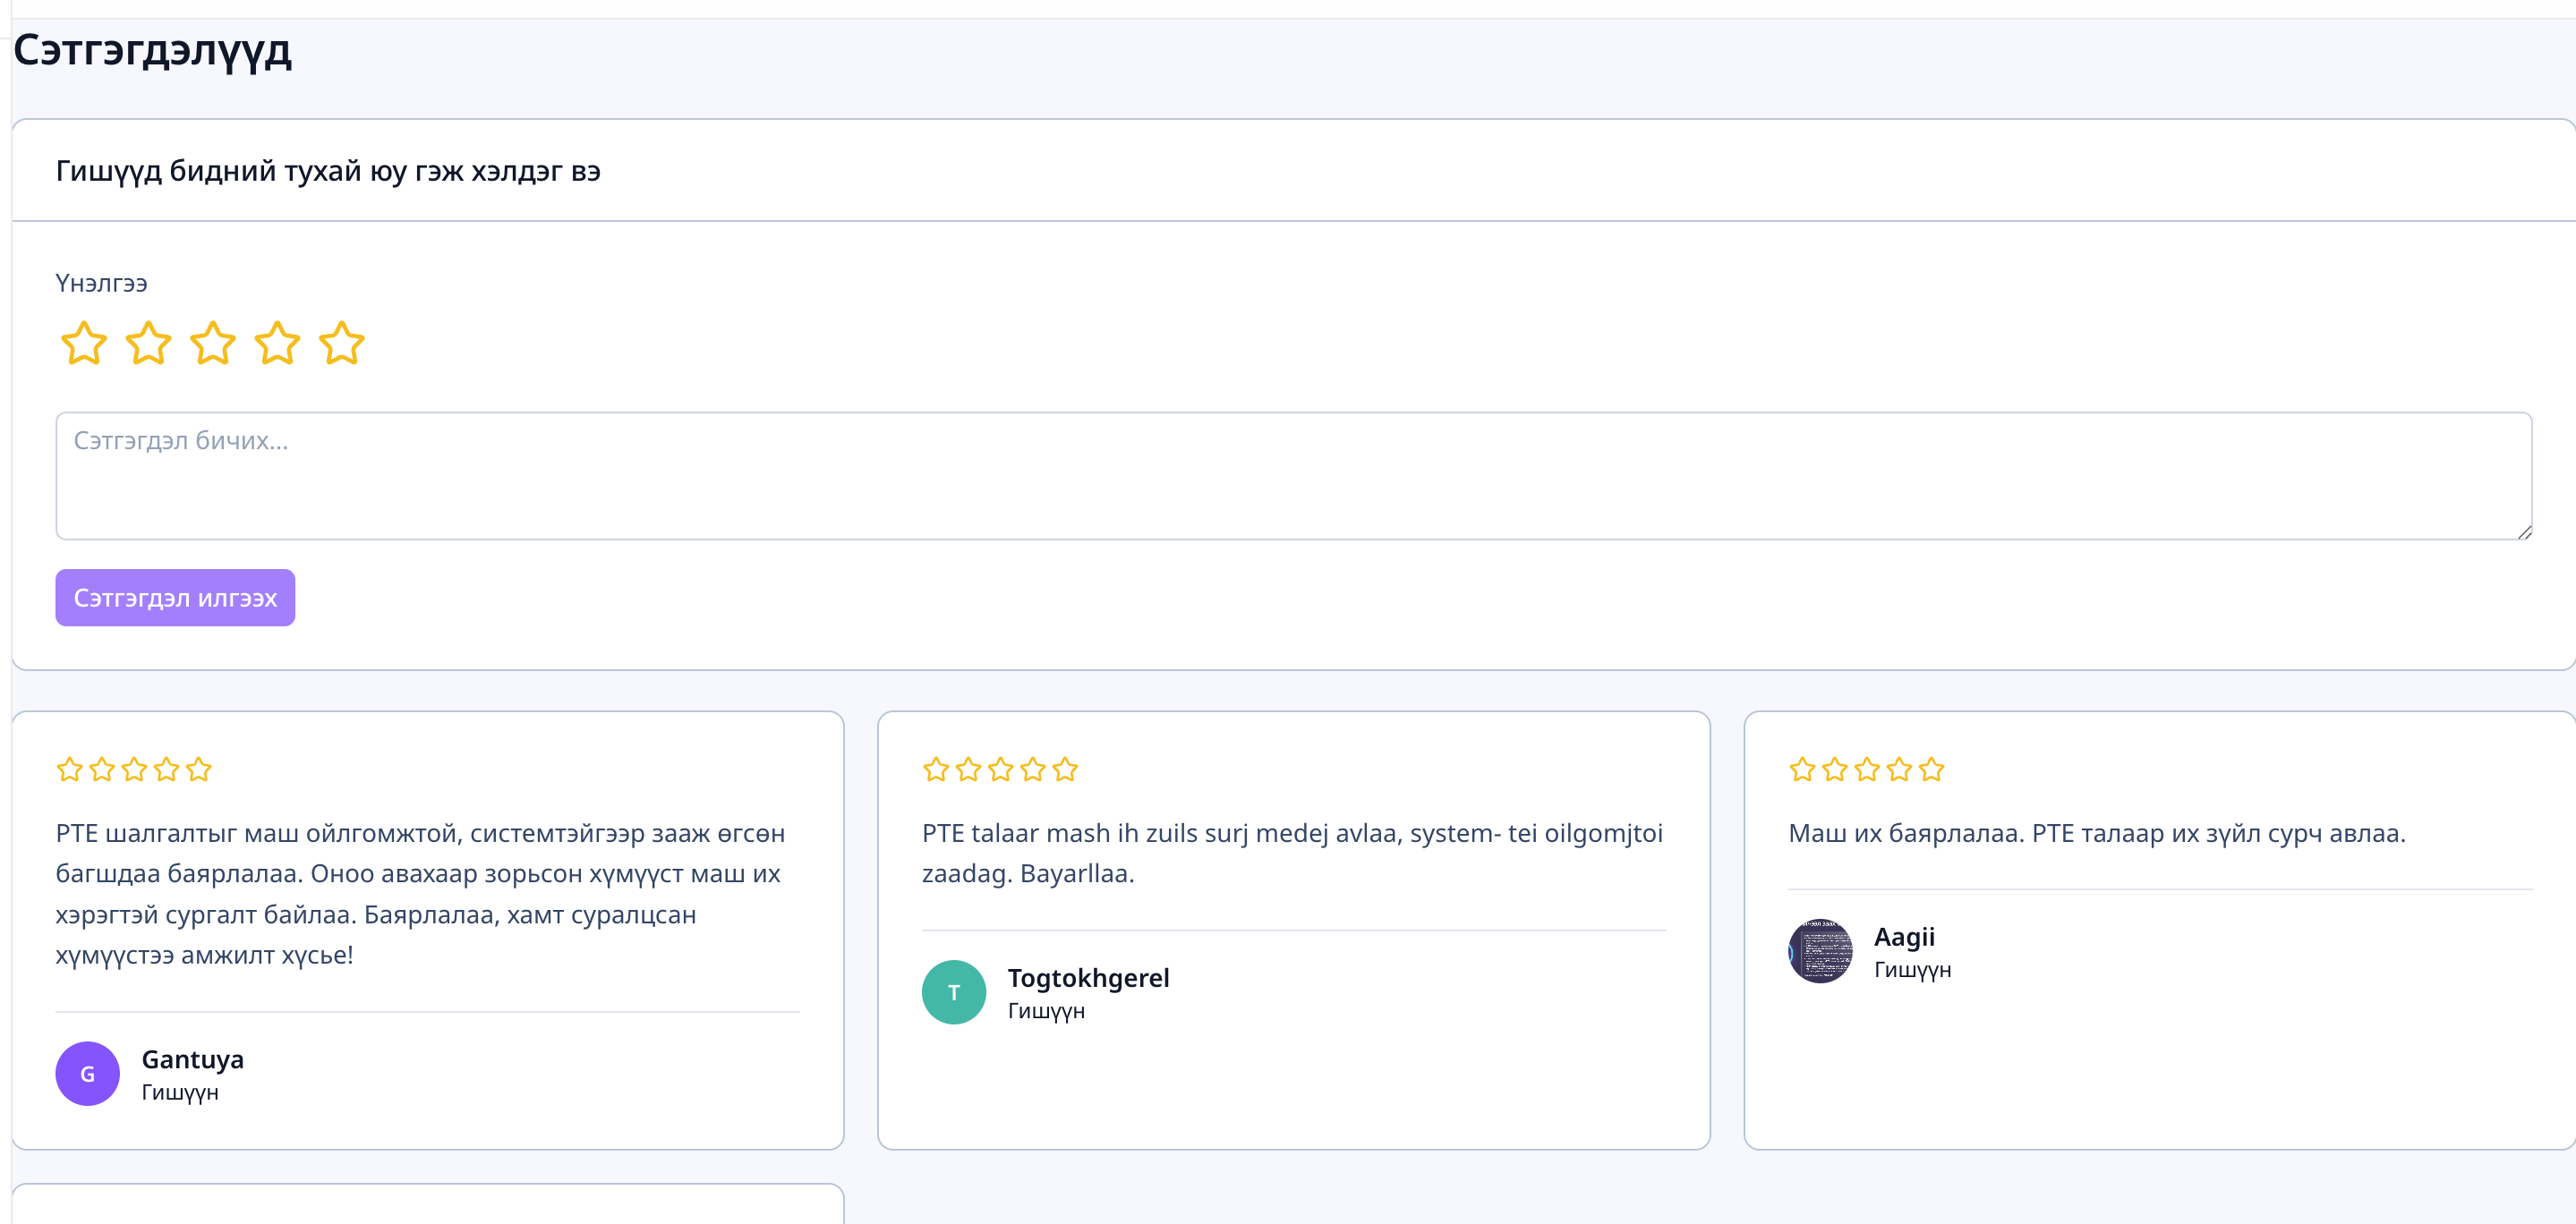
16.1 Testimonials
- Click Testimonials in the left sidebar.
- Read what other members say about the community.
- Click "Add testimonial" to share your own.
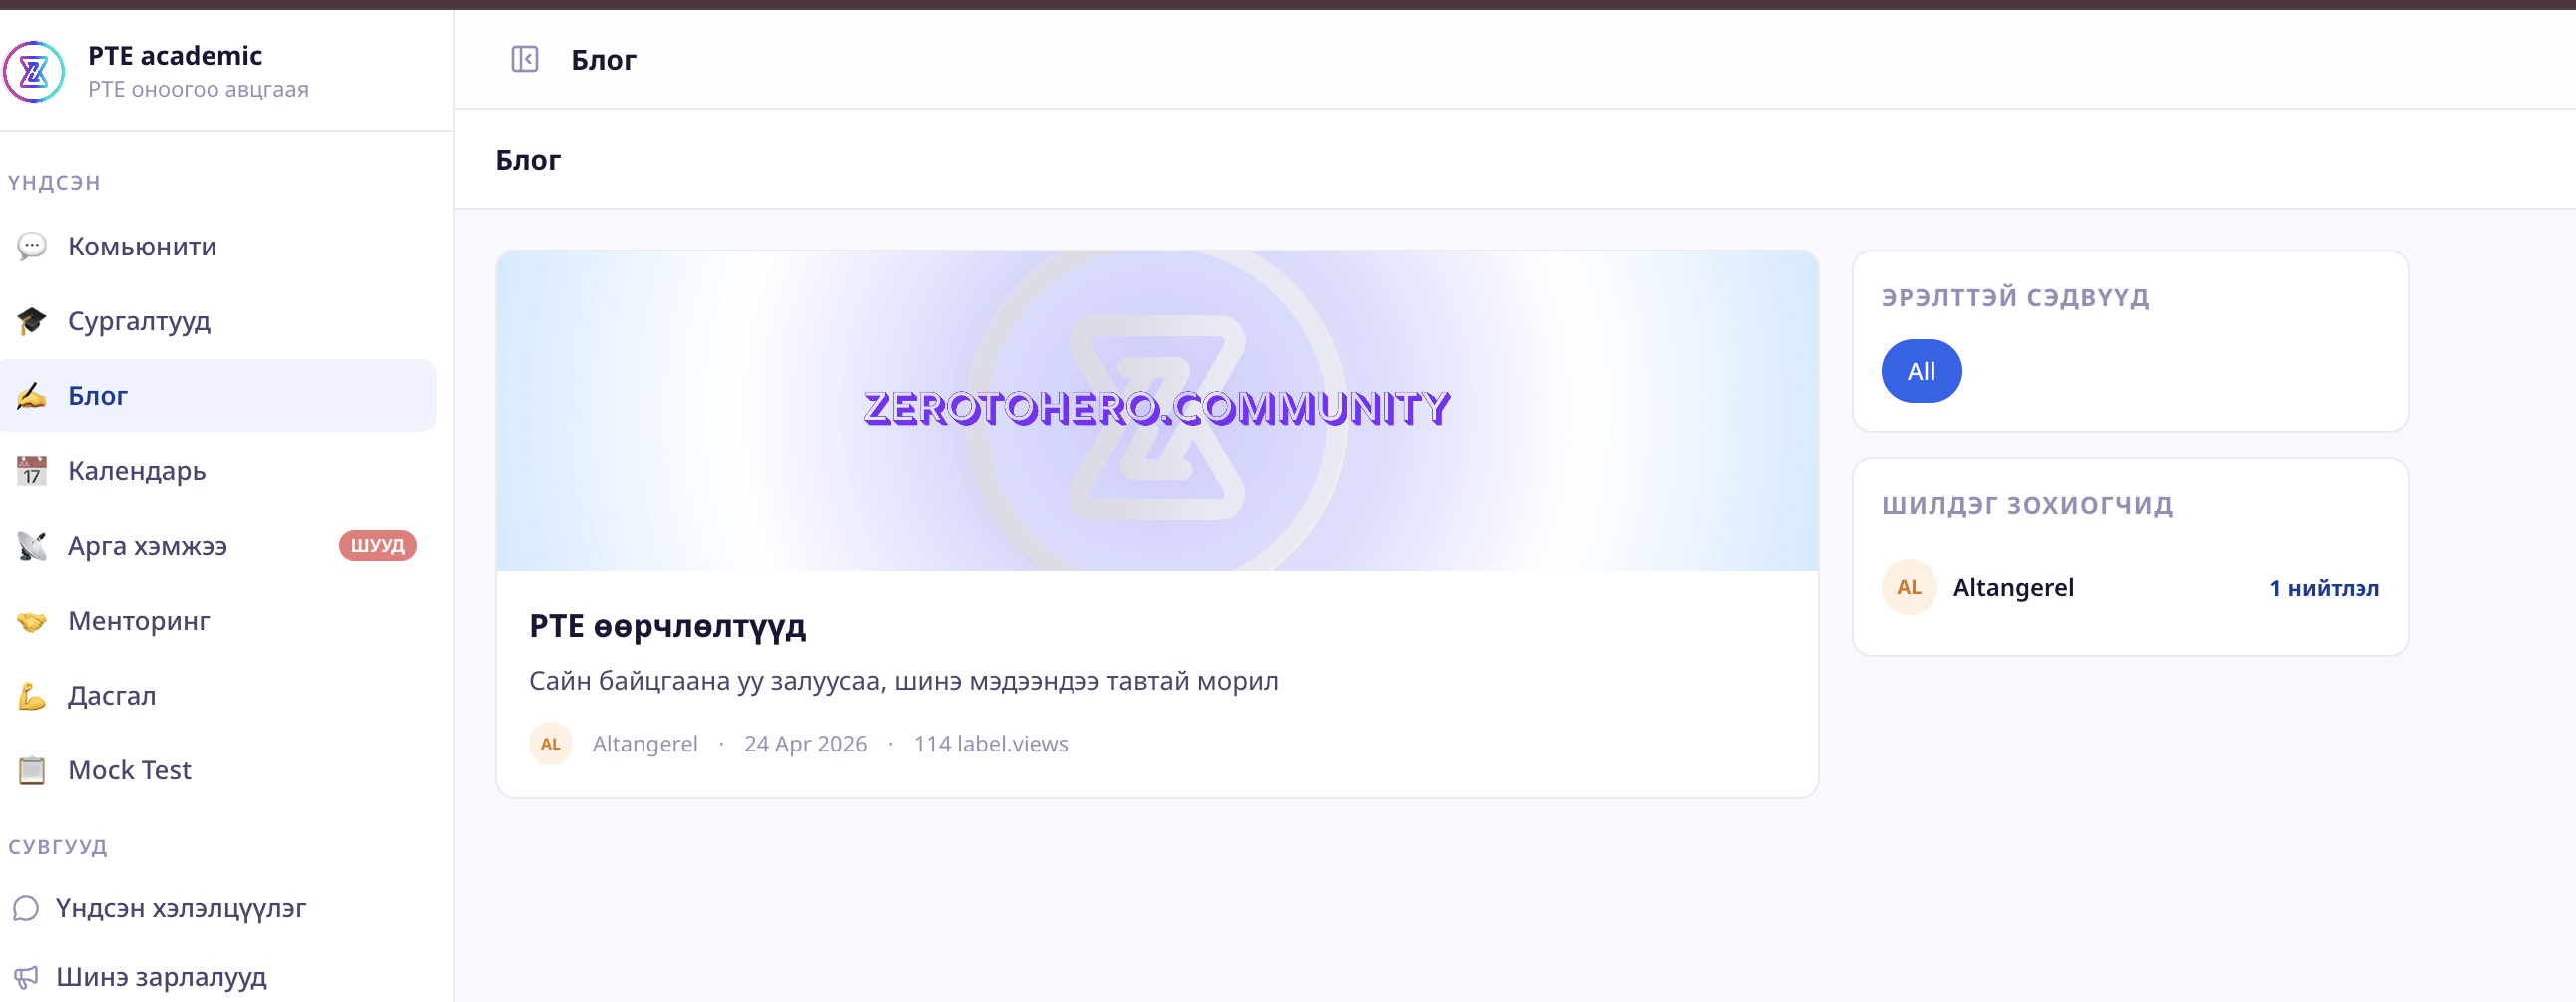
16.2 Blog
- Click Blog in the left sidebar.
- Read long-form articles, sorted with newest first.
17. Profile & settings
17.1 Editing your profile
- Click your avatar in the top-right and choose "Profile".
- Click "Edit" to update your name, bio, photo, and address.
- Click "Save".
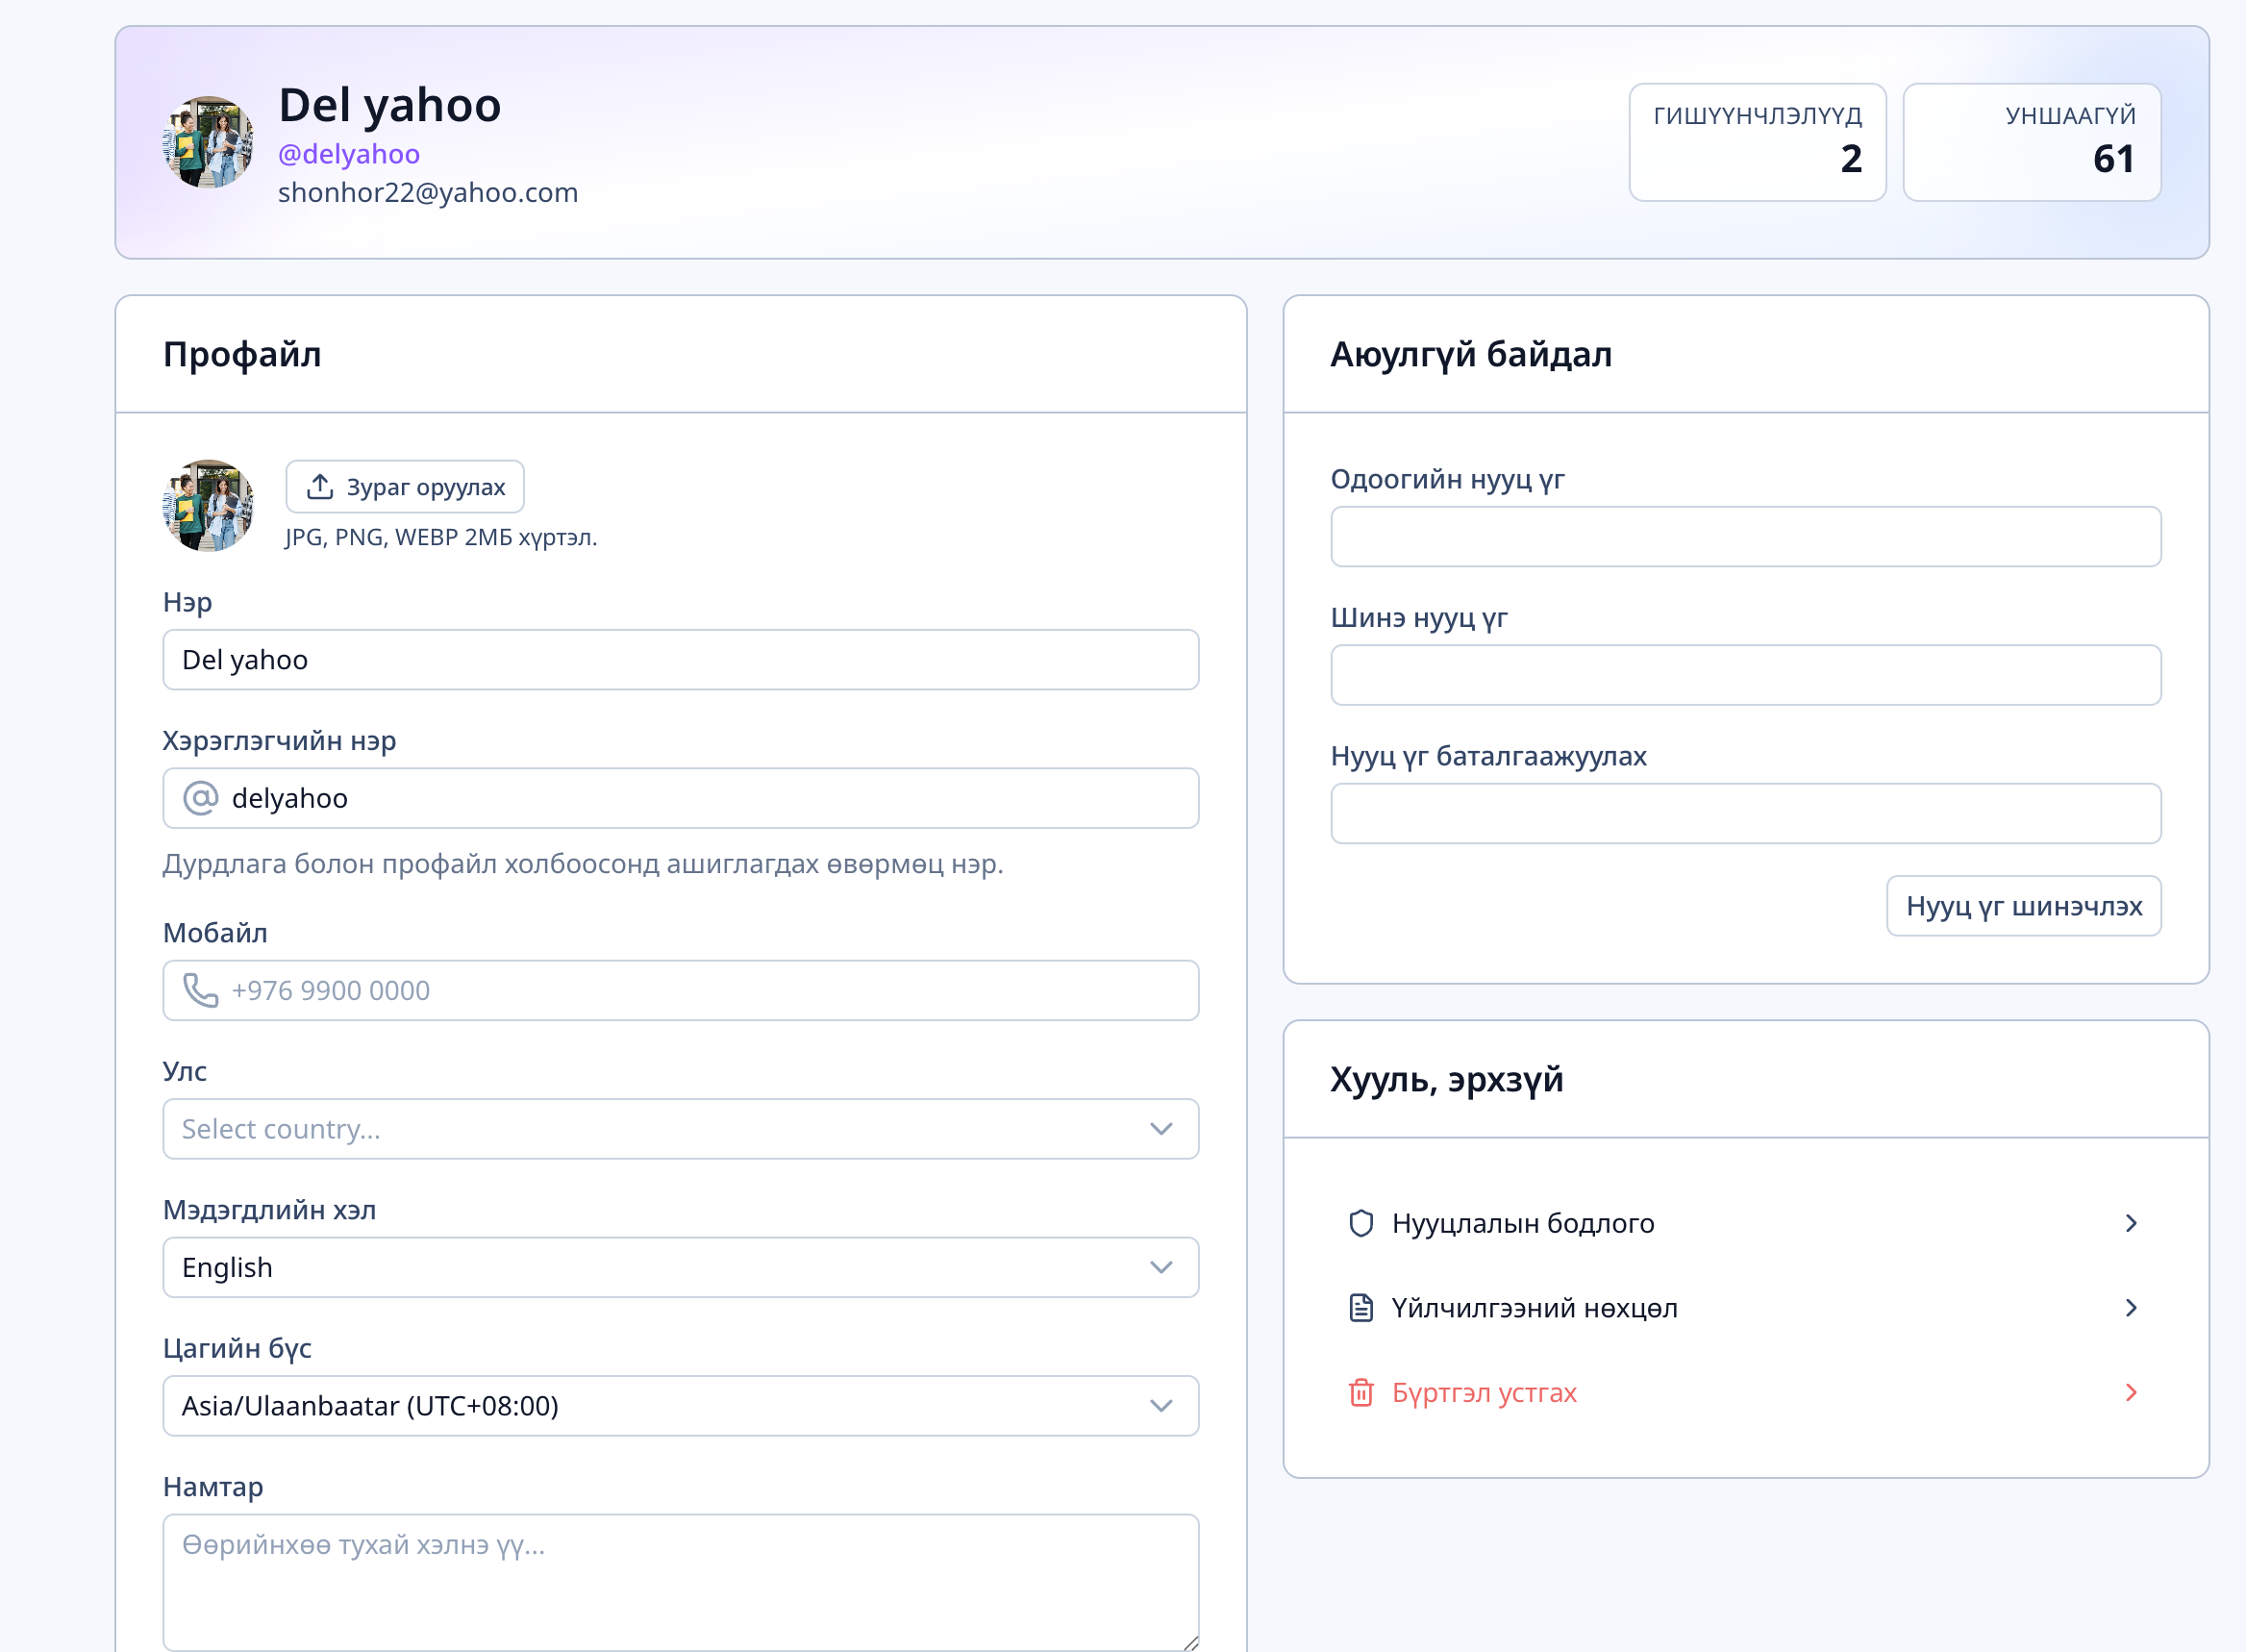
17.2 Changing your password
- From your profile, select "Change password".
- Enter your current and new password.
17.3 Changing the language
The web has an EN / MN language switcher in the top-right. The whole UI updates instantly when you switch.
17.4 Notification settings
From Settings → Notifications:
- Toggle email notifications (new courses, events, messages)
- Configure mobile push notifications
17.5 Log out
Click your avatar in the top-right and choose "Log out". Web and mobile use separate sessions — logging out on one doesn't log you out of the other.
18. Payment methods
The platform supports the following payment methods (each community shows only the methods it has enabled):
| Method | How it works | Processing time |
|---|---|---|
| Bank transfer | Transfer to the listed bank account and enter your transaction reference. | Manual; typically within 1 business day |
| QPay | Scan the QR code and pay from your banking app. | Instant (seconds) |
| Stripe (card) | Visa / MasterCard. International cards supported. | Instant |
18.1 Payment flow
- Click "Enroll" or "Join" — the checkout page opens.
- Pick a method.
- Follow the on-screen instructions to pay.
- Once confirmed, the course or community unlocks automatically.
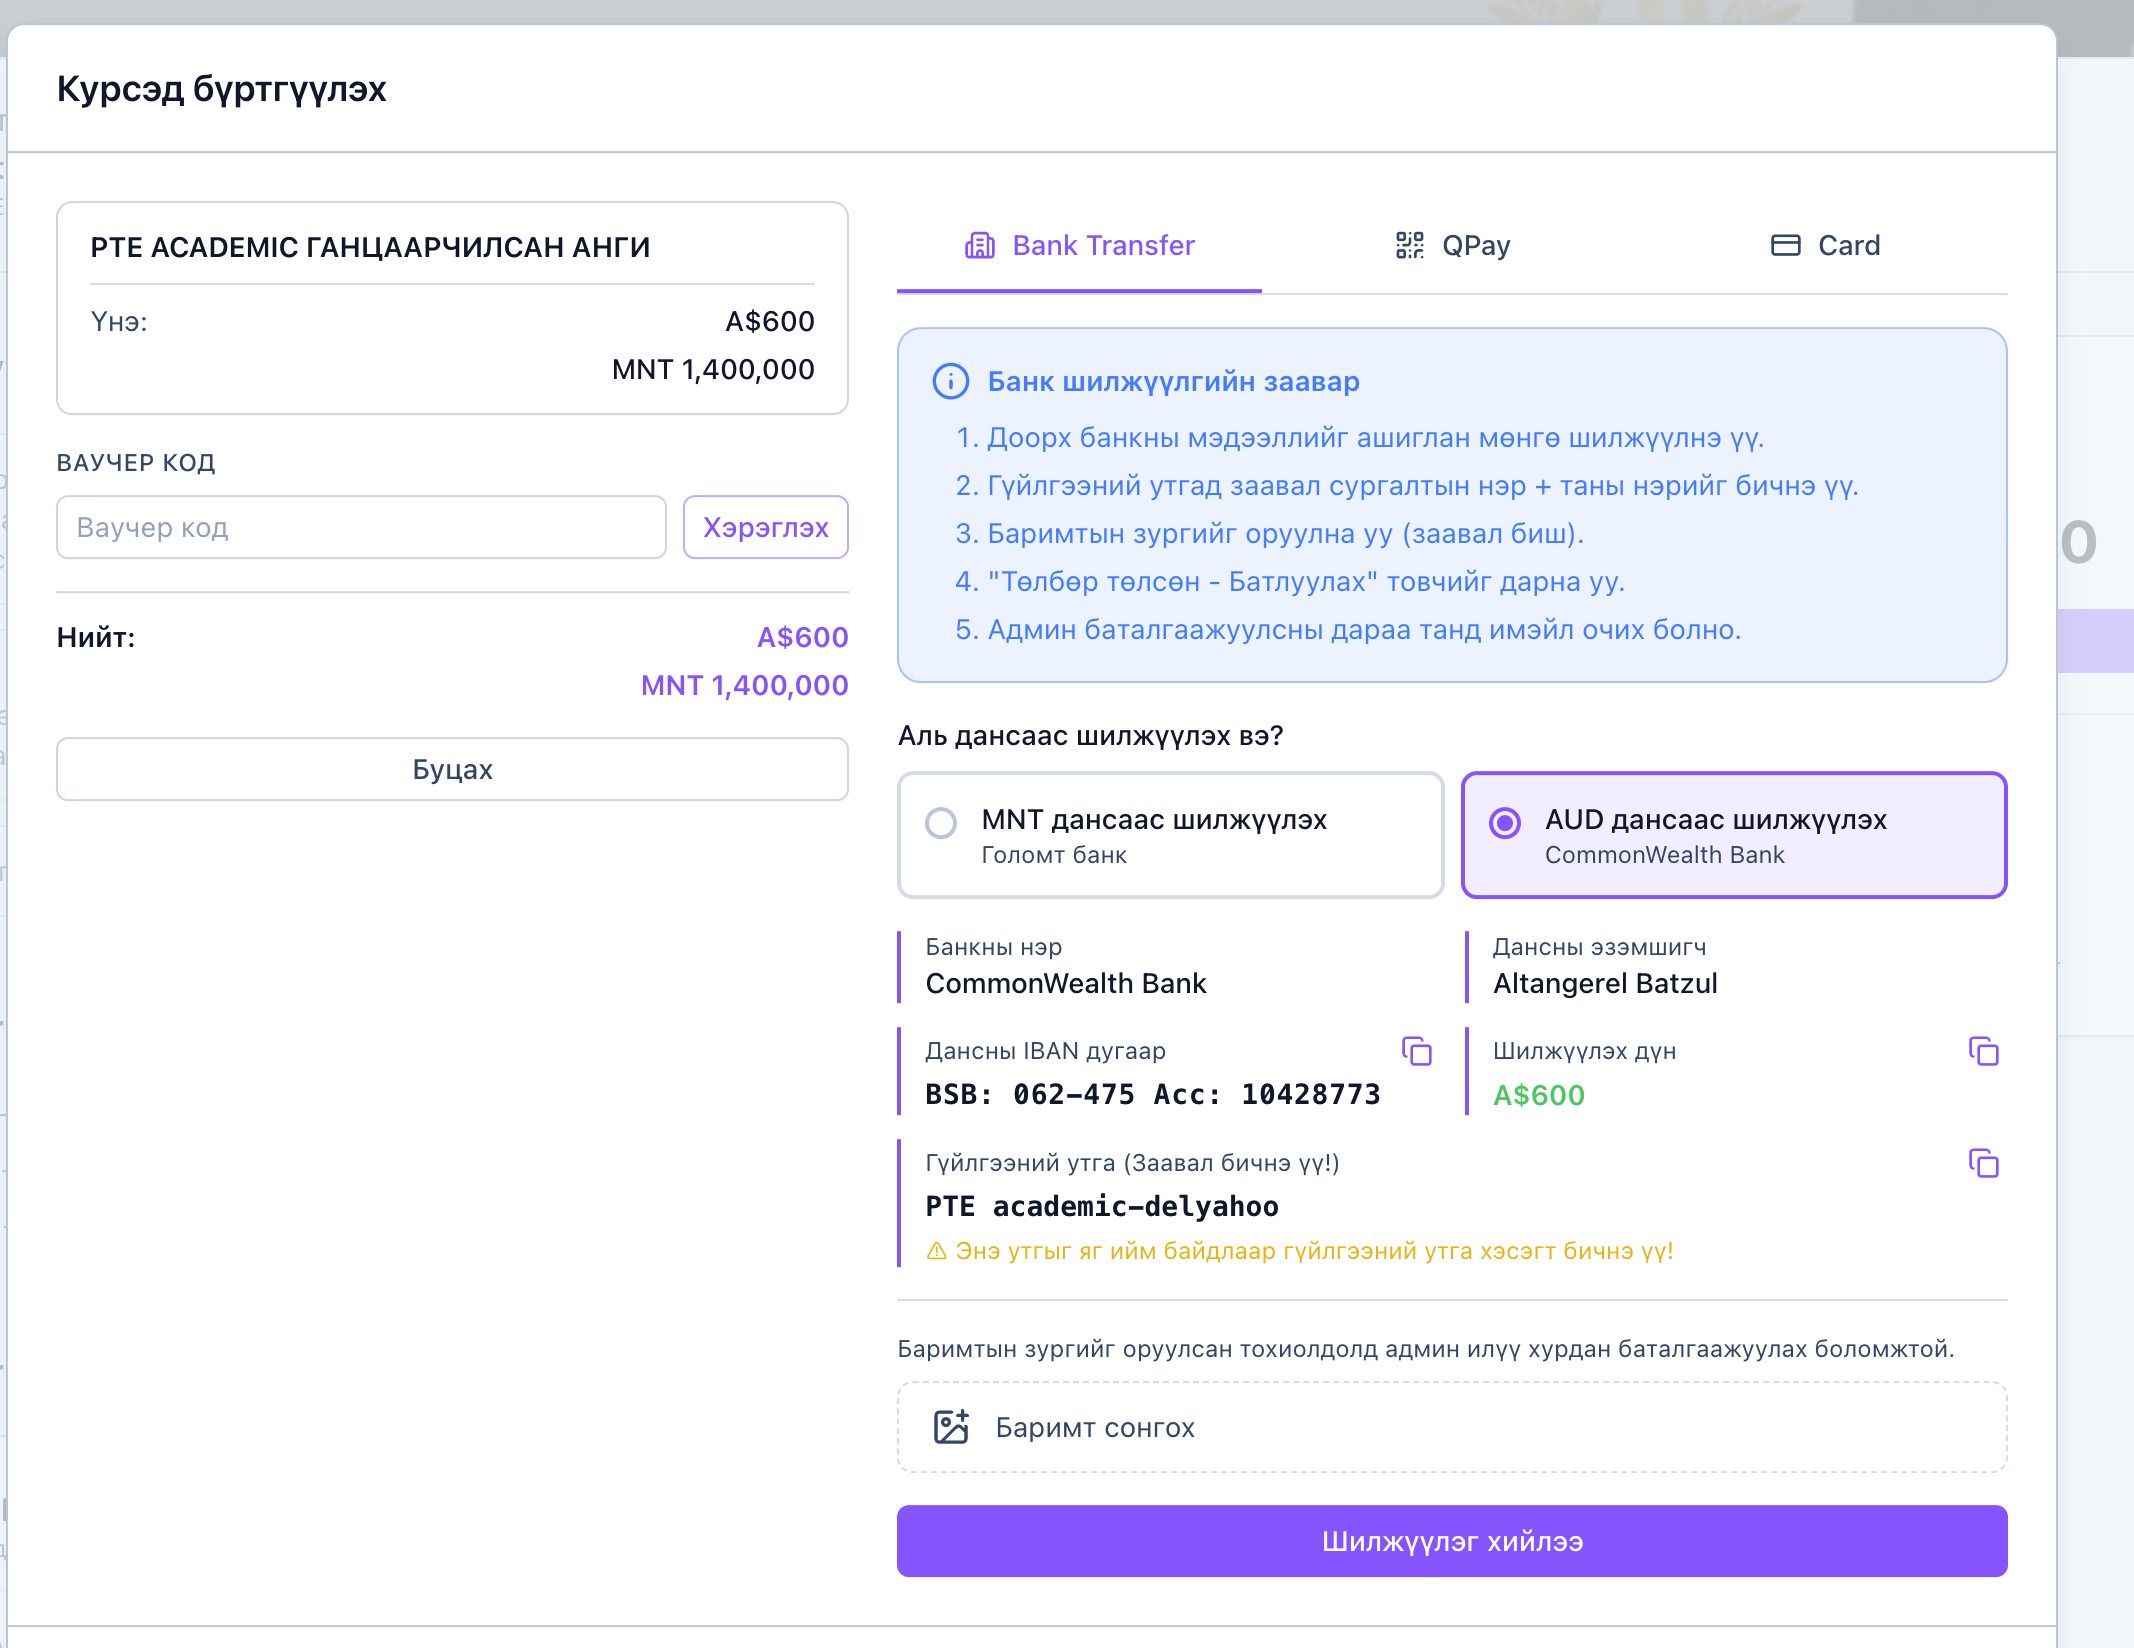
18.2 Receipts
Every successful payment receipt is saved under "My transactions" in your profile.
19. Using the mobile app
Once you've joined a community and enrolled in courses on the web, you can sign into the mobile app with the same account and pick up where you left off. The mobile app is available on both iOS and Android.
19.1 Download
- iPhone / iPad — search "Zero to Hero" on the App Store.
- Android — search "Zero to Hero" on Google Play.
19.2 Signing in
- Open the app.
- Enter the same email and password you use on the web — or use the Google button.
- Once signed in, the following is automatically synced:
- Communities you've joined
- Courses you're enrolled in
- Practice progress and scores
- Messages and notifications
- Profile info
19.3 Navigation (tab bar)
The mobile app has a bottom tab bar with:
- Home — your communities, featured courses, events
- Communities — the communities you've joined (pick one to enter)
- Messages — all conversations
- Notifications — notification inbox
- Profile — profile, settings, log out
19.4 Community features on mobile
Tapping into a community opens its "community shell" with the following tabs:
| Feature | Mobile support | Notes |
|---|---|---|
| Feed (landing screen) | Web + Mobile | Combined view of new posts and news |
| Channels | Web + Mobile | Read, reply, and post |
| Courses | Web + Mobile | Watch lessons on the go |
| News | Web + Mobile | |
| Live Events | Web + Mobile | Opens Zoom to join |
| Mentoring | Web + Mobile | Booking works on mobile |
| Members | Web + Mobile | |
| Practice | Web + Mobile | All exercise types supported |
| Messages | Web + Mobile | Push notifications supported |
| Calendar | Web only | No mobile calendar yet — upcoming events appear on the Home tab |
| Mock Test | Web only | Not yet on mobile |
| Testimonials | Web only | |
| Blog | Web only |
19.5 Push notifications
To enable push notifications:
- The first time you open the app, "Allow Notifications" will be requested — tap Allow.
- If you missed it, go to your phone's Settings → Notifications → Zero to Hero and enable it.
- Inside the app, go to Profile → Settings → Notifications to choose which types of notifications you want (messages, events, course updates, etc.).
19.6 Web vs mobile — when to use which
Better on the web:
- Discovering and joining new communities (marketplace)
- Paying for new courses — bank transfer, QPay, card payments
- Viewing the full Calendar
- Taking Mock Tests
- Reading Testimonials and the Blog
Better on mobile:
- Quick practice sessions (Flashcards, Quizzes) on the go
- Watching course videos
- Replying to messages with push notifications
- Joining Live Events fast
20. FAQ & support
20.1 Frequently asked questions
Q: I paid but the community hasn't unlocked.
A: Bank transfers may take up to 1 business day. QPay and Stripe should confirm instantly. If it's been more than 30 minutes, message the admin (see 15.3).
Q: A course I enrolled in on the web doesn't show in the mobile app.
A: Sign out and back in. Or pull down to refresh the Home tab.
Q: Can I take a Mock Test on mobile?
A: Not yet — Mock Test is currently web only. Mobile support is planned.
Q: I forgot my password.
A: See 2.3 Forgot password.
Q: I want to delete my account.
A: Go to Profile → Settings → Delete account and submit a request. It will be processed within 7 days.
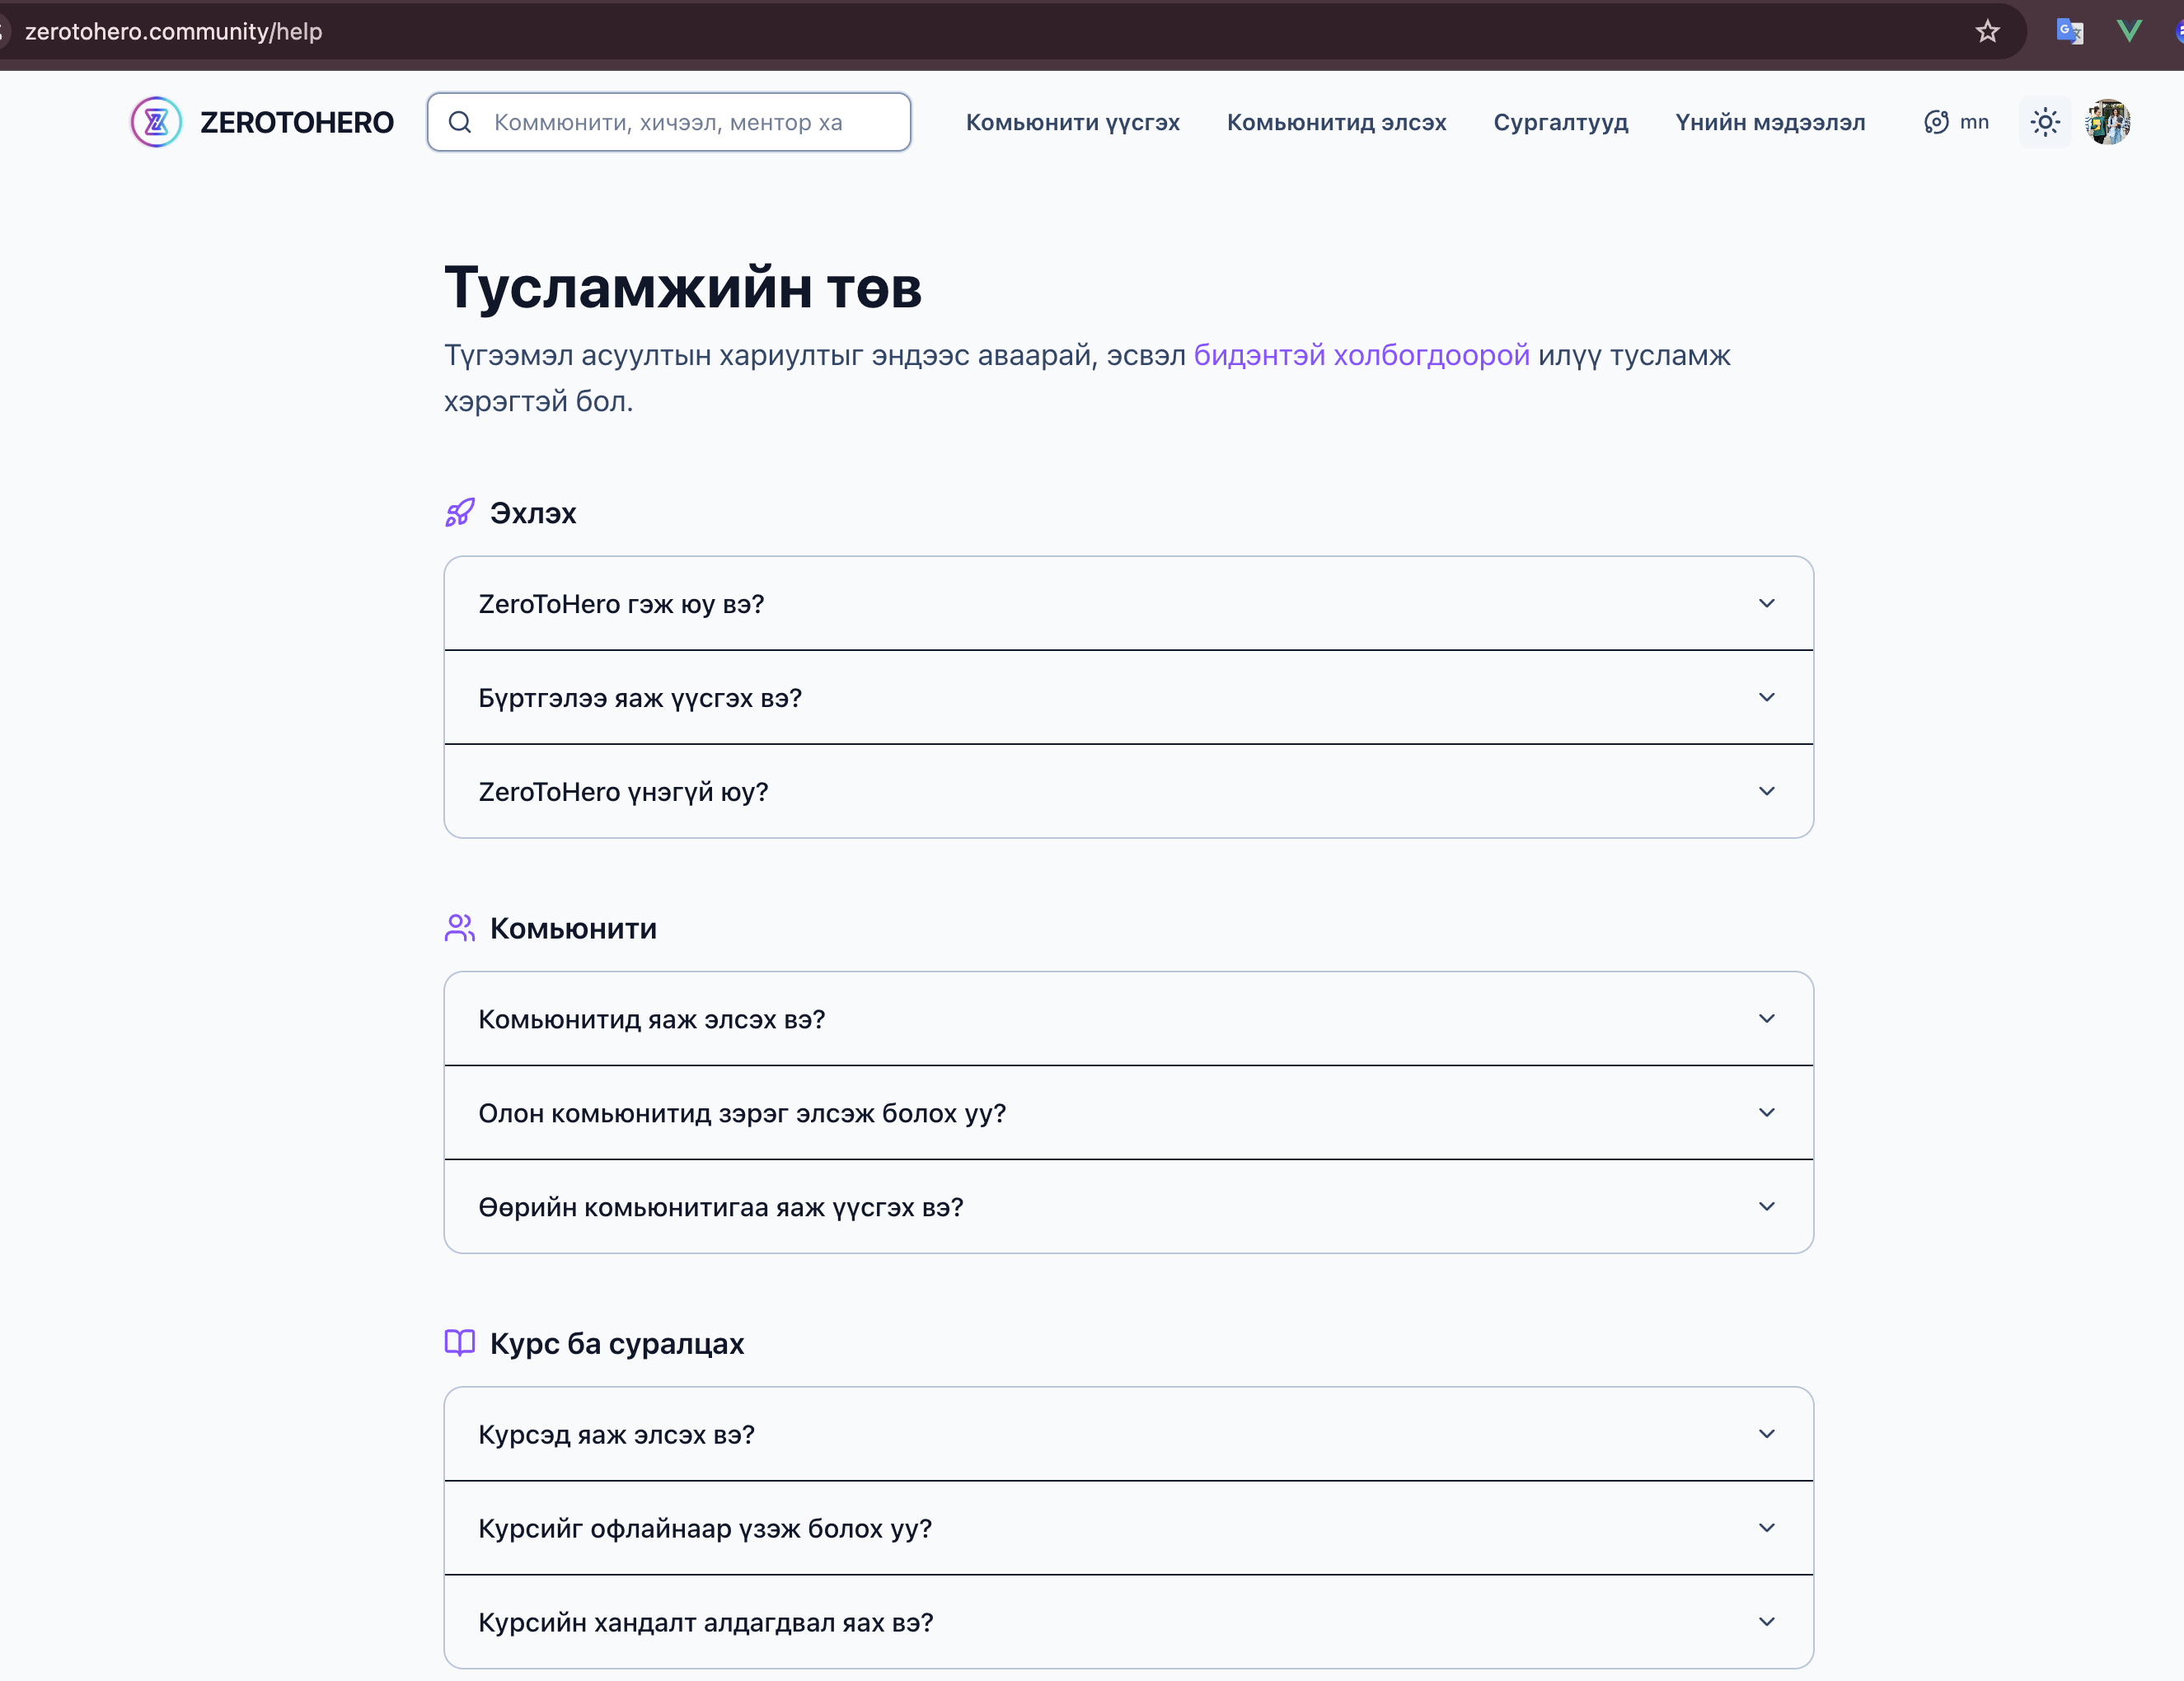
20.2 Getting help
- Message the platform admin —
/me/messages - Help Center — link in the homepage footer
- Email — support@zerotohero.community